Soft Pretzels
These are the absolute best Homemade Soft Pretzels! They’re fluffy and buttery, baked up just like the ones you get at the mall, but made from scratch with no preservatives. The dough is very easy to make, and even kids can easily work with this recipe. Make this whole recipe in one hour!

Once you try these homemade soft pretzels, you will never bother with those mall pretzels ever again.
I used to love Auntie Anne’s and Wetzel’s Pretzels, and waited in some pretty long lines upon smelling that darned cinnamon sugar and butter wafting over from like 100 feet away, but these are SO much better.
Plus, it only costs a buck or two to make a WHOLE TRAY instead of just getting one kind of pretzel. Not to mention there aren’t any artificial ingredients or preservatives when you make them yourself. And all the ingredients are the simple ones that you’d expect, like flour, yeast, water, and salt.
Tips for Best Results
Use instant rise yeast – At the grocery store you can buy “active dry yeast” or “instant rise yeast” (sometimes also called “quick rise yeast”). They are the same price, and I always recommend the instant rise, which is what we’ll use here.
Make sure the yeast is fresh – Yeast does expire, so make sure those packets haven’t been hanging out in your pantry for too long. Check the date, and try to use newer yeast.
Be patient – This entire recipe, even with rise time, should generally take an hour, which is really fast for bread. However, if your kitchen is cold and the dough has not doubled in size during the 30 minute rise, give it another 15 minutes.

I love prepping a fresh batch of these easy homemade soft pretzels on football game-watching days, along with a fresh pan of Buffalo Chicken Dip and Baked Chicken Wings. So good!
More Flavor Options
The default here is to simply brush with butter, and enjoy these soft pretzels “plain” with butter and salt. However, here are a few more flavor ideas.
Cinnamon Sugar – In my 100% Whole Wheat Version of these pretzels, I share a cinnamon sugar coating that is wonderful.
Garlic Parmesan – Use the sauce from my Garlic Parmesan Wings for brushing the outside, for an extra flavorful garlic parmesan butter.
Buffalo – When the pretzels come hot out of the oven, brush with Buffalo Wing Sauce and serve with Blue Cheese Dip.
Orange Honey Butter – When hot out of the oven, brush the pretzels with Homemade Orange Honey Butter.
Step by Step Overview:
I have a full video on how to make the pretzels, as well as a quick visual photo overview.
Start by making a simple yeasted dough, made with flour, water, instant yeast, salt, and sugar, then shape it into a ball.
You can make the dough in the bowl of a stand mixer, using the dough hook attachment, or you can make it by hand!

Let the dough rest for about 30 minutes in a warm place, to let the dough rise and double in size.
The yeast will work its magic and create these gorgeous bubbles that will give us the rise and fluffy texture we want.

Make-ahead option
If you wish, you may keep the risen dough in the fridge for up to 24 hours. Make sure to cover the bowl tightly with plastic wrap.
When ready to bake, simply proceed with the recipe as usual, cutting and rolling the pretzels.
Divide up the dough into 8 equal pieces, then roll each one into a long rope.

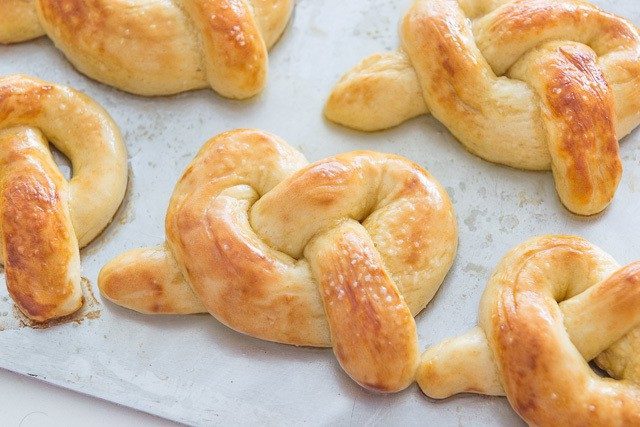
Shape the thin ropes into pretzels by looping the rope through the hole above.

The ends of the rope should end up on the bottom. See the video as needed.
Dip each pretzel into a baking soda bath, which is simply warm water with baking soda. This provides flavor, and will also brown the baked pretzels, much like an egg wash makes baked goods golden brown on the outside.
Then finally, sprinkle each pretzel with coarse sea salt or pretzel salt, and send them into the oven on a prepared baking sheet that’s either greased, covered with parchment paper, or covered with a silicone mat.
Let the Excess Water Drip Off
Let the excess water drip off the pretzels before putting each piece of dough on to a large baking sheet. You don’t want the pretzels to be too wet, or they may stick to the tray, even if it’s greased.
You may also place the pretzels on parchment paper or a silicone mat to ensure this isn’t an issue whatsoever.

Bake the pretzels until golden and puffed, then brush with melted butter while hot, or any other sauces or coatings you’d like.

See the box toward the beginning of the post for flavor ideas, but I think the best soft pretzels simply have butter and a good coarse salt, with cinnamon sugar being a close second. I love getting to appreciate their flavor and chewy texture.
How to Serve
These are great hot out of the oven, either with plain butter and salt or one of the flavor options I suggested above.
You can also try serving with Homemade Nacho Cheese Sauce, marinara sauce, honey mustard, or even Basil Pesto.
For something sweet, try the icing on my Overnight Cinnamon Rolls or homemade Caramel Sauce.
More Snacks that Pair Well
If you’d like to make a nice spread of homemade snacks with these pretzels, I recommend Buffalo Garlic Knots, Homemade Corn Dogs, and Jumbo Garlic Knots.
Bacon Wrapped Jalapeños, Homemade Mozzarella Sticks, and Homemade French Fries are also fantastic.
Tips and FAQ
Let cool completely, then keep at room temperature for 1 day, in the fridge for 1 week, or in the freezer for 2 months.
Yes, in an airtight container for up to 2 months. Let them cool first before freezing.
Warm in a 300F oven for 5 minutes. Add an extra 3 minutes if reheating straight from frozen.
Yes, keep the risen dough in the fridge for up to 24 hours.
Did you enjoy the recipe? Please leave a 5-star rating in the recipe card below and/or a review in the comments section further down the page. Or, follow me on Facebook, Instagram or Pinterest!
Soft Pretzels
Ingredients
For the Dough:
- 2.25 tsp instant or "quick rise" yeast
- 1 cup warm water 110 degrees F
- 1 tsp sugar
- 12.5 oz all purpose flour, by weight (2.5 cups, if measuring)
- 1/2 tsp sea salt
For the Topping:
- 1/2 cup warm water
- 1 tbsp baking soda
- oil for greasing the sheet pan
- coarse sea salt for sprinkling
- 3 tbsp unsalted butter melted
Instructions
- Combine the yeast, warm water, and sugar in the bowl of a stand mixer*, and let sit for 10 minutes until foamy. This indicates the yeast is alive and working. Add the flour and salt. Mix with the dough hook by hand for a few seconds to roughly combine, then fit the hook and bowl on the mixer and knead on medium low for 5 minutes. The dough should feel soft and smooth, not sticky to the touch.
- Cover the dough and let rise for 30 minutes, until doubled in size. If your kitchen is cool, you made need closer to 45 minutes.
- Preheat the oven to 450F, and lightly grease a baking sheet with oil. You may also use parchment paper or a silicone mat to prevent sticking.
- Place the dough onto a lightly oiled countertop. Divide the dough into 8 pieces (just cut it with a knife or bench scraper).
- Whisk to combine the warm water and baking soda and heat in the microwave for 1 minute. FYI it’s not going to dissolve completely, and that’s okay.
- Roll each of the eight pieces into a long rope, and shape each one into a pretzel (see the step-by-step photos on the blog post to see how to do this). Dip each pretzel into the soda wash and place onto the greased baking sheet. Sprinkle with coarse sea salt, then let them rest for 10 minutes.
- Bake for 10 minutes until the pretzels are golden brown. Brush the pretzels with the melted butter while they are hot out of the oven. Enjoy while they are hot, and keep in mind these don’t taste as amazing the next day. Enjoy!
Notes
Nutrition
Nutrition is estimated using a food database and is only intended to be used as a guideline for informational purposes.
Post updated in December 2017. Originally published 2011.
450 Comments on “Soft Pretzels”
Hi Joanne! Love your site and this recipe. Quick question…..even after 5 mins with the dough hook attachment on my mixer, the dough was still sticky. What might I have done wrong? It made rolling out the strips very trying! I baked them as directed and they tasted delicious but weren’t pretty due to difficulties forming the actual pretzel. LOVED the taste but HELP this novice please! (This was my first time using yeast). Keep these awesome recipes and videos comin’!!!!! Fondly, Beth
Hi Beth, did you measure or weigh the flour? It sounds like it might’ve needed just a little more flour. Next time you can add additional flour, a tbsp at a time, to make sure it isn’t sticky (tacky is okay).
Thank you! It was amazing and so easy!
YAY! Really glad they turned out well!
Do you have any gluten free recipes for the pretzels?
Hi Connie, unfortunately I don’t, but you may be able to find something in a google search. Good luck!
This recipe looks AMAZING !
How long can I keep the dough ? Do I have to use it right away ?
Hi Lucy, the dough and texture will change as its refrigerated, but you can keep it for a couple days. Enjoy!
I made this tonight after finding it on pinterest. I have been making them in the past with a different recipe, but this recipe was much easier and tastes almost identical. Thank you so much, yum! 🙂
That’s wonderful Malinda, really happy to hear that!
I think I’ve discovered my new comfort food website…
I just made these and I’m sure I did something wrong. For some reason the 2.5 cups of flour was nowhere near enough to reduce the stickiness of the dough. I swear I added flour at least 25 times to several pieces just to be able to work with them and it was still difficult. I didn’t use a dough hook, by the way..I kneaded it by hand. How much is a dough hook with that excellent futuristic contraption!? I enjoy making home-made pizza often anyway and it would be nice to have. Anyway, mine came out OK, but I’m sure I did something horribly wrong (like: are we supposed to very lightly dip JUST the bottom of the pretzel in the water/baking soda mix or are we supposed to soak it?). Thank you for the recipe.
Hi Josh, hm, I have never made these by hand so I can’t comment on that personally, I just know that several people have commented saying they’ve made these successfully by hand. A stand mixer is fairly expensive, I think around $400, but it should last a lifetime and I use mine often. The baking soda wash doesn’t have any impact on the fluffiness or anything, it’s solely for flavor (and that step can be skipped if desired).
Came to pin this yummy pretzel recipe and was intrigued by your “A Bread Recipe for Those Who Don’t Know How to Boil Water” recipe. When I click on it I get a 404 error. Any chance you’ll repost it or is there a fix?
Hi Hilary, I’m really glad you said something! A while back all the URLs on my site got updated, but because these were inserted manually, they didn’t get updated too. They should be good now =)
I just made your recipe for preztel and they turn out great . I made the typical shape , nuggets, stcks and some unusual shapes. I also don’t have an oven so I used my toaster oven and still the great . This recipe is a keeper . Thank you so much .
Awesome, glad you enjoyed them and tried some fun shapes!
My kids are adults and since I found this recipe last year i have made it numerous times and they constantly want more!! They insist I no longer twist them but make large stick pretzels as they prefer them that way. Thank you for a great, fun and easy recipe.
Huh… I don’t have a bread hook…But I’m a Clay Mator Which Means I make clay mation…
So I make my own clay with flour water and salt and then paint it…So do I really need a bread hook? ‘Cause I if I knead it with my hands it will come out fine…Right? OH MY GOSH! I just got an idea for my next clay project, CLAY PRETZEL! Gotta run!
Oh Thanks By The Way
Just made these for Monday’s pre-school snack. I doubled the recipe but realized they are plenty big enough to stretch the recipe to 12 pretzels for little people. I also had to add a little extra flour, about 1/2 a cup and it was still super sticky when I left it to rise. It is a good thing I doubled it because they are ssooooo good! I think I ate three. I just hope they last for school tomorrow and that the kids enjoy them. I’ll be coming back for more recipes!
Hi Kirsten, that’s wonderful! So glad you enjoyed them and glad you were able to adjust the flour. It can be tricky when humidity levels vary. Happy cooking!
Just made these… They are AMAZING!!! Personally I think they are WAY better than store bought or pretzel shop ones!!!!
This is a great recipe for other bread bases. I am gonna try it as a pizza crust tomorrow for dinner, and probably as burger buns in a few days! lol
My 2.5 year old step daughter helped make them, and when told she could have one after she ate dinner she ate so fast I had to check the floor around her to make sure she didn’t just toss it. lol We loved them! Thank you!
YAY! So glad you enjoyed them! And that’s great you had your step daughter help you =) Happy cooking!
I just made these. I used a silpat and they came out wonderfully. However next time I will make a few changes. They came out way too fluffy to be considered a pretzel and reminded me more of a biscuit, so I will cut out small balls of dough from the big dough and roll it thinner to make them more like Auntie Anne’s. I divided my dough up into 8ths like the recipe said but my dough could have actually produced more pretzels than that. I would have needed to make the pretzels much bigger than the photos show to make 8 pretzels or would’ve made more smaller pretzels. I’ll use my own judgement next time.
Oh! And I will also brush on the baking soda water rather than dip. They came apart when I dipped them and then after baking I realized I had missed some spots.
Hi Joanne,
So, as promised, I made these pretzels today and they were absolutely awesome! I will never buy mall pretzels again– just that good! My only problem was the pretzels sticking to the pan– had it been anybody other than family eating them, I would have been embarrassed. Can you tell me where I went wrong? I lightly oiled the pan with vegetable oil, gave the pretzel dough a ‘soda bath’ and let them rise for 10 minutes before baking them. Did I not use enough oil? Or, should I have tried to get as much of the baking soda mixture off as possible before placing them in the pan? I just dunked them and slapped them on the pan. Any ideas? Thanks!
Hi Veronica, glad that you enjoyed the pretzels!! As far as the sticking, I think it depends on the pan. I use an uncoated pan and haven’t had any issues with sticking, and I don’t really grease it heavily. Do you have a silpat? You could use that, or a high temp parchment paper.
Hi Joanne,
I used a pan that already had a nonstick coating. I didn’t grease it heavily– I poured a small amount of vegetable oil and used a pastry brush to spread it around. I do not have silpat or a high temp parchment paper (before reading the other posts, I saw parchment while shopping for the ingredients, but didn’t get it due to the 420 degree rating), but I will definitely invest. I saw another post where someone said Wilton makes parchment that goes up to 450 degrees so I will look for it.
Thanks Joanne! I look forward to trying more recipes!
Hi Veronica, I actually don’t use nonstick pans anymore for this reason. I found that stuff stuck to them more often than not, which didn’t make any sense to me. I actually ended up throwing them away. I have less issues with a completely uncoated pan like this one http://amzn.to/17PVSoj Hope that helps!
I want to make these pretzels but I am a bit confused by your measurements. it says 12.5 oz (2.5) cups. 2.5 cups would be 20 oz. Which one is it?
The standard weight for a cup of all purpose flour is 5 oz. America’s Test Kitchen uses this measurement. At 5 oz per cup, 5+5+2.5 = 12.5 total ounces . 20 ounces is way over and would be the equivalent of 4 cups. Hope you enjoy the pretzels.