Pan Seared Salmon
Pan Seared Salmon is the ultimate way to enjoy this popular fish, just like they make it at the restaurant, with a golden crispy skin and a moist interior cooked to your preferred doneness. It’s very easy to make crispy salmon at home, in just 10 minutes! Here are all my essential tips.
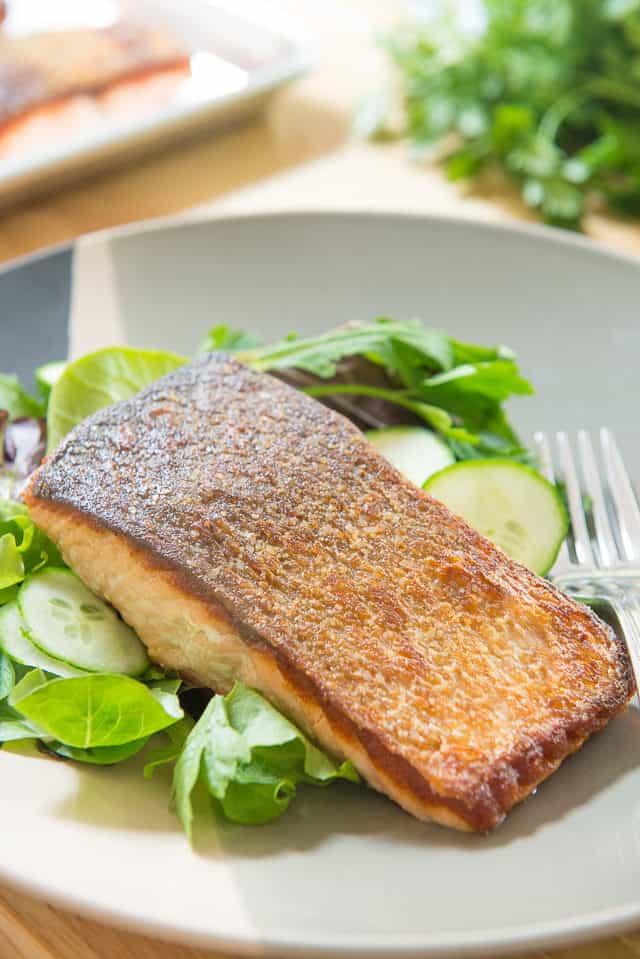
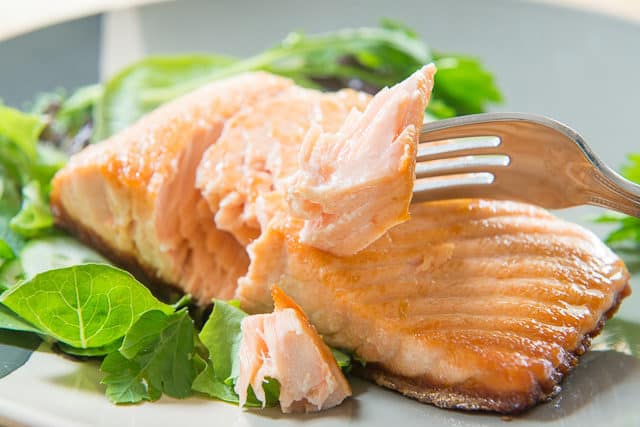
A moist, juicy piece of salmon with a robustly crispy skin is like icing on a cake. It’s truly the perfect contrast to a big fat piece of tender salmon.
The first time I tried salmon like this was at a restaurant many years ago, and I remember thinking, is it okay to eat the skin? I grew up eating salmon, but we always scraped the fish from the skin, then threw the skin in the trash.
But the moment I dug in and crunched down on the most wonderfully crispy shard of savoriness, I became hooked forever.
I’m going to show you how to get super crispy skin with perfectly cooked salmon in your own kitchen, and it’s really so much easier than you could imagine. The skin is robustly crunchy, even crispier than a potato chip!
While my quickest and easiest salmon recipe is this Baked Salmon, this crispy salmon only takes a little bit more effort and you get to enjoy that crunchy skin. The presentation is also very impressive.
Tips for Best Results
De-scale the skin – I’ll show you below how to remove the scales from the skin before cooking, in case the fishmonger didn’t do it thoroughly. These scales are like little plastic sequins in texture, so you definitely don’t want them ruining your eating experience!
Cook almost entirely on the skin – Another thing you’ll want to do that you’re likely not used to is to cook the salmon almost entirely on the skin side. This ensures maximum crispiness!
Dry the skin thoroughly – It is a rule in cooking that before browning can happen, all moisture must be cooked off. So dry the exterior thoroughly with a paper towel before cooking.

This is a healthy meal and great choice for preparing this wonderful fish!
What Kind of Salmon to Use
This recipe will work with any type of salmon, though cooking time will vary depending on kind and thickness. This is why it’s recommended that you use a thermometer when cooking meat and fish, to ensure that you get your desired doneness.
As a general rule, wild salmon tends to have more flavor but is also more lean and therefore less forgiving of overcooking. Farmed salmon tends to be fattier, but has an inferior flavor to wild. The only way to learn your preference is to give them all a try at some point and see what you like best.
My ultimate recommendation is Wild Alaskan King Salmon, as it has the best of both worlds with delicious flavor AND tenderness, but it is quite expensive. My second choice is farmed Atlantic salmon.
Ask for Center-Cut Fillets
When you’re purchasing your salmon at the grocery store, ask the fishmonger if he will give you center cut pieces. These will be more even in thickness, and cook more consistently.
Step by Step Overview:
First we need to make sure the skin is ready for searing and remove the scales. Oftentimes the fishmonger will de-scale the fish before filleting (mine does), but they often miss spots.
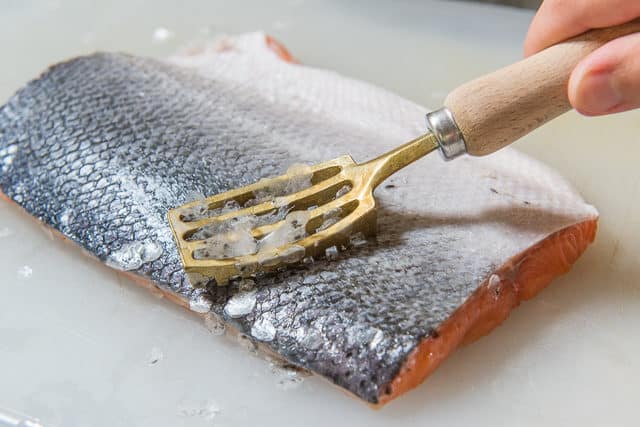
We eat salmon every week, so I bought a dedicated fish scaler, but you can also use a sharp chef’s knife to scrape off the scales…just beware that they will fly all over the place, so wear an apron.
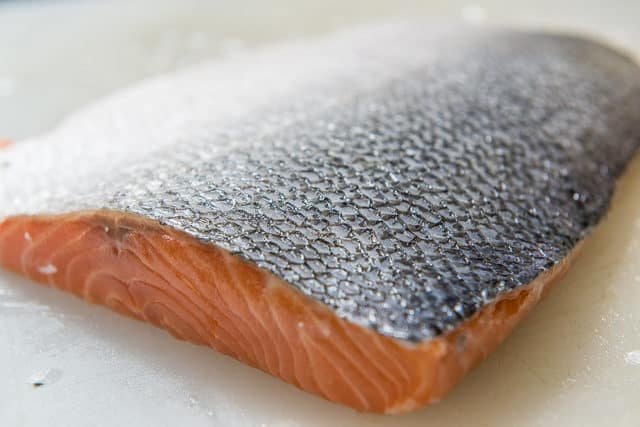
After a few scrapes, voila, no more scales. You can tell they’re gone because the skin has a netting pattern to it:
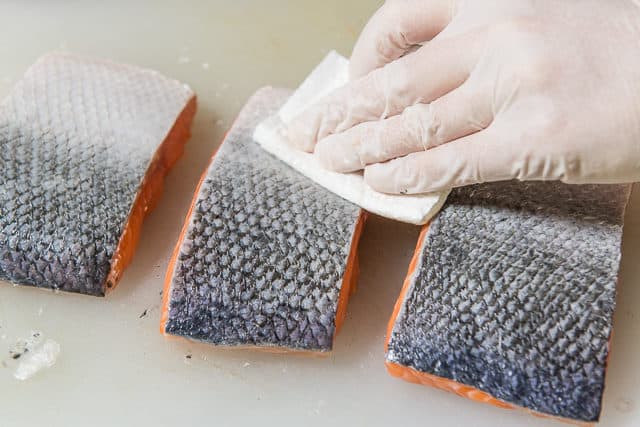
If needed, give the fish a quick rinse to remove the scales, or just brush them off.
Regardless of whether or not you rinse the fish, dry the exterior very well with paper towels. Water is the enemy of a good crispy sear.
Next, start preheating a skillet for searing the salmon.
What kind of skillet to use
For the best sear, I recommend an uncoated stainless steel pan. A well-seasoned cast iron skillet would be a close second.
Some people like to use a Teflon-style nonstick pan for searing fish, but I don’t. You just don’t get the same sear, and you’re not supposed to use this high of heat for those pans.
If the pan is hot enough, the fish won’t stick anyway. Literally I can pick the entire filet up with a pair of tongs because it’s so un-stuck to the pan.
Also, select a pan that’s fairly close in size to the piece of fish, then preheat for about 3-5 minutes (3 minutes for gas stoves, 5 for electric).
Once the pan is pre-heated and you’re ready to cook, dab the exterior one last time for any excess moisture on the outside:
Then, season the fish skin with a good pinch of kosher salt at the last moment, right before you add it to the pan.
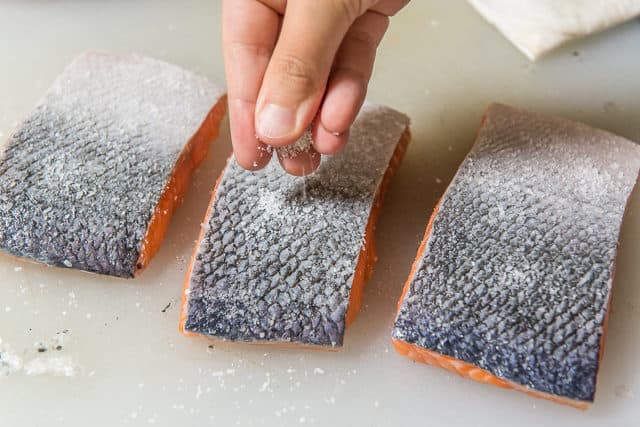
Side note: I don’t recommend black pepper on the skin, or spices like garlic powder or onion powder, as they will burn.
The reason you want to season with salt *right* before searing is that salt pulls moisture out of the fish skin and makes it wet again, preventing an optimal sear.
Time to Cook!
Add oil to coat the bottom of the skillet, and note that it should be shimmering, but not smoking violently. If it’s smoking like crazy, turn the heat down slightly.
What Kind of Oil to Use
Olive oil does not have a high enough smoke point for pan-seared salmon, because we have the skillet pretty hot, preheated over medium heat. I recommend using ghee, avocado oil, or other higher smoke point oils.
Take your piece of fish and test it by touching the very end of it to the pan. If it makes a hissing sizzling noise, that means the pan is sufficiently hot.
Go ahead and lay the fish down in the hot pan on the salmon skin side, always away from you so the hot oil doesn’t splash. (And if the fish doesn’t sizzle, your pan isn’t hot enough, so heat longer).
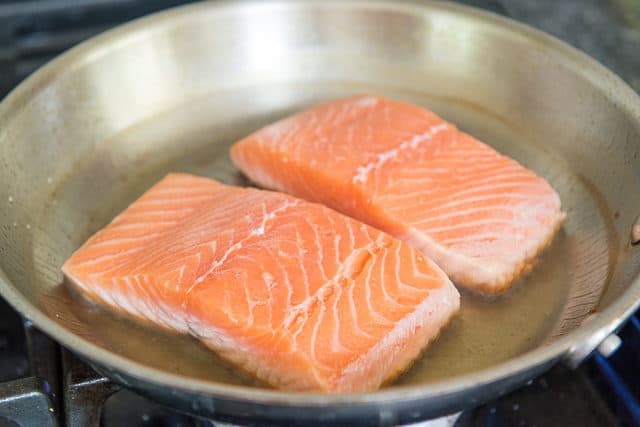
Here’s the secret: Let the fish cook for 90% of the time on the skin side. This thoroughly crisps the skin, and also results in a gentler cooking for the flesh side of the salmon.
How Long to Sear Salmon: The salmon I get is usually about an inch thick, so I cook it for 5 minutes on the skin side, until it’s golden brown and crispy. Time will vary depending on the thickness of the fillets, so always use a meat thermometer to check.
Once the salmon is cooked most of the way (you can see this below), I flip the individual fillets over to give them a brief “kiss” on the other side, cooking for about 15-30 seconds:
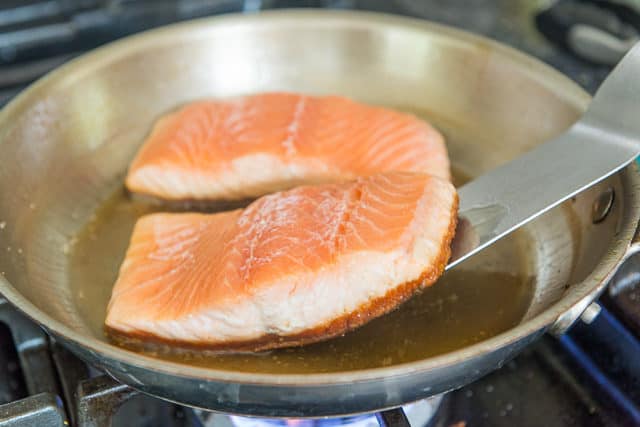
If the pan was hot enough when adding the fish, you should have no issue getting the salmon off the skillet, but I like to use this razor thin turner to get under it and keep the salmon held together in a nice piece. A fish spatula would also work well.
When removing the fish from the skillet, plate it with the skin side up, so the skin retains its crispiness and keeps from getting soggy. Plus, that way you get to admire that perfect golden crust!
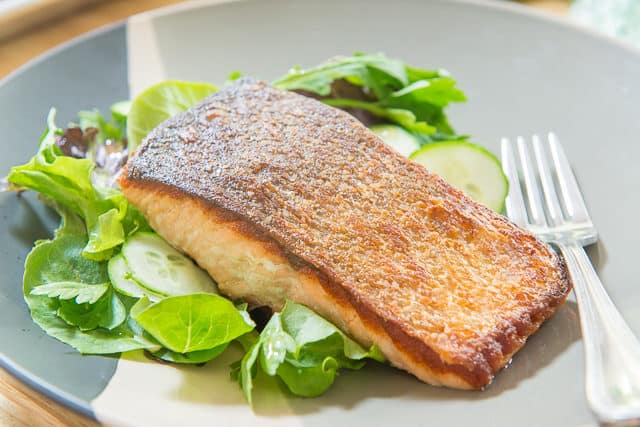
Here’s a look at the inside, which is moist and glistening. I like salmon at medium, so with an internal temperature of about 125F. This doneness gives you tender salmon fillets that flake nicely, but are still slightly pink.
If you want the fish fully cooked, 140 degrees F is sufficient.
How to Serve
Because this Pan Seared Salmon only has salt, you may wish to serve it with lemon slices, a sprinkle of fresh herbs, or a sauce. I love pairing it with Romesco, Basil Pesto, or Chimichurri. A classic Tartar Sauce also always goes well with seafood.
For side dishes, any type of salad like Carrot Raisin Salad, Tabbouleh, or White Bean Salad will work nicely. You can also try heartier sides like Roasted Acorn Squash, Cauliflower Mashed Potatoes, or Crispy Smashed Potatoes.
Seared Scallops are another one of my favorite seafoods to make at home, as it’s crazy easy and much cheaper than the restaurant.
Salmon Salad and Smoked Salmon Deviled Eggs are also great salmon dishes that I recommend. Enjoy!
Recipe Tips and FAQ
Store in an airtight container for up to 3 days.
Yes, store in an airtight container for up to 2 months. For best results, thaw in the fridge overnight before reheating.
The best way to reheat is to crisp the skin in the skillet much like how you cooked it, skin-side down, then give it a flip at the end to warm the top. You may also use the microwave, but I recommend cooking gently at no more than 50% power in 30 second intervals until it’s warm to the touch, as it’s very easy to overheat the fish in the microwave.
No, always thaw the fish first. You can thaw quickly in cold water, which takes about 15 minutes. Make sure to dry it very thoroughly before cooking.
Did you enjoy the recipe? Please leave a 5-star rating in the recipe card below and/or a review in the comments section further down the page. Or, follow me on Facebook, Instagram or Pinterest!

Pan Seared Salmon with Crispy Skin
Ingredients
- 2 salmon fillets skin-on, descaled, and patted dry with paper towels
- avocado oil* or ghee, for searing
- salt
Instructions
- Preheat a skillet over medium heat for 3-5 minutes (3 minutes for gas stoves, 5 for electric).
- Add enough oil to coat the bottom of the pan, about 1-2 tbsp. The oil should shimmer.
- Season the skin of the fish generously with salt, then test your piece of fish by touching the very end of it to the pan. If it makes a hissing sizzling noise, that means the pan is sufficiently hot. Go ahead and lay the fish down in the pan, always away from you so the oil doesn’t splash.
- Let the salmon cook for 90% of the time on the skin side. The salmon I get is usually about an inch thick, so I cook it for 5 minutes on the skin side.
- Season the top of the fish with salt, then flip it over to cook for 15-30 seconds on the other side. Serve on the plate skin side up, and enjoy!
Notes
Nutrition
Nutrition is estimated using a food database and is only intended to be used as a guideline for informational purposes.
Post updated with new photos, writing, and more tips in August 2018. Originally published August 2012. This post contains an affiliate link.
124 Comments on “Pan Seared Salmon”
Your instructions are always so great! Everything I’ve made tastes fab…..I do have a question here……how do you handle the salmon pieces that vary so much in thickness,and manage not to dry out the thinner end?
I honestly just avoid those pieces and make sure to tell the fishmonger which one I want when I’m at the store. I haven’t figured out a way to get it all to cook evenly in the pan. I’m not sure there is much that can be done.
Tried tonight – very delicious. Thanks for the instructions!
My salmon had nice thick skin which inspired me to try this technique. The result was a tasty crispy skin. Delicious.
I posted it on FB in was a party in my mouth I give you and myself 5stars⭐⭐⭐⭐⭐💖
So well explained TY😘
Best Salmon Ever!!! I will never order salmon in a restaurant again. I pulled out my cast iron frying pan and it was perfect for searing the skin to a wonderful crispness. I had this at a high end restaurant years ago and tried to duplicate. Your directions and pictures make it so easy and delicious. I’ll be checking out your other recipes. Thank you!
Thanks, this was very detailed and helpful!
Hi Peter, it delights me that you found the details helpful. Happy cooking!
This is spectacular!
Trying this tonight. Do you think cast iron would be a good pan?
Hi Marci, cast iron works great. Enjoy!
I got a fillet from Whole Foods that was slightly thicker than 1 inch in the middle and I had to wait 10 min! It still wasn’t cooked by the time I flipped to the other side so I ended up cooking the other side for 4 more min, but it was perfect then. Yum!
It is so weird though, yours and Serious Eats both only take 5 min on skin side and 15 seconds on other side. Maybe it’s because I have an electric stove and it sucks?? It was definitely hot since the oil kept splattering out from the pan all over the stove. I used cast iron with avocado oil.
Hi Esther, generally speaking an electric stove is not as hot or responsive as gas. 10 min on my stove for a 1″ piece would be too long. I think it sounds like maybe the heat needs to be hotter on your stove when you cook. But I’m glad you were able to watch it and get the cook right!
Thanks! Does the oil splatter everywhere for you too?
I recently got another fillet from Whole Foods that was pre-seasoned, but it still has the scales on it! I always thought places would remove the scales for you especially if they’re going to pre-marinate or pre-season it for you.
Hi Esther, if you dry the salmon very thoroughly, oil should splatter much less. It’s the moisture from the salmon that makes it pop. You can also look into a splatter screen, though I don’t use one. And yes that’s odd they left the scales on!!
5 minutes too long, burnt the skin 🙁
Thank you Joanne, the best Salmon I’ve ever cooked.
Hi Danny, I’m SO glad to hear that!!
Trying to leave a “rating”. I give this a 5 (if 5 is the highest). I’ve never eaten salmon skin before, but with this recipe the skin is crisp while the fish flesh is moist and succulent. It’s perfect!
My boys fish for our salmon here in the Pacific Northwest every summer. This recipe is handy for my packed freezer full of wild salmon.
I have some salmon in the freezer, now I know just what to do with it!
I’m so glad to have found this recipe. I cant tell you how many times our salmon skin has stuck to the stainless steel pan and is unattached to the fish when we flip it over. Lol. We already enjoy ur whole wheat pancakes recipe and plan on cooking salmon this week! Thanks so much
This tutorial/recipe is amazing! Thank you, thank you, thank you! The skin is crispy like bacon but healthier. I have bookmarked the tutorial for the future.
I your blog while searching for salmon recipes and tried this out for dinner today. It was a hit with the family, and my four year old son kept asking for more. Unfortunately, I didn’t quite grasp the part about laying the fish away from you and splattered a few drops of hot oil on my chest and neck. Now I understand what you meant and the blisters are a painful reminder to pay more attention.
Whoops, that should say I *found* your blog
Hi Caroline, that is wonderful your family enjoyed the salmon!!! I’m sorry to hear about the oil. I know how much it hurts.