Best Soft Pretzel Recipe
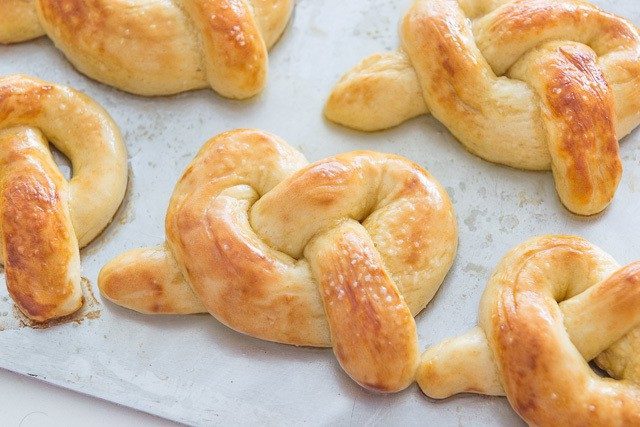
These are the absolute best Homemade Soft Pretzels! Fluffy, buttery, and mall‑style using a simple baking soda dip. This soft pretzel recipe makes 8 large pretzels in about 1 hour.

Once you try these homemade soft pretzels, you will never bother with those mall pretzels ever again.
Plus, it only costs a buck or two to make a WHOLE TRAY instead of just getting one kind of pretzel. Not to mention there aren’t any artificial ingredients or preservatives when you make them yourself. And all the ingredients are the simple ones that you’d expect, like flour, yeast, water, and salt.
Table of contents
Reader Loved Recipe: Hundreds of 5-Star Ratings
Jan R – My husband says they’re the best soft pretzel he’s ever eaten! I agree.
Denisha M – Oh my….. These we’re delicious! Will definitely make again.
Z – Made this recipe a few times i absolutely love it. This is totally my go to pretzel recipe
Pretzel Dough Tips for Best Results
Use instant rise yeast – At the grocery store you can buy “active dry yeast” or “instant rise yeast” (sometimes also called “quick rise yeast”). They are the same price, and I always recommend the instant rise, which is what we’ll use here.
Make sure the yeast is fresh – Yeast does expire, so make sure those packets haven’t been hanging out in your pantry for too long. Check the date, and try to use newer yeast.
Be patient – This entire recipe, even with rise time, should generally take an hour, which is really fast for bread. However, if your kitchen is cold and the dough has not doubled in size during the 30 minute rise, give it another 15 minutes.

I love prepping a fresh batch of these easy homemade soft pretzels on football game-watching days, along with a fresh pan of Buffalo Chicken Dip and Baked Chicken Wings. So good!
More Flavor Options
The default here is to simply brush with butter, and enjoy these soft pretzels “plain” with butter and salt. However, here are a few more flavor ideas.
Cinnamon Sugar – In my 100% Whole Wheat Version of these pretzels, I share a cinnamon sugar coating that is wonderful. 1/2 Cup Sugar, 2 TBSP Cinnamon
Garlic Parmesan – Use the sauce from my Garlic Parmesan Wings for brushing the outside, for an extra flavorful garlic parmesan butter. 1/4 Cup melted butter, 1/2 Cup grated parmesan cheese, 1tsp garlic powder, 1/2 tsp dried oregano, 1/4 tsp salt.
Buffalo – When the pretzels come hot out of the oven, brush with Buffalo Wing Sauce and serve with Blue Cheese Dip. 4 TBSP Melted butter, 6 TBSP Franks hot sauce, 1/2 tsp worcestershire sauce, 1/2tsp cayenne.
Orange Honey Butter – When hot out of the oven, brush the pretzels with Homemade Orange Honey Butter. 1 Cup heavy cream, 2 TBSP Orange blossom honey, Zest of 1 orange, Pinch of salt.
Step by Step Overview:
I have a full video on how to make the pretzels, as well as a quick visual photo overview.
1, Make a simple yeasted dough, made with flour, water, instant yeast, salt, and sugar. Then shape into a ball. You can use a dough hook attachment or make it by hand.

2, Let the dough rest for 30 minutes in a warm place to let the dough rise and double in size.
The yeast will work its magic and create these gorgeous bubbles that will give us the rise and fluffy texture we want.

Make-ahead option
If you wish, you may keep the risen dough in the fridge for up to 24 hours. Make sure to cover the bowl tightly with plastic wrap.
When ready to bake, simply proceed with the recipe as usual, cutting and rolling the pretzels.
3, Divide up the dough into 8 equal pieces, then roll each one into a long rope.

4, Shape the thin ropes into pretzels by looping the rope through the hole above.

The ends of the rope should end up on the bottom. See the video as needed.
5, Dip each pretzel into a baking soda bath, which is simply warm water with baking soda. This provides flavor, and will also brown the baked pretzels, much like an egg wash makes baked goods golden brown on the outside.
6, Sprinkle each pretzel with coarse sea salt or pretzel salt, and send them into the oven on a prepared baking sheet that’s either greased, covered with parchment paper, or covered with a silicone mat.
Let the Excess Water Drip Off
Let the excess water drip off the pretzels before putting each piece of dough on to a large baking sheet. You don’t want the pretzels to be too wet, or they may stick to the tray, even if it’s greased.
You may also place the pretzels on parchment paper or a silicone mat to ensure this isn’t an issue whatsoever.
Place dipped pretzels on a rack over a sheet pan for 10-20 seconds if you over dipped them. This will ensure no pooling occurs.

7, Bake the pretzels until golden and puffed, then brush with melted butter while hot, or any other sauces or coatings you’d like.

How to Serve
These are great hot out of the oven, either with plain butter and salt or one of the flavor options I suggested above.
You can also try serving with Homemade Nacho Cheese Sauce, marinara sauce, honey mustard, or even Basil Pesto.
For something sweet, try the icing on my Overnight Cinnamon Rolls or homemade Caramel Sauce.
Pretzel Recipe FAQs & Troubleshooting
Let cool completely, then keep at room temperature for 1 day, in the fridge for 1 week, or in the freezer for 2 months.
Yes, in an airtight container for up to 2 months. Let them cool first before freezing.
Warm in a 300F oven for 5 minutes. Add an extra 3 minutes if reheating straight from frozen.
Yes, keep the risen dough in the fridge for up to 24 hours.
Tried this recipe? Leave a rating and comment below — I’d love to hear how it turned out! Or, follow me on Facebook, Instagram or Pinterest!
Soft Pretzels
Ingredients
For the Dough:
- 2.25 tsp instant or "quick rise" yeast
- 1 cup warm water 110 degrees F
- 1 tsp sugar
- 12.5 oz all purpose flour, by weight (2.5 cups, if measuring)
- 1/2 tsp sea salt
For the Topping:
- 1/2 cup warm water
- 1 tbsp baking soda
- oil for greasing the sheet pan
- coarse sea salt for sprinkling
- 3 tbsp unsalted butter melted
Equipment
Instructions
- Combine the yeast, warm water, and sugar in the bowl of a stand mixer*, and let sit for 10 minutes until foamy. This indicates the yeast is alive and working. Add the flour and salt. Mix with the dough hook by hand for a few seconds to roughly combine, then fit the hook and bowl on the mixer and knead on medium low for 5 minutes. The dough should feel soft and smooth, not sticky to the touch.
- Cover the dough and let rise for 30 minutes, until doubled in size. If your kitchen is cool, you made need closer to 45 minutes.
- Preheat the oven to 450F, and lightly grease a baking sheet with oil. You may also use parchment paper or a silicone mat to prevent sticking.
- Place the dough onto a lightly oiled countertop. Divide the dough into 8 pieces (just cut it with a knife or bench scraper).
- Whisk to combine the warm water and baking soda and heat in the microwave for 1 minute. FYI it’s not going to dissolve completely, and that’s okay.
- Roll each of the eight pieces into a long rope, and shape each one into a pretzel (see the step-by-step photos on the blog post to see how to do this). Dip each pretzel into the soda wash and place onto the greased baking sheet. Sprinkle with coarse sea salt, then let them rest for 10 minutes.
- Bake for 10 minutes until the pretzels are golden brown. Brush the pretzels with the melted butter while they are hot out of the oven. Enjoy while they are hot, and keep in mind these don’t taste as amazing the next day. Enjoy!
Notes
Nutrition
Nutrition is estimated using a food database and is only intended to be used as a guideline for informational purposes.
Post updated in December 2025. Originally published 2011.
More Snacks that Pair Well
Buffalo Garlic Knots– Great for parties and game day
Homemade Corn Dogs – Better than frozen store bought options
Jumbo Garlic Knots – Fan favorite and easy appetizer
Bacon Wrapped Jalapeños – Crowd pleaser and so much flavor
Homemade Mozzarella Sticks – Huge game day hit
Homemade French Fries – One of my most popular recipes. People will ask you how made them!
459 Comments on “Best Soft Pretzel Recipe”
Love this recipe! My niece made these and shared some with us. I also featured her batch along with a link to you’re recipe on my blog today, Delicious 🙂
http://butterflyangelcreations.blogspot.com/2012/11/HometownFavorites.html
I tried this recipe, twice, and it didn’t work out either time 🙁 I used the stand mixer I followed all the instructions and what seemed to be the problem was the dough didn’t become smooth like in the picture, it was still a little bit chunky. I let it rise hoping it would just magically come together but it didn’t. When I rolled the pieces out it just separated. What are some things I could have done wrong? Let it knead longer? Could it be the yeast? I checked the expiry date and it was fine. Do I have to treat the yeast somehow? (This is my first time baking something with yeast, I’m more of a cookie girl). Any help would be greatly appreciated I really want these to work out!
Hi Gabby, Let me ask you a few questions so we can get to the bottom of this. First question is, do you think the dough actually rose? If it did rise, then we will know it wasn’t a problem with the yeast, but if it didn’t rise, then we can troubleshoot any yeast problems. Sounds more like it was a problem with the dough though. How are you measuring the flour? Scoop and scrape method? Weighing it? Let me know =)
yes the dough did rise, but the initial problem was that it wasn’t smooth like in the picture it was still kind of chunky and not quite combined. to be completely honest I’m an approximation baker haha. I probably didn’t measure things completely exact, thats probably my problem!
Okay, I was going to say, this post has been up for almost a year and I don’t think anyone has ever said they had trouble with it. You really can’t bake things well unless you measure. Baking is so exact, and small variations can make a big difference in the end result. It’s okay with cooking to approximate, but not with baking.
I did it! Measuring was definitely the problem, Haha. Thanks a lot!
YAY!!!!! haha. See, measuring really makes a difference with baking, glad they turned out well this time!
Hi I don’t have a stand mixer! So I put the dough in a zip lock bag and kneeded that way, and it turned out great! If you have kids they would love helping with that! Did for about 5 min. Then put in a oiled bowl, to let it rest! Then did the rest of your instructions and they turned out great!
I do think you have to watch the temp. Of oven each is different! Other than that Great!
Thanks!
Hi Teri, I’m so glad hand kneading worked so well for you. Regarding oven temp, do you have an oven thermometer? If not, you should totally get one. I have one and I’m always amazed by how much my oven lies! haha. I have to watch it pretty carefully. Sometimes it’ll say it’s heated to 350 and it’ll be at 425 according to my thermometer. Although, I am currently moving from GA to CT at this very moment so we’ll see how much new oven does. Hopefully it needs less babysitting =)
These were such great pretzels!! Thanks for sharing!
YAY! SO glad to hear it Myrtle =)
Yum! These look delicous, and looked just as delicous (and tasted!) when I made them! Great recipe!
This dough by they way makes an outstanding pizza dough. Just roll it out as thin or thick as you like.
These are so easy and delicious! My husband and little brother have eaten 2 dozen today.
Thank you for the recipe and instructions.
I had to knead the dough by hand since I don’t have a stand mixer and after rising, I tried rolling it into ropes like the instructions said but it didn’t really work. The dough was pretty puffy and would immediately shrink back up as soon as I had it rolled out. There was no way I was going to be able to make it into a fancy shape like in the picture, so I just cut each rope into three straight sticks. They are in the oven right now, so we will see how they turn out.
You kneaded by hand? What a workout! haha. Anyway, when doughs shrink up, that just means that the gluten is very tight. If you let the dough sit for 10 minutes or so, the gluten will relax and you should be able to roll it out. This happens with pastas and breads, basically anything where you are building a really strong gluten network.
I had the same issue but I used my stand mixer. They turned out lovely but not as easy to work with as I would have liked. Very springy! But oh so yummy… We put cheese on some half way thru baking. 🙂 thanks
These were awesome and my kids thought I was the best when they came home from school to these. My first job was making pretzels and this is exactly how we did things!
I’m so glad to hear it Mel! Happy cooking =)
Didn’t taste like a pretzel but it had a nice texture.
Is there any need to change anything for high altitude?
Hi Marian, Sadly I don’t know anything about high altitude baking. I’ve always lived at sea level!
Darn, but thanks for the great recipe anyway.
OMG, these were amazing!! I mixed garlic salt with the butter and holy cow!!
I just made these but I turned mine into pretzel dogs! Yum yum!
I love pretzel dogs =) Glad you enjoyed it!
I made these last night with my two children and they were a hit! They loved being able to help roll the dough out and sprinkle the salt. I’ve tried to make homemade pretzels before but they were a complete failure. Thanks for your step by step photos and directions these were a totally different story! I will be making these more often for sure. I was also wondering if I could post your recipe to a family blog we have simply for family members to connect and share favorite recipes? I will definitly give credit for the recipe to you and your wonderful site. Thanks for your consideration! I think everyone should try these! Like I said, we LOVED them! Thanks again!
Hi Janae, that’s so great you made the pretzels with your kids! That’s one thing I look forward to when I have kids one day. Thanks for asking about the recipe, if you wanted to post a photo and the link that’s fine, but it’s my policy that full recipes aren’t reposted. Sorry for any inconvenience, I do appreciate your thoughts! Happy cooking!
I just came across your blog and I love it! I tried these pretzels and they were delicious. There are a few other recipes that I am going to try too. Your blog is very inspirational and I LOVE your photography.
Thank you Tara! So glad you enjoyed them. Stay in touch and happy cooking =)
Hi–these look great! Do you think you could substitute whole wheat flour?
Thanks!
Laurie, I’ve done it with half whole wheat half regular bread flour, and that works well. Not sure about all whole wheat, but I’ll be trying it soon. The problem is whole wheat flour has less proteins in it that create gluten and dough strength, but certainly worth a shot!