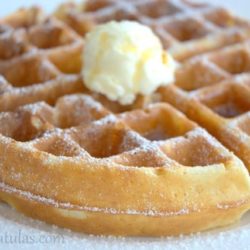
Crispy Waffles
I’m sharing my top 6 tips for how to make the best Crispy Waffles for breakfast or brunch. These homemade waffles have wonderful flavor, and the batter is simple to mix together. Serve them piping hot while crisp, topped with butter, maple syrup, or your favorite toppings.

Did you ever eat those frozen pre-packaged waffles growing up? I did. And I almost can’t believe I did. They’re quite a far cry from the crisp, thick, flavorful waffles I now make at home for brunch.
Even though my waffle standards started out with the soggy, spongy frozen variety, I’ve gotten very demanding about how a waffle should be.
The best waffles are crisp on the edges but a little fluffy in the middle, with good flavor, and doused in real maple syrup (though admittedly that last part has nothing to do with technique).
There is only one exception to this: Chef Capon’s Savory Bacon Cheddar Waffles, which are neither crisp nor should you put maple syrup on them, but are insanely delicious.
After a decade experimenting with various waffle ingredient combinations and several tiers of waffle makers, I’ve discovered there are 6 major secrets to perfect waffles.
Tip #1: Add stiff egg whites
For the most crispy waffles, we will be separating the egg yolks from the egg whites, and mixing them separately.
When you beat egg whites to stiff peaks, they hold in a TON of air (think about what’s going on with a soufflé). Incorporating stiff egg whites into your batter makes the waffles incredibly light instead of heavy and dense.
I mix the small amount of granulated sugar needed in this recipe directly into the egg whites, both to make the beaten egg whites more stable, but also to dissolve the sugar thoroughly.

It takes an extra minute, but this step is important for a more crisp exterior.
Tip #2: Add cornstarch
I first read about adding cornstarch to waffles after someone sent me Pam Anderson’s recipe, and the thought of adding cornstarch really surprised me.
I went in skeptical but after testing it out I was convinced. It makes a big difference! The addition of cornstarch protects the waffle from getting soggy from cooking steam.
What’s interesting is that over the years, I have noticed more and more people incorporating cornstarch into their baking as a secret ingredient. When added to baked goods like cakes, cookies, and so on, it helps the texture quite a bit.
Tip #3: Swap Amaretto for vanilla
Vanilla extract is classic in sweet applications, and you may certainly use it here if that’s what you have. But I love adding a little amaretto liqueur to the batter instead. It makes the waffles flavorful and aromatic, in a way that’s different from the norm.
If you don’t have amaretto, make sure you at least use some vanilla or almond extract, so you get that nice flavor and aroma that’s necessary for a great waffle.
Tip #4. Use real buttermilk
Real buttermilk is important for the same reason as #3…flavor. We all love substitutes, but be sure to use actual whole milk buttermilk from the store here, not vinegar curdled regular milk! A vinegar milk mixture might work out chemically, but it does not compare to the real thing.
If you have leftover buttermilk, you can freeze it, or use the leftovers for Lemon Buttermilk Pie, Buttermilk Pancakes, this amazing Cornbread Recipe, or this legendary Fried Chicken Recipe.
For the wet ingredients, mix the buttermilk with egg yolks, melted butter or vegetable oil, and your amaretto or vanilla.
Add it to the dry ingredients of all purpose flour, cornstarch, baking powder, and salt, in a separate bowl:

Once the buttermilk amaretto liquid is added to the dry ingredients, it’s time to fold in those stiff egg whites I mentioned earlier:

Fold gently in a large bowl with plenty of room to turn, so as not to deflate the whites. This ensures crispier waffles.
Tip #5: Use a flip waffle maker
As good as your crispy waffle recipe may be, if you have a crummy waffle maker, you’re going to get crummy waffles. I know this because I had one. One side would get completely burned, while the other side was underdone.
It pained me to do so, but I threw it away and bought this flip waffle maker instead. Flipping the iron after pouring in the batter allows all the liquid to spread out evenly, so the waffle cooks evenly on both sides.
Also take care not to overfill the waffle maker, as it will just spill over the sides and make a mess.

With a good quality preheated waffle iron, each waffle should come out crisp, golden brown, and ready to eat. If this doesn’t happen, the following tip will save you.
Tip #6: Crisp five minutes extra in the oven if needed
If the waffles aren’t fully crisped when they come out of the waffle iron, put them in a 250 degrees F oven for 5 minutes, directly on the metal racks of the oven (not on a baking sheet).
This will crisp the waffles even further and putting it on the wire oven rack will allow the steam to escape and prevent sogginess. This is also good for maintaining the waffles’ crispy exterior while you’re cooking the remaining batter.

How to Serve
My favorite toppings for these crispy waffles are simply some good quality butter and a drizzle of pure maple syrup. Classic waffles always please! But you could also dust with a little confectioner’s sugar, add Homemade Orange Honey Butter, Blueberry Sauce, or fresh fruit.
You may also want to balance these delicious waffles out with some healthier savory options. I love Poached Eggs with Hash Browns, Sausage Breakfast Casserole, and this Potato Frittata.
Also try Cinnamon Roll Pancakes, Bananas Foster French Toast, Carrot Cake Pancakes for some fun and indulgent brunch recipes. If you want to go a little healthier, these 100% Whole Wheat Pancakes are shockingly delicious too. Enjoy!
Recipe Tips and FAQ
Keep leftover waffles in an airtight container or sealable plastic bag in the fridge for up to 5 days.
Yes, keep in an airtight container or sealable plastic freezer bag for up to 3 months.
Reheat in a 350F oven (or toaster oven) for 5-10 minutes, until warmed through. If reheating straight from frozen, you will need to add an extra 5 minutes. It is also possible you can pop them into the toaster, depending on how thick your waffles are.
No, I do not recommend using this recipe for pancakes. Try Buttermilk Pancakes or Whole Wheat Pancakes instead.
Yes. Sprinkle up to 1/4 cup of chocolate chips per waffle immediately upon adding the batter to the hot waffle iron.
Tried this recipe? Leave a rating and comment below — I’d love to hear how it turned out! Or, follow me on Facebook, Instagram or Pinterest!
Crispy Waffle Recipe
Ingredients
- 2 eggs separated
- 2 cups whole buttermilk
- 1/3 cup melted butter or oil of your choice*
- 1 tbsp amaretto (can substitute 1 tsp vanilla extract)
- 7.5 oz all-purpose flour, by weight (1.5 cups, if measuring)
- 2.5 oz cornstarch, by weight (1/2 cup, if measuring)
- 1 tablespoon baking powder
- 1/2 teaspoon salt
- 3 tbsp sugar
Instructions
- Separate the egg yolks and whites, and beat together the egg yolks, buttermilk, melted butter or oil, and amaretto to combine.
- Whisk to combine the flour, cornstarch, baking powder, and salt. Set aside.
- Combine the leftover egg whites with the sugar, and whip to stiff peaks (if you lift the beaters straight out of the egg whites, then invert the beaters, the egg white should stand up on its own as a stiff peak).
- Stir the buttermilk liquid into the flour mixture (make sure the batter is still a little lumpy), then fold in the egg whites, being careful not to deflate them.
- Pour the batter into a preheated waffle maker and cook for about 3-4 minutes. Enjoy!
- Note: If the waffles don’t get crispy enough in your waffle iron, place them on a rack set on a baking sheet (or it can be the rack in the oven if it’s clean) and bake in a 250F oven for another 5-10 minutes, until crisp.
Notes
Nutrition
Nutrition is estimated using a food database and is only intended to be used as a guideline for informational purposes.
243 Comments on “Crispy Waffles”
First of all I want to say thanks for you time and I enjoy your website. I am sorry to report that I made these twice and both times no luck. I made a half recipe for a trial run and they just were not crispy or flavorful. I made them again since I bought the amaretto however I used half vanilla, a dash more salt and made sure I oiled the waffle iron instead of Pam. They still were not crispy. I turned the temp up but the indentions were overdone. The waffle cooking tips go right alone with cooking science but for me it didn’t work. Please do not take this as criticism, just baffled as your waffle photo is just beautiful.
Hi Deb, I’m so sorry to hear that this hasn’t worked for you. I know it is frustrating when you cook something and it doesn’t turn out with the results you want. Do you happen to know what brand of waffle iron you are using?
It is a Oster flip. It has made good waffles, I just want that Perfect waffle. I may have over beat the egg whites. With the sugar, it was more like meringue.
Thanks gain.
I tried this, only instead of putting the amaretto in the waffle batter, I poured it on the waffles in place of syrup. It was amazingly good. Purely a weekend morning thing, though.
Haha, that’s awesome!
Can you use almond extract instead of
Amaretto? Isn’t that pretty much the same thing? Thanks!
Hi Amy, Hm, I see you commented a few weeks ago but I didn’t get a notification, sorry for the delay in response! Almond extract would work, only use 1 tsp since it is stronger.
Can you use almond extract instead of
Amaretto? Isn’t that pretty much the same thing? Thanks!
Wow! It looks delicious!Thanks for this recipe. Will make some and share what happens =)
thanks so much, i came from pinterest and this is a great and helpful article! my son who loves waffles is visiting and i can’t wait to make these for him xo
OK, so I just made these! I bought the waffle iron you suggested and decided to go for it for Mother’s Day. My wife and I are expecting our baby any day now, but I decided she still counts despite her protests to the contrary.
The batter was light, fluffy and yummy, but I had trouble figuring out how long to cook the waffles. I tried 4 minutes, flipping it at the half way point, and that came up with uneven waffles. Some spots seemed to almost burn, while others looked nice. I cut it back to 3 minutes, and ultimate 2:40 but they ended up soft and squishy, not crispy on the outside.
Do I need to adjust the batter or the cook time?
Despite all these, they were a BIG hit! ^_^
Hi Andre, Congratulations on your soon-to-be-born baby!!! I wish you and your wife luck on delivery day =)
I know with our particular waffle maker, the instructions recommend that you flip the waffle maker right after you pour the batter in, and leave it that way for pretty much the whole time. Sorry I wasn’t more clear about that in my directions, I updated it to specify about our particular iron.
Also another thing to note is that seasoning the pan with butter vs. oil vs. nothing can change up the browning a bit. It’s kind of tricky…I usually brush the waffle maker with butter after every couple of waffles, not for every one, but you can experiment a bit with that. As a general rule of thumb, since butter contains milk solids (which burn easily), butter can lead to more browning than oil. If they get too brown you can try something like vegetable oil.
Hope it goes better next time Andre!!! Sorry these didn’t turn out perfect for you and your wife the first time. Let me know again if anything comes up!
Thanks for sharing this tips!
Oh my word, you are killing me. I’d like to request these for breakfast when I return to Florida one day. Purty pleeze!
Fantastic tips, Joanne! Much like how your raspberry frozen yogurt hit home how much I need an ice cream maker, these waffles prove why I also need a waffle maker! (I know, I know … I need/want a lot of things.) I certainly don’t want crappy waffles so I’m looking for a flipping kind. Thanks!
I need to get myself a waffle machine pronto! I come from Poland where they still do sell waffles like this with cream and jam from tiny little outlets that make nothing but. Yours look perfect Joannne!
I rarely eat waffles because of the carbs but this post will come in very handy the next time I do … great job!
I agree–nothing beats homemade. I always ate the frozen waffles growing up, but can’t remember the last time I had one. Your waffles look absolutely perfect and golden. 🙂 I need that waffle maker!
Ohhh…thanks for sharing the secrets…!!! never imagine to add amaretto, I’m sure it will give that special taste.
These are some amazing tips and I never knew a single one of them! I have a crappy waffle maker, but I’m gonna try them anyway….then I’ll probably get addicted to this incredible recipe and buy a flip waffle iron!
Love the idea of the almond flavor – that would make an amazing waffle!