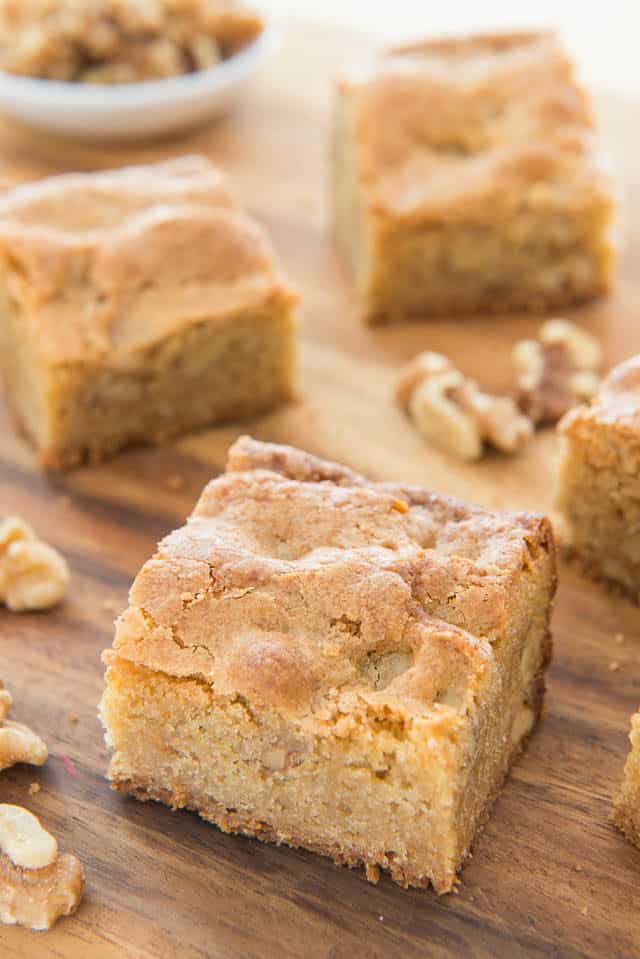
Brown Butter Blondies
These Brown Butter Blondies have absolutely incredible flavor and the perfect chewy texture. They’re kind of like an extra thick cookie bar, and they’re simple to make! They’re great for bake sales, potlucks, or anywhere you need a dessert that holds up well and still tastes delicious for several days after its made.
Every time I make something with brown butter, I feel like I’m in on a secret.
Brown butter just makes everything SO good. The flavor and aroma are out of this world, and it takes any dessert up several notches with very little effort.
Though the ingredients for this blondie recipe are simple, the brown butter gives them that quality where you take a bite and think, what IS that?!
You know, when you get a gloriously delicious flavor and can’t quite put your finger on what it is, until you realize it has the nutty aroma and flavor that can only be from butter whose milk solids have been caramelized to perfection. Swoon.
What You’ll Love About This Recipe
- Unbelievably delicious flavor – The brown butter makes the aroma and flavor of these blondies sing.
- Uses ingredients you probably have on hand – There are no unusual ingredients here, just the usual baking staples like flour, sugar, eggs, vanilla, etc.
- No chilling – You won’t have to wait for the dough to chill before baking or anything like that.
- Makeahead friendly – If you need a dessert that keeps well, this blondie dessert is a great choice because it won’t dry out or lose its chewy texture easily.

What Is a Blondie?
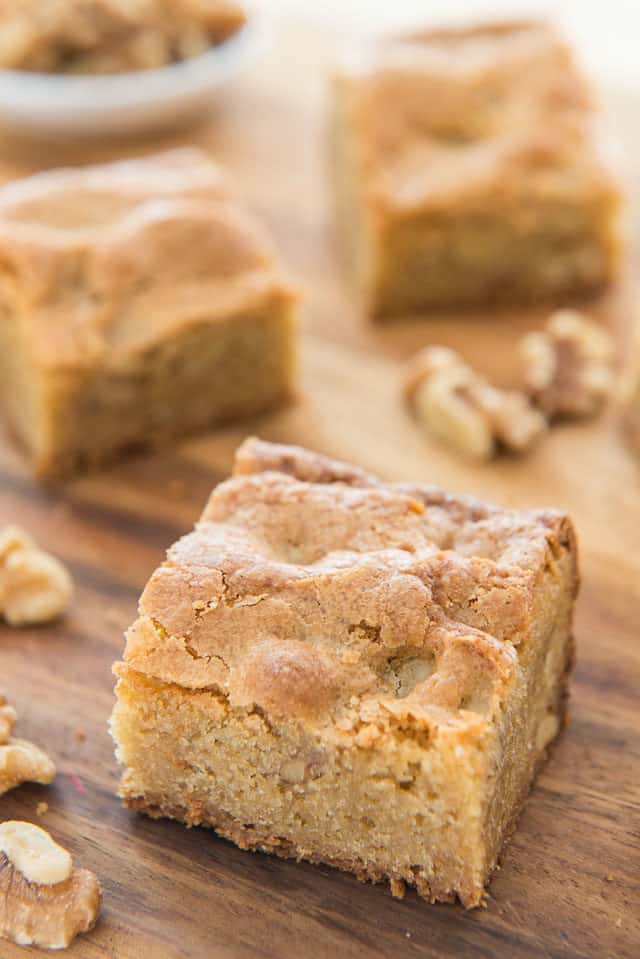
I like to think of it as a brownie without the chocolate. They have a very similar texture, with a great chewiness and rich bite, but with a completely different flavor. They are very sweet, and you get notes of brown sugar and butter…and in this case, brown butter!
Some call them blonde brownies, and they also remind me of an extra thick cookie bar. Add some milk chocolate chips to make these like extra thick brown butter chocolate chip cookies.
(Side note: if you need a chocolate brownie fix, see Irish Cream Brownies with Caramelized White Chocolate Buttercream, or these fudgy Coconut Oil Brownies).
Tips for the Best Results
Use light brown sugar – In my recipe testing, I found light brown sugar to best balance having a rich flavor while also optimizing texture. Dark brown sugar will substitute fine here, but make sure you don’t use only granulated sugar.
Brown the butter – Technically you could get away with just melting the butter, but you’d be missing out on the glorious experience of brown butter. It only takes a few minutes extra.
Do not overmix – You hear this again and again with baking, and it’s because mixing develops gluten in the flour and can make your end result tougher. Once the flour has disappeared, do not stir anymore. When adding mix-ins like walnuts, I actually add them just before the flour has been mixed in.
Step-by-Step Overview:
First we need to brown the butter, which only takes about 5 minutes. Start by melting unsalted butter over medium heat in a small saucepan:
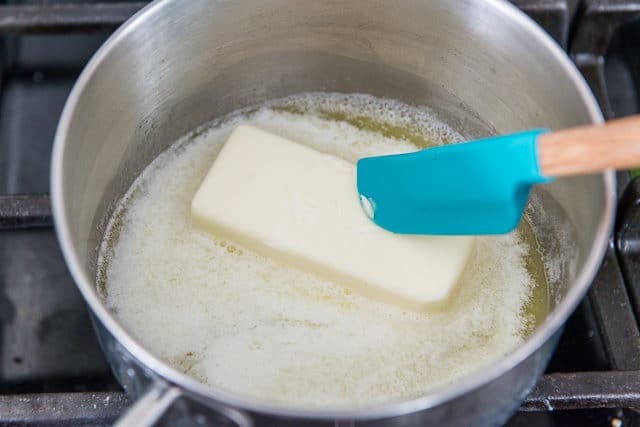
After the butter melts, it will foam like crazy, then start to subside:
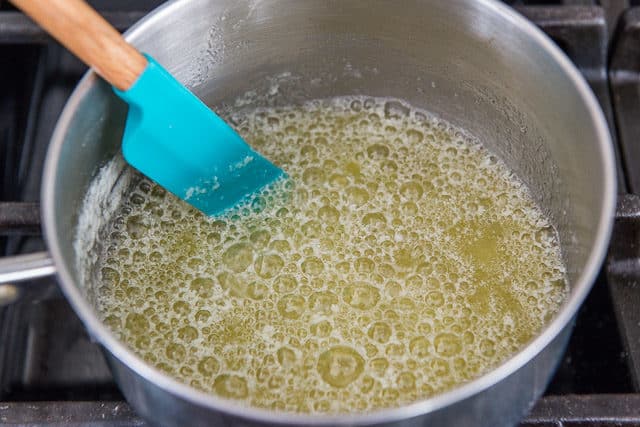
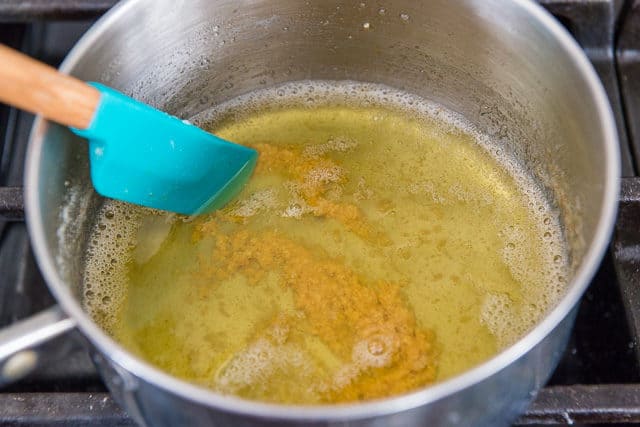
And a couple minutes later, the foam will be mostly gone, and you’ll see clumps of brown bits in the bottom of the pan.
Those are the caramelized milk solids that make for brown butter, and give you that amazing nutty flavor. Make sure to stir well and scrape those bits off the bottom of the pan as needed, using a rubber spatula.
Pour the brown butter into a large mixing bowl, and add brown sugar and granulated sugar:

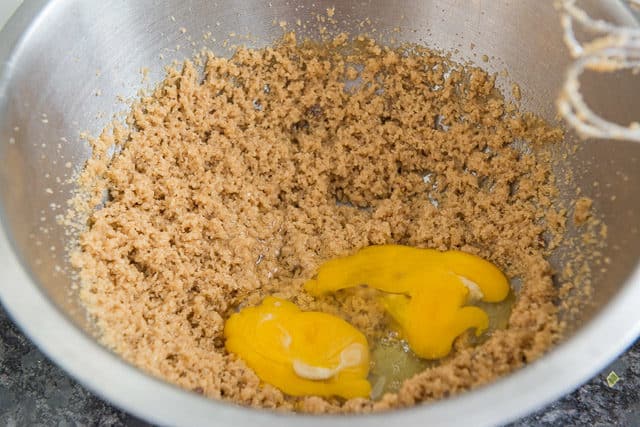
Beat the butter and sugars together with a hand mixer until combined, then add two eggs:
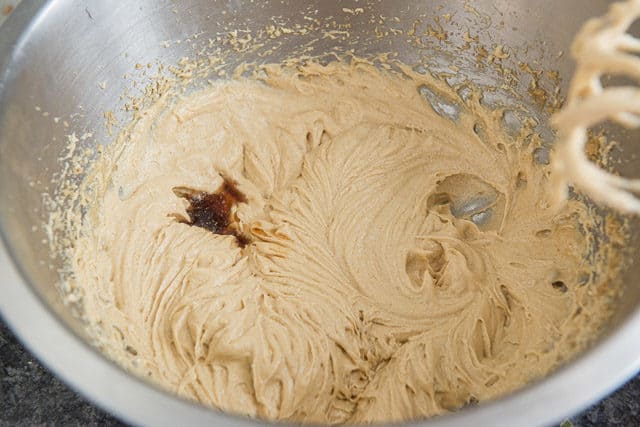
Beat it together until the mixture turns creamy and light in color, then add vanilla extract:
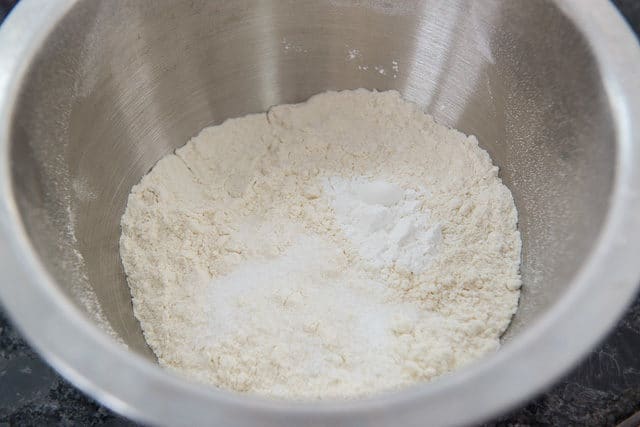
For the dry ingredients, combine all purpose flour, baking powder, and salt in a medium bowl:
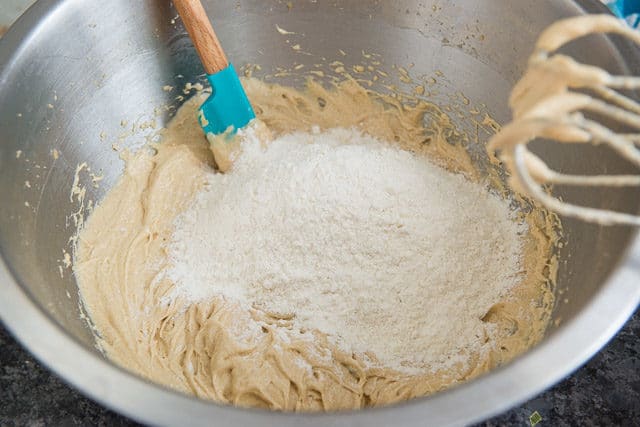
Whisk to combine the dry ingredients, then add the flour mixture to the wet ingredients:
When the flour has almost disappeared into the wet ingredients, stop and add some chopped walnuts to the blondie batter:

Other Ideas for Mix-Ins:
In times past, I would make these chewy brown butter blondies with toffee bits mixed in, but I now make them with chopped walnuts. Something about the walnuts plays so well with the brown butter, and balances out the sweetness of the blondies. But if you are feeling toffee, then try my Toffee Bars!
You can mix in whatever you like here. You can try dark or white chocolate chips, hazelnuts, almonds, or pieces of your favorite candy bar. Or maybe you decide that the best blondie recipe is one that is plain, without any mix-ins. Personally I like plain best, with chocolate chip blondies as a runner-up.
While you can leave the nuts out, even a family member of mine who doesn’t like nuts admitted that they’re really good here. I suggest trying the walnuts.
Finish mixing the walnuts in (I do it by hand, so I don’t overstir), then spread the batter out into an 8×8 dish:
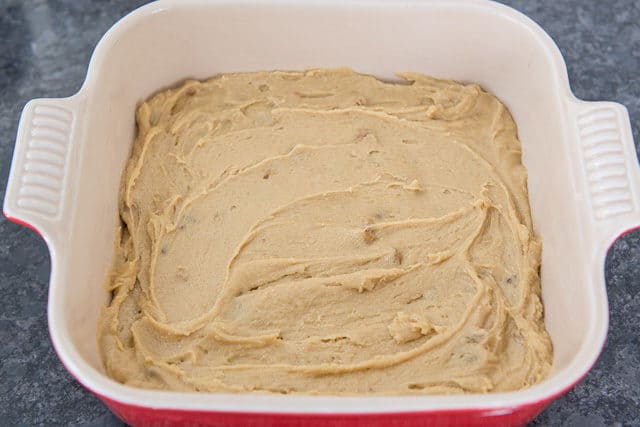
I have a square of parchment paper down in the bottom for easy removal of the brown butter blondies later (I know you can’t see it because of the batter on top, but it’s there)!
Bake the blondies for about 35-40 minutes until golden brown with crispy edges. A toothpick inserted into the center should come out clean.
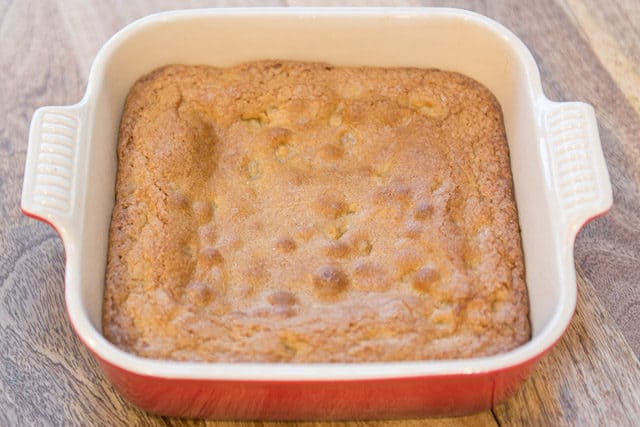
I wait several hours, and sometimes even overnight, before cutting them, so they cut cleanly.
Though technically you can eat them as soon as they come out of the oven, I think they taste best once they’ve cooled well, at least a few hours. That way you can really taste their toffee-like flavor.
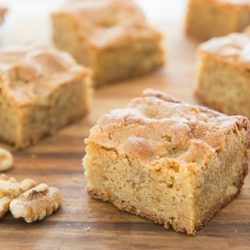
They taste fantastic the next day too.
The brown butter blondies freeze well and are great for bake sales, potlucks, or whenever you need a dessert that travels nicely. Enjoy!
For more of my favorite baked bars, I recommend these Cookie Dough Cheesecake Bars and Chocolate Peanut Butter Marshmallow Squares.
How to Serve:
These are great served as is, but you can also jazz them up with a scoop of Homemade Vanilla Ice Cream Without An Ice Cream Machine and a drizzle of Caramel Sauce.
Recipe FAQ and Tips:
Yes, they freeze beautifully for 2 months! Make sure they’re sealed in a bag or airtight container so they don’t dry out.
About 3 days at room temperature before the flavor starts to deteriorate and they dry out, or you can freeze for 2 months.
They’re definitely similar in terms of texture, though the flavor is very different. Some people call these blonde brownies, but they’re more like a thick cookie bar.
Let the blondies cool for at least 4 hours, so the crumb has time to set. Then cut with a sharp knife.
Yes, bake in a 9×13 dish, but know that you will likely need to extend the baking time by 10-15 minutes.
Tried this recipe? Leave a rating and comment below — I’d love to hear how it turned out! Or, follow me on Facebook, Instagram or Pinterest!
Brown Butter Blondies
Ingredients
- 1/2 cup unsalted butter
- 5 oz all-purpose flour by weight (1 cup measured)
- 3/4 tsp baking powder
- 3/4 tsp salt
- 8 oz light brown sugar by weight (1 cup packed if measured)
- 1/4 cup granulated sugar
- 2 large eggs
- 1 tsp vanilla extract
- 3/4 cup chopped walnuts
Instructions
- Preheat the oven to 350 degrees F. Line the bottom of an 8×8 baking dish with parchment paper.
- Make the brown butter: In a small pan set over medium heat, melt the butter and cook until it turns brown and smells nutty, about 5 minutes. Try not to walk away from the butter, as it can go from brown to burned very quickly. Pour the brown butter into a large mixing bowl and let it cool slightly.
- Whisk together the flour, baking powder, and salt to combine.
- Add both sugars to the brown butter, and mix on medium speed with a hand mixer until well combined, about 2 minutes. Add the eggs and beat for another 2 minutes, until the mixture has lightened in color. Add the vanilla, and beat for 30 seconds.
- With the mixer on low, slowly add the flour mixture, and stop mixing right before the flour disappears.
- Add the chopped walnuts, then finish stirring by hand with a spatula, just until the flour is fully mixed in.
- Pour the mixture into the prepared pan and bake for about 35-40 minutes, until a toothpick inserted into the center comes out clean. Cool on a wire rack, and cut into squares. Enjoy!
Notes
Nutrition
Nutrition is estimated using a food database and is only intended to be used as a guideline for informational purposes.
This post was updated with new photos, writing, and a recipe change. It was originally published in April 2011. The recipe change was swapping walnuts in for toffee bits.
140 Comments on “Brown Butter Blondies”
Oh My!!! These are so yummy and the perfect amount of chewiness. I did not have un-salted butter on hand, so used the salted and just cut down a little bit on the salt. I will definitely be making these again.
What can you substitute for brown sugar
Hi can I add white chopped chocolate pieces instead of walnuts thanks
Can dark brown sugar be used instead of light brown sugar? Do the blondies cook up okay if I add chocolate chips?
I want to it to be a little cakey but still chewy, what should I do?
Just bake it for longer and if the tops are starting to burn, then cover it with foil.
I am sorry, but my family wanted me to write a review. I followed the recipe, exactly, and the end result was not enjoyable.
Absolutely AMAZING. I’m sure that waiting would improve their texture, but honestly they’re incredible right out of the oven. Foolproof recipe–I also tossed some toffee in for extra buttery flavor and it was great. Make these!
These are amazing! I think I prefer them to regular brownies! I urge everyone to try these!
These were delicious!!!! Thank you for the recipe!
Hey
I tried your recipe a few times but mine never rose like the picture 🙁
I bake pretty often and followed the directions
Help! It taste great but with it fluffed up after baking
Hi, I make these often too. Is it possible your leavening is old? Not sure what else could be the issue. Unless the eggs aren’t whipped enough?
i made this with no baking powder because i was out, and made a mixture of powdered sugar and brown sugar for the granulated sugar because i was also out of that. i also had no sticks of butter, so i used land o lakes run of butter with canola. i baked for about half the time. they were still SO GOOD.
Thank you for this recipe! Can I double and bake in a 9 x 13 pan?
That should work!
Soooo good and easy!!!
I totally didn’t bake these, eat half the pan before 4 hours of cooling were even up, and have my family rave about them and finish them by the next morning
only one word to describe these blondies – perfect! thanks for sharing 🙏
The best! I hate baking, and always feel overwhelmed by the whole process. These are just as easy as buying a box and taste so so much better. This is a gem of a find! Thank you!!!!