Cinnamon Raisin Bread
This Cinnamon Raisin Bread is one of the simplest breads you can make at home from scratch, and it’s loaded with wonderful cinnamon flavor and juicy raisins. It’s completely free of preservatives and dough conditioners, and is wonderful simply sliced or toasted with butter.
Homemade bread takes a bit of work and time, but to me it’s always worth it. I’d rather make my own instead of buying one of those 3-week shelf stable loaves that has 50 unpronounceable ingredients instead of 5.
What I do to make things easier is have a “bread baking day” from time to time where I’ll bake several different loaves at once, then store them in the freezer. It lasts me quite a while.
To those who read my Apple Pie Panini post, this is my recipe for Homemade Cinnamon Swirl Raisin Bread that I used for the sandwich. This cinnamon raisin bread is adapted from my plain sandwich bread post.
If you’re not a fan of raisins, feel free to leave them out and simply enjoy the cinnamon sugar swirl. It won’t affect the baking results at all!
What’s really nice about this cinnamon raisin bread recipe is there’s not a lot of special requirements. We’ll use all-purpose flour instead of bread flour, and other ingredients that are probably already in your pantry.
Tips for Best Results
Resist the urge to add more flour – The more flour you add, the denser your cinnamon raisin bread will be. This is true of all bread. The dough here will be slightly sticky, but this is what gives us a lighter crumb, so be mindful about adding more flour.
Don’t rush the initial rise – You will need about an hour for the dough to double in size, but if your kitchen is cool, it could potentially need two hours. Be patient. This is the time the yeast needs to put the gas bubbles in the dough, which helps the end result be lighter rather than denser.
Get the good cinnamon – Ground cinnamon varies hugely in quality and potency, and ideally you want a good quality Ceylon cinnamon for this so the aroma and flavor really sing. My absolute favorite is King Arthur Flour’s Vietnamese cinnamon.
Step by Step Overview:
Start by stirring together warm milk, butter, yeast, and a little honey, and let it sit for 10 minutes until foamy:

Instant yeast is preferred, but you may also use active dry yeast if that’s all you have.
Also, I prefer honey for its flavor, and I love its qualities for bread. However, you may also substitute white sugar or maple syrup instead.
Combine this liquid with all-purpose flour, eggs, salt, and raisins in the bowl of a stand mixer, and knead with the dough hook attachment for 10 minutes:

Go Fancy with the Raisins
This recipe works great with the standard, smaller raisins that you find at any grocery store. However, feel free to go fancy with the raisins if you’d like! You can try a medley, use jumbo golden or flame raisins, or whatever variety you prefer. Trader Joe’s has some great choices.
Let this soft, sticky dough double in size, covered, and ideally in a warm place. This doubling should take an hour or two (and if your kitchen is as cold as mine is right now, it will take two)!

I also do this right in the stand mixer bowl, instead of transferring to a greased bowl.
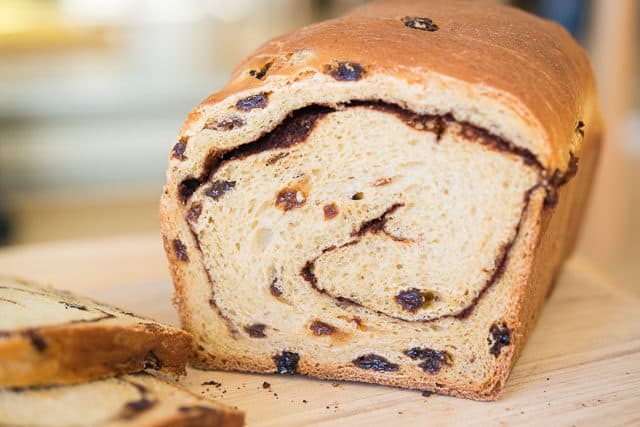
Once the dough has risen, it should look stretchy and strand-like, like this:

Remove the dough and stretch it out into a rectangle on a lightly floured surface, trying to add as little flour as possible:

Make the cinnamon filling by mixing together melted butter, brown sugar, and tons of good cinnamon:

Spread the cinnamon filling all over the rectangle, then tightly roll it up:

Pinch the seam shut at the end, then place the dough roll in a standard 9×5 butter greased loaf pan:

Cover the pan with plastic wrap and let the dough rise for about an hour, until it rises above the top of the pan:

Into the oven it goes until it comes out a deep golden brown on the top:

If at any point the top of the bread starts to look too golden, you can either cover it with aluminum foil or parchment paper, or move it down to a lower rack.
If you have a thermometer, check that the internal temperature is at least 190F. It’s fully baked when it’s between 190 and 200 degrees F.
After baking, let the bread cool completely on a wire rack before slicing it. If you slice into it too early, the bread will not cut as cleanly, and it may be gummier than it should be on the inside. The cooling stage is an essential part of the process.
How to Serve
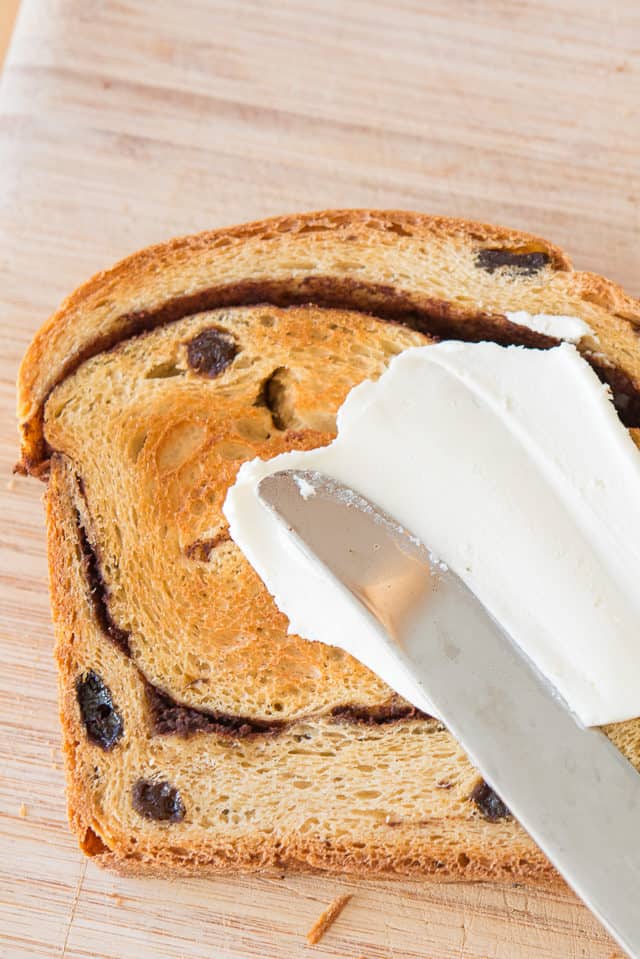
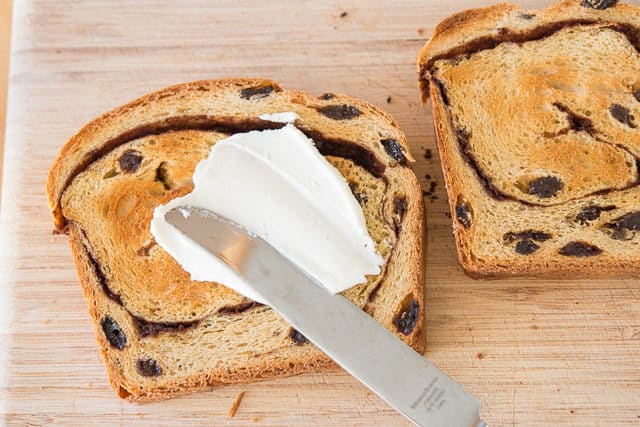
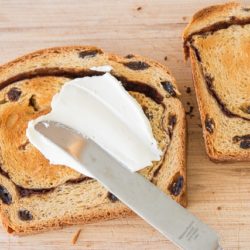
Once your delicious cinnamon raisin bread has cooled, you can slice it up and eat it toasted with salted butter, which is such a nice contrast to the sweet raisins and cinnamon. Or make this glorious Apple Pie Panini with it. When I have it, I like spreading it with Homemade Orange Honey Butter.
You may also use this bread for Bread Pudding, Bananas Foster French Toast, or sandwiches.
Pumpkin Chocolate Chip Bread, Homemade English Muffins, Homemade Cornbread, and Pumpkin Muffins are a few of my other favorite recipes to bake. Enjoy!
Recipe Tips and FAQ
Keep in an airtight container at room temperature for up to 2 days, in the fridge for 10 days, or in the freezer for 3 months.
Store in an airtight container for up to 3 months. To thaw, leave in the fridge overnight, or on the counter for 1 to 2 hours.
The toaster is best, cut in slices. However, you may also re-warm the whole loaf in a 300F oven for about 10 minutes, until warmed through.
Certainly not all of it, though you may be able to get away with swapping out half of the all-purpose for whole wheat. Expect the crumb to be much denser. You cannot develop as much gluten with whole wheat flour, so it’s not recommended.
Tried this recipe? Leave a rating and comment below — I’d love to hear how it turned out! Or, follow me on Facebook, Instagram or Pinterest!
Cinnamon Raisin Bread
Ingredients
For the dough:
- 1 cup whole milk
- 4 tbsp unsalted butter melted
- 3 tbsp honey
- 2.25 tsp instant or quick rise yeast (you may also use active dry)
- 17.5 ounces by weight all-purpose flour (3.5 cups, measured)*
- 1 tsp salt
- 2 eggs
- 1/2 cup raisins**
- butter for greasing the pan
For the cinnamon filling:
- 1/4 cup brown sugar
- 2 tbsp ground cinnamon***
- 2 tbsp unsalted butter melted
- 1/8 tsp salt
Instructions
- Combine the milk, melted butter, and honey in a microwave safe glass.
- Heat the liquid in the microwave**** to 110 to 115 degrees F, then stir in the yeast. Let this mixture sit for 10 minutes, until foamy.
- Pour the yeast liquid into the bowl of a stand mixer, and add the flour, salt, eggs, and raisins.
- Stir it around with a wooden spoon or the dough hook of the mixer until roughly combined.
- Fit the stand mixer with the dough hook, and knead for 10 minutes on medium low speed.
- Cover the dough bowl with plastic wrap and let the dough rise for one to two hours, until doubled in size.
- Lightly flour your countertop and spread the dough into a rectangle that is the length of your loaf pan (I use a standard 9x5inch pan). It doesn't have to be perfect.
- Make the cinnamon filling by stirring together the brown sugar, cinnamon, butter, and salt.
- Spread this mixture all over the top of the dough rectangle, then roll the dough up like a cinnamon roll, and pinch the seam shut.
- Grease a 9×5 loaf pan with butter, and place the bread roll seam side down into the pan.
- Cover the loaf with plastic wrap and let it rise for 60 minutes, until the dough has risen past the top of the loaf pan.
- Preheat the oven to 375 degrees F, and place a sheet pan on the lowest shelf of the oven. Add enough boiling water to cover the bottom of the sheet pan, then bake the bread on the shelf above the water for 40-50 minutes until the inside registers 190 to 200 degrees on an instant read thermometer.
- Let the bread cool completely on a wire rack before slicing it. Enjoy!
- Storing: since there are no preservatives, the bread will only keep for a few days at room temperature. I recommend freezing any unused bread.
Notes
Nutrition
Nutrition is estimated using a food database and is only intended to be used as a guideline for informational purposes.
Post updated in September 2018. Originally published November 2013.
167 Comments on “Cinnamon Raisin Bread”
My husband loves thick sliced cinnamon bread and Trader Joe’s stopped carrying it and couldn’t find anywhere else so decided to make it. Your recipe was great. I started late , so after the second rise covered it and refrigerated overnight. Took out in morning and left out for an hour before baking. I also cut the dough down the center and twisted it before placing in the 5 x 9 pan. It was delicious. Thank you
Bread is in the oven as I speak! It is HUGE! Next time I make it, I will be splitting into 2 loaves! Cannot wait to try it. I added a little cinnamon to the dough itself, and added more raisins as I was rolling it up, (my husband and son love raisins). Also, it’s looking very brown on top, so I tented with parchment, hopefully this will be enough to prevent it from burning. Cannot wait to try it, the smell is amazing!!
Very good raisin bread. Directions are easy to follow and provide helpful hints. I give baskets of baked goodies to my children and grandchildren for the holidays . This raisin bread will be a nice addition to these baskets.
That is such a fun gift! i hope they all enjoy!
Yummy
I’m a little confused at the 2.25 tsp instant or quick rise yeast. Is it supposed to be 2.5 tsp’s?
1 packet of yeast will typically come with 2.25 tsp of yeast or 2 1/4 tsp. Hope that helps!
I have been making sourdough cinnamon bread for years now and I have two tips:
1. You don’t need to proof instant yeast they way you do active yeast so you can simply add it to the dry ingredients.
2. To avoid gaps in the bread, leave a bare strip on one short end and use one egg beaten together with a Tablespoon of water for the wash over your dough. Roll up snugly from the end with the filling.
The yeast really makes a difference. Make sure the yeast/milk/butter are frothy in the very beginning otherwise the bread will not come out perfectly, it will be dense. I thought the honey and butter add such a nice flavor to this bread. Use a large bread pan or split the dough into 2 smaller pans.
Can you confirm that flour weight is correct? 17.5 ounces is 496 grams which is way more than 3.5 cups. I only follow recipes that list ingredients by weight so I want to be sure…this seems like way too much flour for only one cup of milk (if it really is 17.5… but at 3.5 cups that is more like 14 ounces). Looks great though!!! Thank you!
The measurement I use of 5 ounces per cup is where I typically land, it’s also the standard for America’s Test Kitchen (https://www.americastestkitchen.com/cooksillustrated/how_tos/6573-measuring-flour), so yes the 17.5oz would be 3.5 cups. It really does seem it can vary by person measuring and/or brand used, but I am going by weight here as well typically. Hope that helps.
Hi Joanne, it’s my second time making this wonderful raisin bread recipe. However, I have to ask about the dough hook the 10 minutes seems like an awful long time in a KitchenAid mixer and the dough was climbing the hook which means it was ready to come out but it never really made a ball in the mixer. Am I doing something wrong? The finished product was really good. I found the cinnamon spirals separated a little. I’m wondering if egg wash before putting the cinnamon mixture in and rolling, it would help stop that separation thank you. Hope to hear from you soon Mike.
Oh I just saw you have a second comment here. If you feel like you can build enough dough strength in less than 10 minutes, that’s okay to do less, but you’ll need to make that judgment calls. The windowpane test can be a good guide. For the cinnamon spirals separating, I assume you mean when you’re slicing/toasting? Do you feel you are rolling fairly tightly? That’s not a bad idea on the egg wash, I have not tried that myself though.
Hi Joanne, first time making your cinnamon bread and also first time I have use a stand mixer and dough hook. Not really sure why it didn’t form into a ball on the door hook and started climbing the dough hook. I am new to baking bread as well. Any advice and the speed I put on was between two and four on a KitchenAid mixer, waiting for it to do its first rise at the moment. Thanks.
Hi Mike, if I am reading your comment correctly, you were concerned that the dough was going up the hook? That is normal to some degree, you may have to scrape it down from time to time. How did the rest of the recipe go?
I had several issues with this recipe. There is not enough flour- my bread was practically wet. But the crust was very dry- even having the water tray in the oven. Raisins should be rolled in with the cinnamon mixture. The raisins on the outside of the bread just burn.
Amazing recipe. It turned out wonderfully and was absolutely delicious. The bread was a huge hit in my house and I’m definitely going to be making it again!
This was good, but, as many others have said, it should be for 2 loafs!! Next time, I’ll split this into 2 loave pans and definitely add more cinnamon/sugar. BTW, I used coconut sugar to cut down on the glycemic index.
Thanks!
This is my second time making this bread, and it will definitely be one that we keep in our recipe book. The first time I made the bread, I followed the recipe exactly; however, I agree with some of the other comments that the bread is HUGE. The second time I made it I did x1.5 of the recipe and made two loaves. The x1.5 recipe made two perfect sized loaves (and the slices now fit in my standard toaster!). I also doubled the raisins and cinnamon mixture as I like my bread a little more rich. The only issue I have is that the bread tends to separate at the cinnamon mixture when you cut into it, but I’ve had the same issue with other cinnamon swirl breads too… maybe its just me :).
can you use almond milk?
I loved this! Thank you so much for sharing this recipe. I have made two loaves so far, and the directions guided me through the process well. Next time, I am going to try heating the butter/cinnamon/brown sugar mixture to make it more spreadable. In a cold kitchen, I think the dry ingredients stiffen it up a little. Both times. the loaves have come out much taller than the pan, but no matter, the color, taste and texture of the bread are wonderful.
The only thing I would change about the directions is that in step #7, the width of the rectangle should be the approximate length of the pan, and stretch the dough out as long as possible to allow the most turns of the cinnamon swirl.