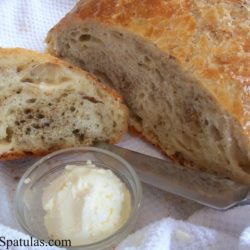
Parmesan Peppercorn Bread
This Parmesan Peppercorn Bread is simple enough for cooks of all levels to make, and the pairing of nutty parmesan cheese and sharp peppercorns is lovely! Slather it with butter or serve with a fresh Tomato Burrata Salad.

Parmesan Peppercorn Bread: no fancy machinery required. I specifically designed this recipe so you can make it by hand. Every Christmas my dad orders goodies from different food catalogs, and he always ordered Parmesan Pepper Bread and Chocolate Cherry Bread from a famous bakery in Ann Arbor, Michigan named Zingerman’s. If you want some of this Parmesan Peppercorn Bread shipped to you, you have to shell out $28. $28 for a loaf of bread?!?!? Ouch. It was time to try to make my own parmesan peppercorn bread, and it turned out BEAUTIFULLY. The parmigiano reggiano is so sharp and savory sweet, while the peppercorn has a slight heat to it.

Make the shaggy mass of dough:

Cover with plastic wrap and let it rest for two hours.
Break up a block of parmesan cheese into chunks:

Knead the parmesan chunks into the bread, keeping your hands wet at all times so the dough doesn’t stick to you. Let it rise for an hour (this is the final rise).

Bake, and enjoy!
For more parmesan recipes, try Garlic Parmesan Wings, Crispy Parmesan Crusted Chicken, and Creamy Parmesan Chicken.
Parmesan Peppercorn Bread
Ingredients
- 3 cups bread flour (15 oz by weight)
- 1/2 tsp active dry yeast
- 1 tsp sea salt
- 1.5 cups warm water
- 2 tbsp extra virgin olive oil if you want a crustier bread, leave the EVOO out, but I find it adds a nice flavor/aroma and I like what it does for the crust
- 1.5 tbsp freshly cracked black pepper
- 4 oz Parmesan cheese try to use authentic parmigiano reggiano
Instructions
- Stir the flour, yeast, salt, water, pepper, and olive oil together in a large bowl until well combined. It should look sort of shaggy smooth. Cover with plastic wrap and let it rest for two hours.
- Flour your countertop with 1 tbsp flour, turn the dough out, and sprinkle the top with another tbsp of flour. Knead for 2 minutes by hand (after that it will start to get too sticky, and we don’t want to add too much flour to the dough, since it will change the identity of the bread). Place the dough back into the bowl, and let it rest for another hour, again covered with plastic.
- Break the Parmesan up into little pieces. Knead the parmesan chunks into the bread, keeping your hands wet at all times so the dough doesn’t stick to you (before we used flour to prevent sticking, and now we’re using water. You see? Keeping things in balance). Knead the dough enough to distribute the parmesan evenly, about 2 minutes. Let it rise for an hour (this is the final rise).
You can bake your bread one of two ways:
- Method 1: 20 minutes before baking, preheat your oven to 450 degrees F. Stick a dutch oven in the oven to heat up (I just used a heavy bottomed stockpot since I don’t have a dutch oven). Once the oven reaches 450, place your dough into the pot, cover with a lid, and bake for 30 minutes. Take the lid off, and bake for 15 more minutes, until the bread reaches 200 degrees F on an instant read thermometer. Cool on a wire rack.
- Method 2: Preheat your oven to 425 degrees F. Put a sheet pan filled with boiling water on the bottom shelf of your oven, and spray the walls of your oven with water. Bake your bread on a sheet pan for 20-25 minutes, until the bread reaches 200 degrees F. Cool on a wire rack, and slather with salted whipped butter.
Nutrition
Nutrition is estimated using a food database and is only intended to be used as a guideline for informational purposes.
37 Comments on “Parmesan Peppercorn Bread”
Just a question about the knead w/ the watered hands: my dough went from very nice firm to mushy and sticky when I watered my hands. Wonder if I could just do this knead w/ a kitchen aid blender w/ a hook to avoid that? Also was difficult getting the parmesan to distribute evenly. Thinking the kitchen aid w/ hook would help with that also. I’ll give that a go next time and see what happens.
Yes, feel free to use your kitchen aid mixer next time instead. A lot of people don’t have mixers, but if you’ve got one, it makes everything a lot easier.
This recipe was pretty good for not being a sour dough like the original Zingerman’s parmesan peppercorn bread! I personally like it spicier so i put in 2 tablespoons of peppercorn but what I really felt that this recipe lacked was more parmesan flavor throughout the whole loaf. I used this recipe again and added another 3/4 cup of shredded parmesan in addition to the parmesan chunks and it tasted soooooooo much better. This is a great recipe if you don’t have time to tend to a sour dough starter!
Great instructions and recipe, except 1.5 tbsp of ground peppercorn was way too much pepper. My bread looked like a lemon poppyseed loaf and left your mouth on fire after the first bite. Did you mean 1.5 tsp of ground peppercorn?
I used to order this bread for my coffee shop from a bakeshop run by a guy who was a manager for Zingerman’s in Ann Arbor. It was originally made with corn meal and white flour. The bread was a corn meal bread with Parmesan and black peppercorns, and just enough bread flour to hold it all together. He made the chocolate cherry, too.
An additional note (aside from the photo) about the wet/non-wetness of each stage would help. My dough seemed very wet and I had trouble kneading it without adding flour in stages. When you reach the third rise, you’re required to used wet hands to knead it but it was the opposite of what I had to do. I had to constantly flour my hands to manage kneading in the cheese. Something’s a bit off.
The bread is delicious but I didn’t get the rise that you got. My dough was quite wet but I was leary about adding more flour because of what the recipe said. Any advice?
Hi Jodie, which baking method did you choose? Maybe if you tried putting the bread closer to the floor of the oven (lowest rack) you would get a better rise.
Hi Joanne, this was a hit. I’ve never left a comment on a blog before but just wanted to tell you how brilliant this was. Had such a happy time kneading, left it overnight (cold Melbourne winter days) and did the parmesan turn in the morning. Baked it in my le crueset pot as a makeshift dutch oven then served with a hearty chicken and bean cassoulet for Sunday lunch with friends and we devoured it. I love the way you write your recipes – I’ll be adding this as a favourite. Thank you so much.
Liv, I’m so happy to hear you all loved it!!! Haha, it’s so funny to think it’s cold there, it’s so hot here (summer in Florida, hot stuff). The cassoulet sounds like a wonderful pairing too. Stay in touch Liv, and happy cooking!
This bread is amazing! It’s also really simple to make and oh, so tasty! Thanks for figuring out how to make it.
Mary, thanks for letting me know! It’s one of my favorites, and will never get old!
Joanne, is it possible to make this in the stand mixer with the dough hook? would any of the knead times change?
Hey Mallory, Yes it is definitely possible to make it in the mixer, I just didn’t in case some people don’t have one. As far as times go…just knead it until it goes to the windowpane stage (are you familiar with that?) Pull off a little piece of dough and stretch it out, and if you can sort of see through the dough, it’s been kneaded properly. I find that it takes slightly longer to knead with the stand mixer than by hand, but just keep an eye out for the windowpane stage. Let me know if you have any other questions!
thank you! i think i will try this this weekend 🙂
I finally just had to sign up to get your posts popped straight into my email because every time I come you have so much good stuff that I’ve missed. I love your “how to’s” because they make cooking so accessible. But then you add such gorgeous recipes as this! We all think you are the “bomb.com”!
YAY! Thank you =) This makes so happy. And makes blogging feel so fulfilling! I love getting people to cook from scratch! I <3 your blog too!
oh gosh… definitely making this! Tagging on delicious now!
Ok, I didn’t think I was that hungry until I got to this post and could literally smell the bread!! =)) Looks so delicious, I’ve never attempted to make bread but this recipe just might inspire me to try it. Thanks for the recipe!
If you’ve never tried making bread before, you can try my “Bread Recipe for Those Who Don’t Know How to Boil Water.” I know a four year old who made it =) It’s super easy and can help you ease into bread making, because really, it’s not difficult! It scared me at first, but it’s not hard at all. The recipe is at https://www.fifteenspatulas.com/2010/12/10/a-bread-recipe-for-those-who-dont-know-how-to-boil-water/
omigosh! This is definitely going on my lists of breads to try! That list is growing by the day of course. Do you use a glass lid? I only have stainless steel pots with glass lids, no dutch oven, and I wondered if it can withstand the heat.
Let us know which dslr you go with. Its on my wish list too, but I don’t know which one to get either.
It’s fantastic bread! I need to try making a chocolate cherry bread soon too. As far as the dutch oven goes, the reason you cook it in the dutch oven is the lid traps the steam, which makes the bread crustier (and professional bread baking ovens inject steam during the baking process). If the glass lid has a tight seal, it will probably be fine. Just make sure you check the max temperature for your pot. Also, you could go the alternate route and put a sheet pan of boiling water on the bottom of your oven and spray the walls with water to create a moist environment for your bread. Then you can bake your loaf of bread on another sheet pan, right above it.
hey Joanne, for DSLRs, both Nikon and Canon are Very Good, but if you want to take fluffy bright pictures of food I suggest Canon-their lens tend to be slightly cheaper too if you plan on eventually expanding ur collection of lenses.
If you want sharp pictures with more range/depth of color, then go with Nikon. Both won’t dissapoint you!
p.s. but I have to say, my friends who use Canon do get jealous when my nikon gets better pictures when there is less light, if that will be a decision making factor for you.
Hey Dawn, Thanks so much for the advice! Hm…it sounds like Nikon may be better? I’ve submitted a couple of my photos to Tastespotting and they say they always aren’t sharp enough! Which bugs me, because my camera just can’t take sharp photos. Sharp is good! Also, it would be great to have a better camera for low light conditions. I’m so excited to get my dSLR!
Yum. And yum again.
It’s so good…and easy. One of the best breads ever!
This looks great!! I will try it for sure!!! Love Parmesan cheese!!
Thank you! Yes, I love parmigiano reggiano…there’s a reason so many people call it the king of cheeses!