Creme Brulee
Creme Brulee is often thought of as restaurant food, but it’s actually one of the easiest desserts you can make at home, with as few as 3 simple ingredients. This classic creamy custard can be customized in many different flavors, and I also share how you can caramelize the top without a torch.
Creme brulee is one of my favorite desserts, but I only ate it when I was at a nice restaurant until I learned how easy it was to make at home. Seriously my version takes almost no effort and is such a special treat to have at home. It only takes Heavy cream, egg yolks, and sugar! come on now a 3 ingredient dessert that feels so luxurious. Get ready for a perfectly silky custard and crisp caramelized sugar topping. Did I mention its make ahead friendly?!
For the simplest option, add vanilla extract or a whole vanilla bean to the dairy. But feel free to do some longer infusions of whatever ingredient you’d like, whether it’s citrus, lavender, coffee, or more unusual flavor infusions like basil or lemongrass (don’t knock it ’til you’ve tried it).
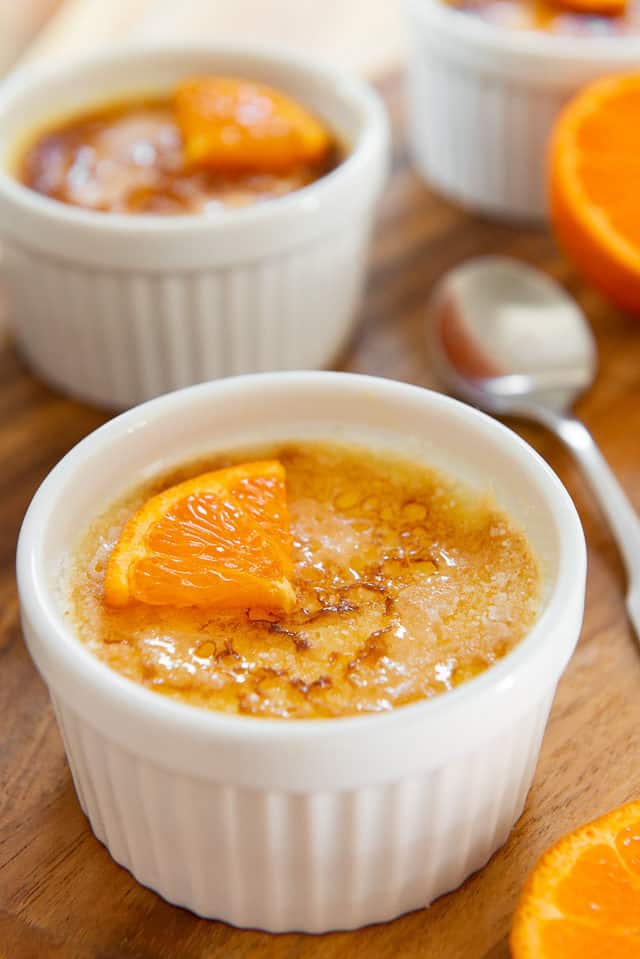
Orange Creme Brulee happens to be one of my favorite flavor infusions after dining out at a fancy restaurant called Va de Vi in the East Bay of California. Their creme brulee bursted with orange flavor, but I noticed there was no orange zest actually visible.
Tips for Best Results
Use premium heavy cream – It is astonishing how different dairy can taste among the various brands. Some dairy products have no flavor, while others have that quintessential sweet cream fatty dairy flavor. I’ve noticed that organic dairy products tend to have more flavor. This is the main ingredient so quality matters!
Only use Egg Yolks – This is what makes creme brulee rich and creamy. Its a custard base so egg whites will ruin the texture. Simply crack your eggs in a bowl and use your fingers to gently grab the egg yolks.
Bake in a water bath – It’s an extra step, but it is absolutely essential to bake the custards in a water bath in order to get the best results. The water bath keeps the temperature of the custards from rising too quickly, ensuring that you get a silky smooth texture instead of curdled eggs.
Allow plenty of time to chill – Warm creme brulee really isn’t very enjoyable. You will need to allow plenty of time for the ramekins to chill in the fridge, for the proper texture and also for the most enjoyable eating experience. This takes a minimum of 4-6 hours.
How to avoid air bubbles – after mixing and pouring your custard into the ramekins, lightly tap them on the counter, and this will release some trapped air inside. If any air bubbles stay on top you can skim the foam on top with a spoon.
Step by Step Overview:
If you’d like to infuse your creme brulee with flavorings like citrus zest or lavender, begin with this optional step.
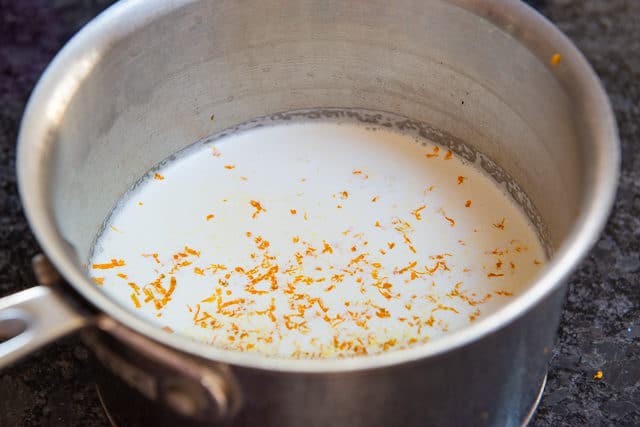
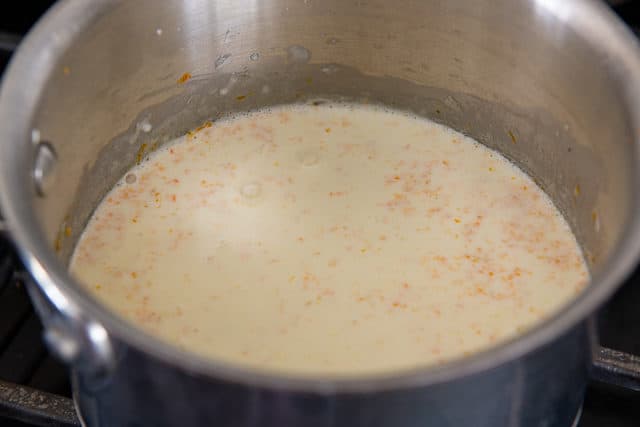
Combine heavy cream and the flavoring of choice in a small saucepan (see suggestions below), and let it sit in the fridge for 2 hours. Skip this step if you’re not doing any infusion.
Creme Brulee Flavor Ideas
There are so many creme brulee flavors you can do that are truly incredible. Because there’s a high fat content in this dessert, it really allows the flavors and aromas to bloom on the palate. Here are some of my favorite flavor ideas.
- Lemongrass – Whack a 2″ piece with a knife to bruise lightly, then steep in the cream for 2 hours.
- Lavender – Steep 1 teaspoon of dried lavender in the cream for 2 hours.
- Citrus – Instead of steeping 2 teaspoons of orange zest in the cream, you could swap in equal amounts of lemon zest, lime zest, meyer lemon zest, or grapefruit zest.
- Vanilla – Add 1 tsp vanilla extract after mixing the egg yolks and hot cream together, or scrape the insides of a vanilla bean pod into the cream and let steep for 2 hours.
- Coffee – Add 1 tsp coffee extract after mixing the egg yolks and hot cream together.
- Teas – Add 1 tea bag of earl gray, chai tea, or green tea to the cream and steep for 2 hours.
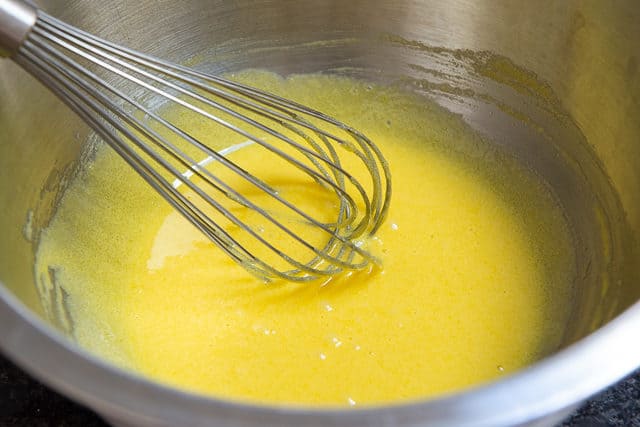
In a medium bowl, combine egg yolks with granulated sugar:
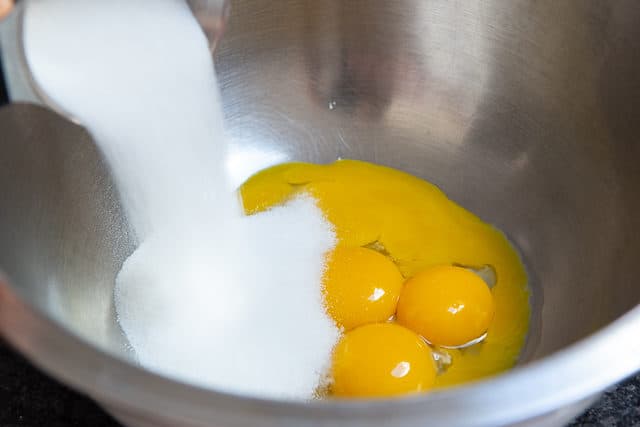
Whisk together for about 1 minute, until the two ingredients are blended well. Then, set the egg mixture aside.
Place the heavy cream in a medium saucepan over medium high heat, and cook until the mixture reaches 180F:
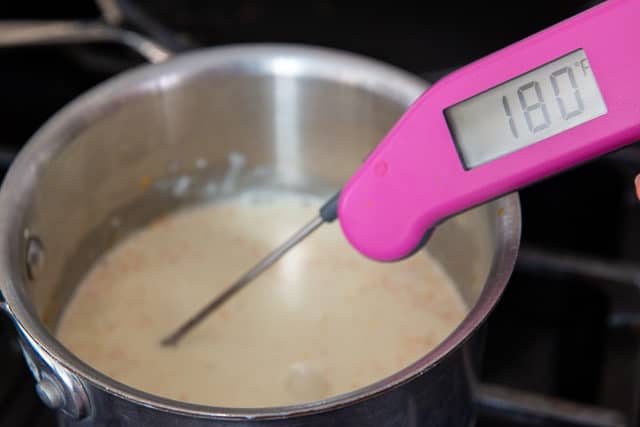
Be careful not to take it all the way to a boil. Using a thermometer (affiliate) is best, but if you don’t have one, you’ll know it’s at proper scalding temperature when bubbles are beginning to form on the side of the pan, but it’s not yet boiling:
While whisking, slowly dribble the hot cream mixture into the whisked egg yolks and sugar, over the course of about a minute:
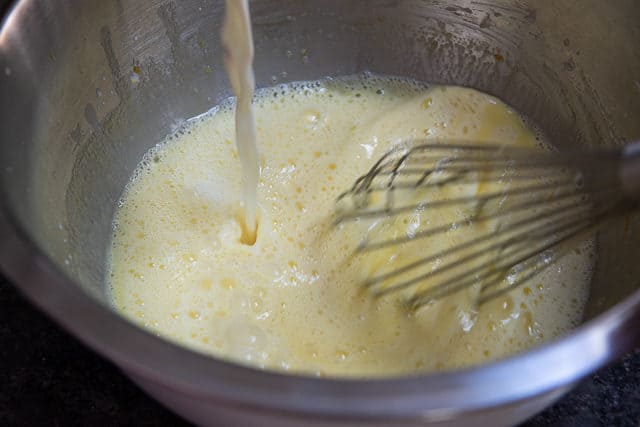
We are tempering the mixture and raising the egg temperature very slowly, so the egg doesn’t scramble and coagulate.
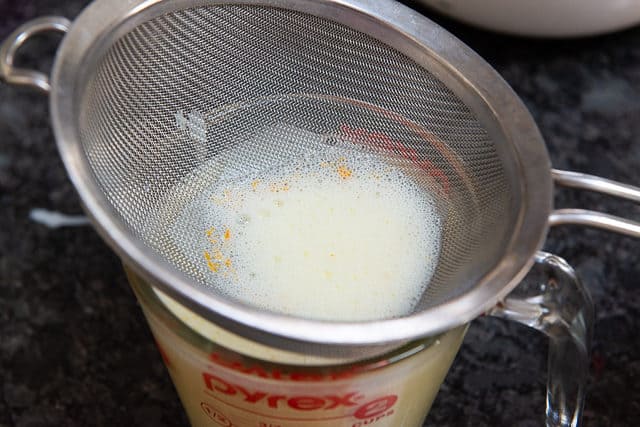
Just to be sure there are no firm egg bits (and to strain out the orange zest), pour the custard through a fine mesh strainer or sieve:
What Ramekin Sizes are Best for Creme Brulee
In this recipe, I divide the creamy vanilla custard evenly between six 4-ounce ramekins. This is the perfect size for individual portions. However, you could also do four 6-ounce ramekins. You may need an extra 5 minutes or so of baking time. The target temperature for doneness is about 165F.
You can also use the really shallow ramekins with the fluted edges, but you’ll need to check for doneness much earlier. Again, check the temperature using a thermomer if you are not comfortable judging by the jiggle.
Evenly divide the custard into six 4-ounce ramekins, then place the ramekins into a 9×13 baking dish or metal pan. Fill the larger pan with boiling water until the water comes halfway up the sides of the ramekins:
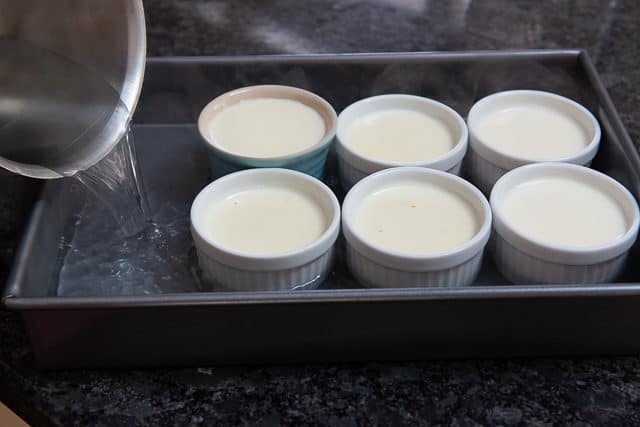
A small tip, but if you want extra protection from the ramekins sliding around, place a few layers of paper towel underneath before adding the water.
What does the water bath do?
Creme brulee is a custard, and with pretty much any custard, you want to cook it slowly, and at a fairly low temperature. Water will never get hotter than 212F, so it does a good job of ensuring that your creme brulee doesn’t overcook and turn into scrambled eggs. The hot water bath will ultimately give you the most silky smooth, creamy end result.
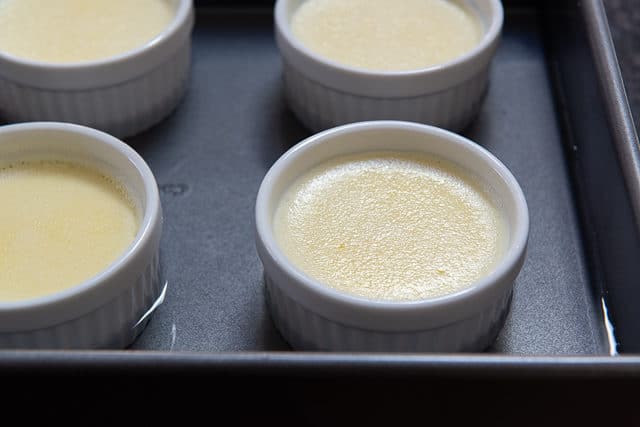
Bake the creme brulee in a 300F preheated oven for 35-40 minutes, until they only jiggle slightly when shaken, and have set:
Take the ramekins out of the water bath and let them cool to room temperature, ideally set on a wire rack. Then cover the tops with plastic wrap and chill completely in the fridge. This will take at least 4-6 hours to completely chill through to the middle.
Can you Make Creme Brulee Ahead of Time?
Yes, and I recomned it! At this point in the recipe, you can store the creme brulee in the fridge for up to 4 days, untorched. Then when you’re ready to serve, simply take the ramekins out of the fridge, add the sugar to the top, and caramelize.
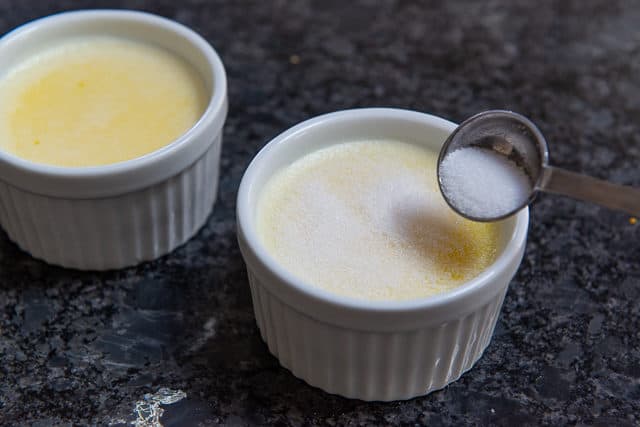
When you’re ready to torch and serve the creme brulee, add 1 teaspoon of granulated sugar to the top of the custard in each ramekin, giving it a shake side-to-side to evenly spread the granules out:
Options for Browning the Top
You have two choices for browning the sugar topping: Using a handheld kitchen torch (affiliate), or using your oven’s broiler.
While both will work, my recommendation is to use a blow torch, for a few reasons. It will give you the most even browning on top, and you won’t risk overheating the custard while you’re torching.
Oven broilers vary, and I’ve noticed with mine that by the time I get proper browning on top, the broiler has heated the creme brulee beneath, and it loses a little bit of its chill and firm texture (and becomes a bit soupy just underneath the sugar).
To get around this a little bit, you can broil the top, then put the custards back into the fridge to firm up again. Using a superfine sugar also helps.
Comparing Torched vs Broiled Tops
For a visual comparison, I browned a few of the ramekins using a torch, and a few using my oven’s broiler.
Here’s what the caramelized sugar crust looks like with the oven broiler version:
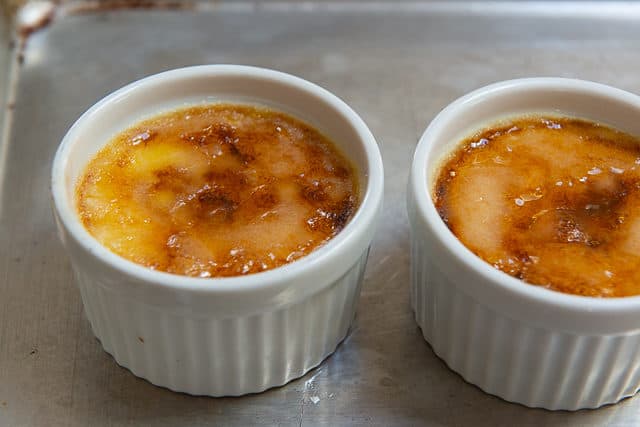
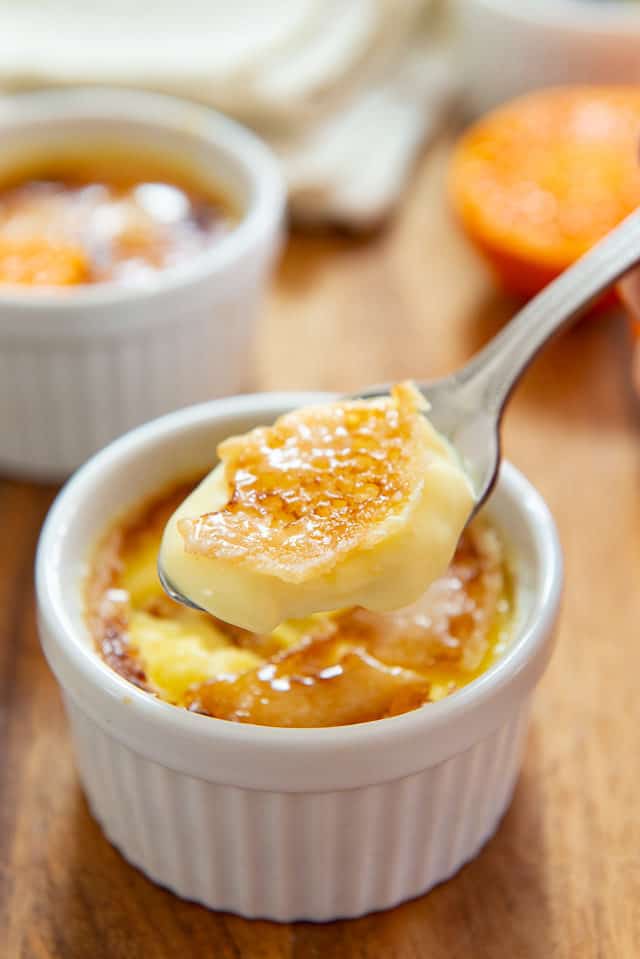
And here’s what the burnt sugar from the torched version looks like:
You can see that using a handheld torch gives you caramelization that’s a bit more even, and it also keeps the custard underneath cool so you can serve right away.
But as I said, if you use the broiler to caramelize the sugar, you can just put the custards back into the fridge to firm it up again, for about an hour. The sugar topping will stay crunchy, though keep in mind that if it sits longer than that, the topping will likely soften as humidity and moisture are absorbed from the air.
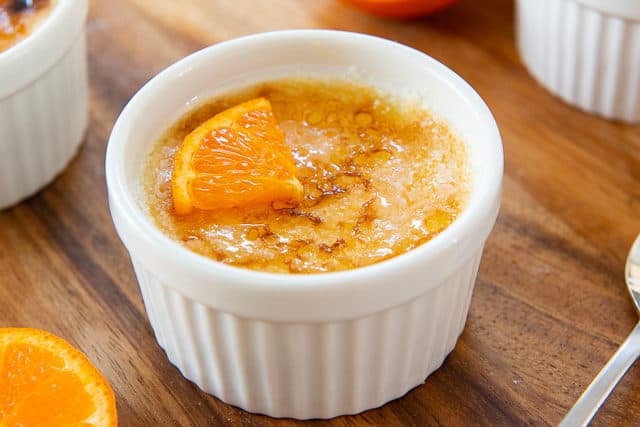
How to Serve
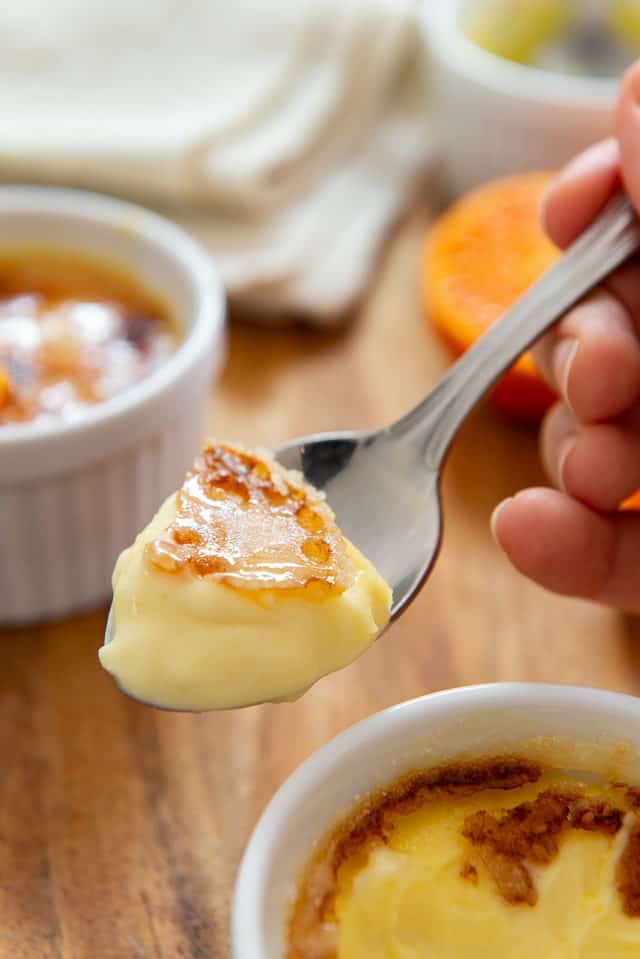
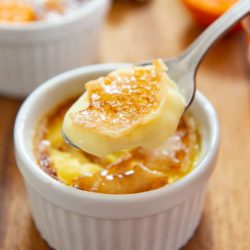
A proper crème brûlée is best enjoyed chilled, and it should have a luscious, creamy, pudding-like texture to it, with the contrasting crunch of the sugar on top. I love serving this classic French dessert for special occasions like Valentine’s day or birthdays.
This dessert certainly stands on its own, but if you’d like to pair it with a few other desserts for the table, I recommend small, relatively neutral and complementary nibbles like Candied Pecans, Shortbread Cookies, or Chocolate Covered Strawberries.
Creme Brulee, also called burnt cream, is a good gluten-free option for dessert. You can also try using a sugar-alternative to make it keto-friendly. For a really unique variation, also try Sweet Potato Creme Brulee.
Peanut Butter Cookies, Caramel Apple Crisp, and Chocolate Peanut Butter Cupcakes are a few of my other favorite desserts on the blog. Enjoy!
Recipe Tips and FAQ
Keep covered in the fridge for up to 4 days.
Yes, for up to 3 months, but know that there will likely be a bit of weeping liquid when you thaw it, and slight textural differences. To thaw, place in the refrigerator overnight.
Set the oven rack as close to the broiler as possible, and preheat the broiler to high. Then place the creme brulees on a sheet pan, and set them underneath the broiler for a minute or two, watching very closely, until the top has browned. Note that this method is not as good as using a torch, since often times oven broilers are not strong enough to quickly brown the top without melting the custard underneath too. If the custard melts, refrigerate the creme brulee for an hour to chill the filling again.
Tried this recipe? Leave a rating and comment below — I’d love to hear how it turned out! Or, follow me on Facebook, Instagram or Pinterest!
Creme Brulee Recipe
Ingredients
- zest of 4 oranges* (about 2 tsp)
- 3 cups heavy cream
- 5 large egg yolks
- 1/2 cup sugar +1 tsp for each crème brûlée
- 1 tsp vanilla extract
Instructions
- Combine the orange zest and cream in a saucepan, and let it sit in the fridge for 2 hours.
- Preheat the oven to 300 degrees F.
- Whisk together the egg yolks and 1/2 cup sugar for 1 minute, until well blended.
- Heat the orange zest cream over medium high heat until 180F, bringing it almost to a boil, but not quite. This is known as a scalding temperature. It's best to use a thermometer, but if you don't have one, you'll know the cream is hot enough when bubbles begin forming on the side, but it's not yet boiling.
- While whisking constantly, slowly dribble the hot cream into the egg yolk mixture, gradually over a minute.
- Add the vanilla extract, then pour the mixture through a sieve to strain out the orange zest and any coagulated egg.
- Pour the strained custard into six 4-ounce ramekins until nearly full (you may use other size ramekins, but you'll need to adjust bake time).
- Place the ramekins in a large baking pan and add enough boiling water to come halfway up the outsides of the ramekins.
- Bake for 35-40 minutes, until the creme brulees jiggle slightly when shaken, and have set. Take the ramekins out of the water bath and let cool to room temperature. Then cover the tops with plastic wrap and refrigerate until they firm up, 4-6 hours.
- When you’re ready to serve the creme brulee, sprinkle 1 tsp of sugar evenly on top of each one, to prepare for caramelization.
- Torch Option: Ideally, use a handheld blowtorch to quickly caramelize the tops of each creme brulee, and serve immediately. This will give you the crunchy top layer you want, while keeping the creme brulee from getting warm.
- Oven broiler option: If you don't have a torch, you can use the broiler of your oven to caramelize the top. Set the oven rack as close as possible to the broiler, and preheat to high. Place the ramekins on a sheet pan, and broil for 1-2 minutes, until the top caramelizes, making sure you keep your eye on the browning (it's easier to burn the sugar using the broiler). If your oven's broiler isn't strong enough to caramelize the sugar without heating the filling, then place the ramekins back into the fridge for an hour before serving, to re-firm the custard. Serve and enjoy!
Notes
Nutrition
Nutrition is estimated using a food database and is only intended to be used as a guideline for informational purposes.
Few desserts can beat out the luscious creaminess that is creme brulee. But give these a try;)
Rice Pudding – A fan favorite. Easy and flavorful
Peanut Butter Pie -This is a total show stopper. Everyone loves the flavor in this pie.
Panna Cotta – Rarely made at home, but surprisingly easy to do
Baklava – A huge hit on my blog, People say its the best baklava they have ever tried!
23 Comments on “Creme Brulee”
Perfectly smooth and delicious.
Thank you! One of my favorites!
I’ve made this many times. Always a hit with guests! No fail if you follow the instructions to a “t”.
Thanks Jeannelle! I love hearing when our recipes become a staple in homes!
Im trying to make this for the first time in my life and followed your recipe exactly and for some reason I can’t get it to set. It’s kinda got me bummed a bit. Help!
Can you tell me more about the ramekins you used and the pan in the oven? Any details you can share will help me troubleshoot.
I’ve got this in thr oven, this is the second time making this in two days, and I cannot get it to set 😖 not sure what I’m doing wrong. Yesterday I baked it for 40 mins, today it’s been in the oven for over 60, and it’s still like water. I don’t understand what I need to do? It tastes amazing though! 😆🤗
Do you have an instant read thermometer by chance? This would allow you to check the actual temperature.
Joanne, this is Roberta! I love this recipe and love your blog!
Wonderful until it was petroleum fluid torched.
I can always tell when food has been torched, it tastes of petroleum fluid. I grew up making & eating caramelized pudding, always in the broiler. Won’t make any difference what kind of ingredients you use if the flavor hints of petroleum fumes.
I love the idea for infusing flavors. I’ve made this before and loved how easy it is, but everyone thinks it’s so fancy.
Small side note: this is not American, it’s French. The name is #1 clue.
Yes agreed! It’s so easy but such a showstopper too, especially when flavored. Thanks for the note, I agree, definitely not American! haha. Don’t know how the wrong category got entered for the recipe box, but I just fixed it.
Hello, I really want to try your recipe, but the ingredient volumes are confusing.
It seems that, when switching from US to metric, everything converts except the egg yolks.
The US volume is 5 yolks, but the metric volume is only 1 yolk.
I’m reluctant to try the recipe because it’s not clear exactly what is intended.
Please will you advise as I’m having guests this weekend and really want to do this.
Thanks.
I pay for a recipe plugin that converts to metric, and it is not checked by me manually because I don’t have experience with metric. It’s supposed to be pretty accurate but sounds like there is an issue here. I will send it to them. If you really need metric measurements I would probably find another recipe just to be safe.
you’re right, I don’t ever think about making this at home, thank you for breaking it down into it’s simplicity and a nice walk through, the orange zest is also a nice tweak too from the original
I love Creme Brûlée and look forward to this version with the infused oranges! Lemons and lavender would be good to infuse too!
YES, I have been wanting to do a lavender infused one so badly lately! Actually, this one was supposed to be lavender, but Whole Foods didn’t have any 🙁 But the citrus was awesome too!
Hi there Joanne! This recipe looks so scrumptious. I’ll def try it out…soon. =) The photos are so pretty, good job!
Be still my heart! This looks fantastic! Creme Brulee is such a treat and yours takes it to the next level of wonderfulness!!!
mMMm, this looks amazing!!! My mouth is watering just by reading how to make it! lol
hahahaha. It was really nice. And SO delicious. Wow. We should make it together soon =) I really wanted to do a lavender infused one but Whole Foods didn’t have any 🙁