Caramel Sauce
Homemade Caramel Sauce tastes a thousand times better than any version you’d buy at the store, and is simple to make. It only takes 15 minutes! Use it for dipping apple slices, or topping ice cream sundaes, cheesecake, banoffee pie, coffee drinks like caramel macchiato, and more. No thermometer needed!
“Fresher tastes better.” It’s something we all hear over and over again about food. Well, let me tell you…it’s SOOOOO true when it comes to caramel. Here we will use only four simple ingredients: sugar, cream, butter, and optional vanilla extract.
It’s easy to pick up a jar of caramel sauce from the grocery store, but it won’t taste nearly as good as your own caramel sauce, freshly homemade from scratch. And as much of a scary reputation that it has, it’s totally doable for cooks of all levels. There are a lot of comments below from people who have had success with this easy recipe, and you don’t even need a candy thermometer to make this homemade caramel sauce!
Tips for Best Results
Use a quality heavy-bottomed pan – Cookware varies wildly in quality. If you have a thin and cheap pan, the heat will be less consistent and the caramel will be more prone to problems. Use a heavy-bottomed saucepan.
Shake the sugar flat before adding the water – Once you add liquid to the sugar, you won’t want to touch or move anything, in order to prevent crystallization. So shake the sugar flat in the pan before adding the water, so it all moistens evenly.
Don’t touch the pan! – Until you add the cream, the pan should not be touched at all once the sugar has been moistened with the water. No stirring, no swirling, no movement at all. This prevents crystallization.
How to Avoid Crystallization
If you follow the below instructions precisely, you should not have any issues with crystallization. The biggest cause of crystallization is from stirring or swirling the pan. The pan should not be touched AT ALL once the water has been added, and until the cream is added to stop the cooking.
Why does caramel crystallize? It’s almost always triggered by some kind of early agitation before the sugar has been fortified with fat, like cream and butter. First you’ll get a few crystallized sugar spots on the sides of the pan, where water evaporated and the sugar granules turned into crystals again, and this sets off a chain reaction for the entire pan.
How do you keep caramel from crystallizing? If you properly shake the sugar to flatten in the pan, then do not touch or move the pan after adding the water, crystallization should not happen. However, if for whatever reason it does, use a wet pastry brush to wash down any sugar from the walls of the pan. An alternative is to put a lid on the pan for a minute or two when you see sugar crystals forming, which will use steam/condensation from the lid to wash down the sides. Another preventative option is to use a little bit of light corn syrup (2 tablespoons) to prevent crystallization. However, a lot of people don’t like to add corn syrup and you don’t need it to make caramel. Most importantly, never stir the caramel until you’ve added the cream.
Can you fix crystallized caramel? YES! You don’t need to start over or throw it away. Add 1/4 cup of water and bring the mixture back to a boil. Heating it up with the water should re-dissolve and moisten the crystals. Then you can proceed with the recipe and start getting some color on the sugar.
Step by Step Overview:
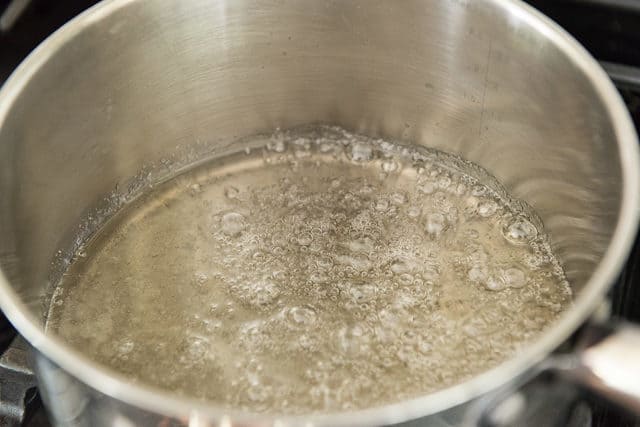
To get started, place a cup of granulated sugar in a medium saucepan, and give it a little shake so the sugar lays flat in an even layer. Then add 1/3 cup of water, which should moisten all of the sugar:

Turn the stove to medium heat and cook until the sugar dissolves into a clear syrup. Remember, do not stir, and do not touch!
Can you use brown sugar?
I do not recommend swapping brown sugar in here. First, know that using brown sugar will give you quite a different flavor from white sugar, due to its molasses content. But additionally, you are supposed to use less brown sugar, as they are not a 1:1 swap. If you want to use brown sugar, I recommend searching for a specific recipe designed for its use.
The sugar mixture will look cloudy at first, but eventually will give way to a clear, bubbling liquid. You can see some spots of cloudiness below where the sugar is dissolving, as well as some clear spots:
Continue to cook the caramel over medium-high heat, and watch as it begins to take on an amber color:
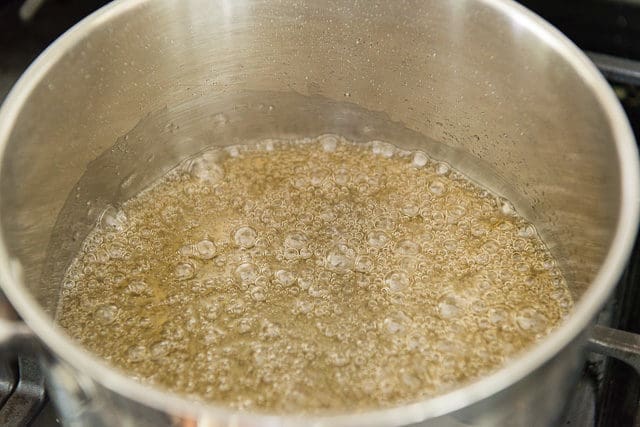
Pay close attention, do not leave the caramel’s side, and have 3/4 cup of heavy whipping cream standing by.
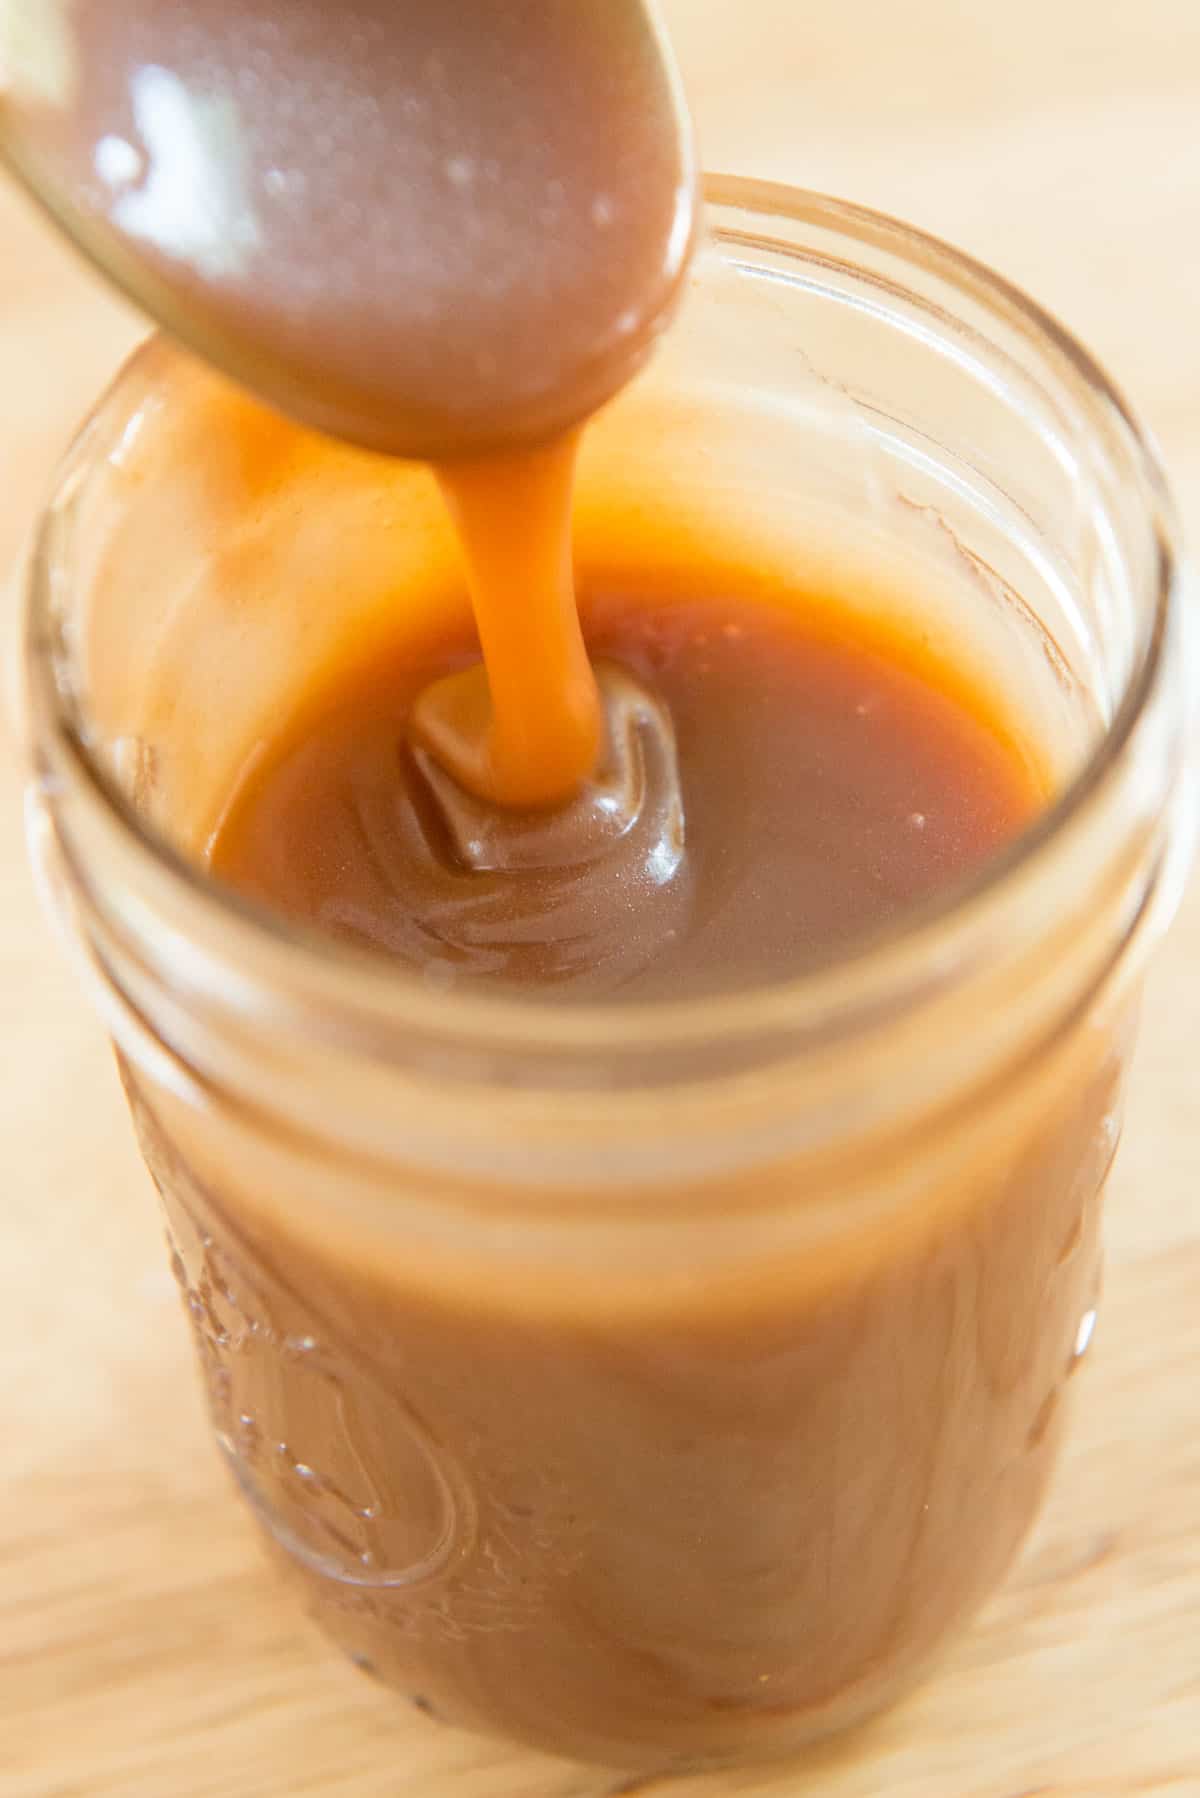
Once the hot caramel has developed a golden color, like honey, turn off the heat and immediately add the heavy cream:
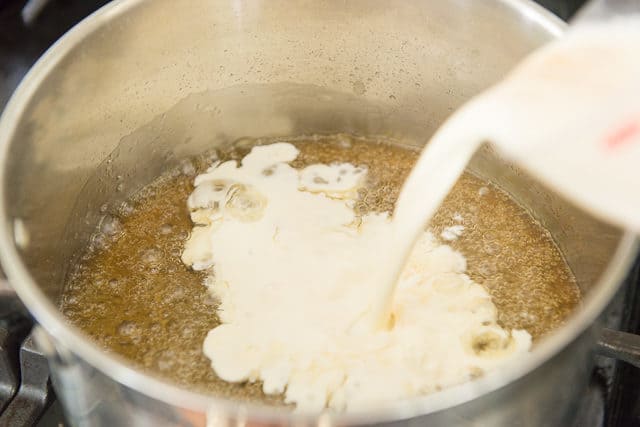
This will stop the caramel from continuing to cook.
What temperature is needed?
A thermometer is not needed for this recipe, as I’ve found it very reliable to go off color, and a thermometer can risk crystallizing the sugar if it moves around too much. However, if you insist on measuring, a temperature between 338 and 350F is your target. Above 350F, you’ll start to smell (and later taste) a burned, bitter quality. Below 338, and you won’t have proper color and caramelization.
Now add two tablespoons of salted butter. Or, you may use unsalted butter, and season to taste with sea salt. I recommend starting with 1/8 teaspoon, and adding more if desired. I would not add more than 1 teaspoon of kosher salt or 1/2 teaspoon of regular table salt. Those amounts will turn this into more of a salted caramel sauce, so be mindful of that.
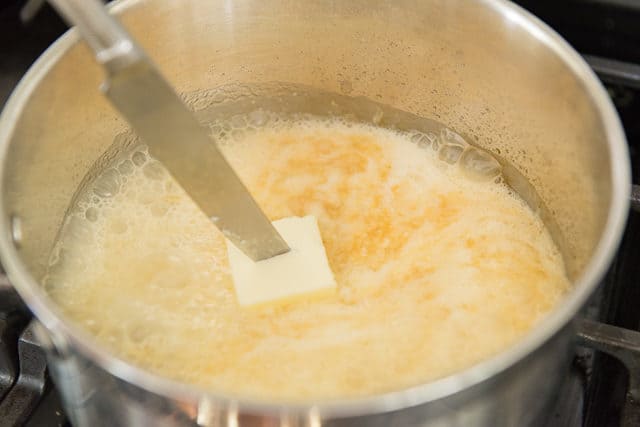
Continue stirring until the caramel has an even texture.
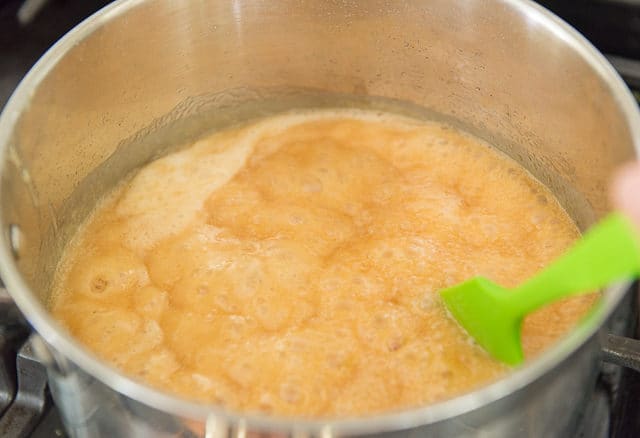
What if the mixture seizes?
If the caramel sauce seizes up when you add the cream and butter, do not worry! This is normal and there is nothing wrong. It should smooth out with more stirring and residual heat, in about a minute or two. If for whatever reason it doesn’t, turn the heat back to medium low and stir for a couple minutes more.
The caramel sauce will look foamy upon adding the cream and butter, like this:
Eventually as the heat dissipates, the caramel will settle down:
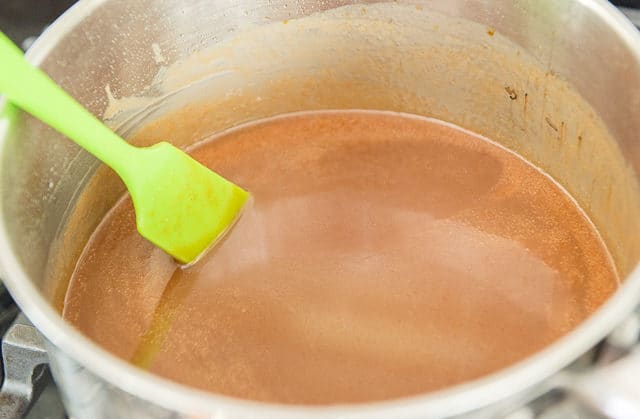
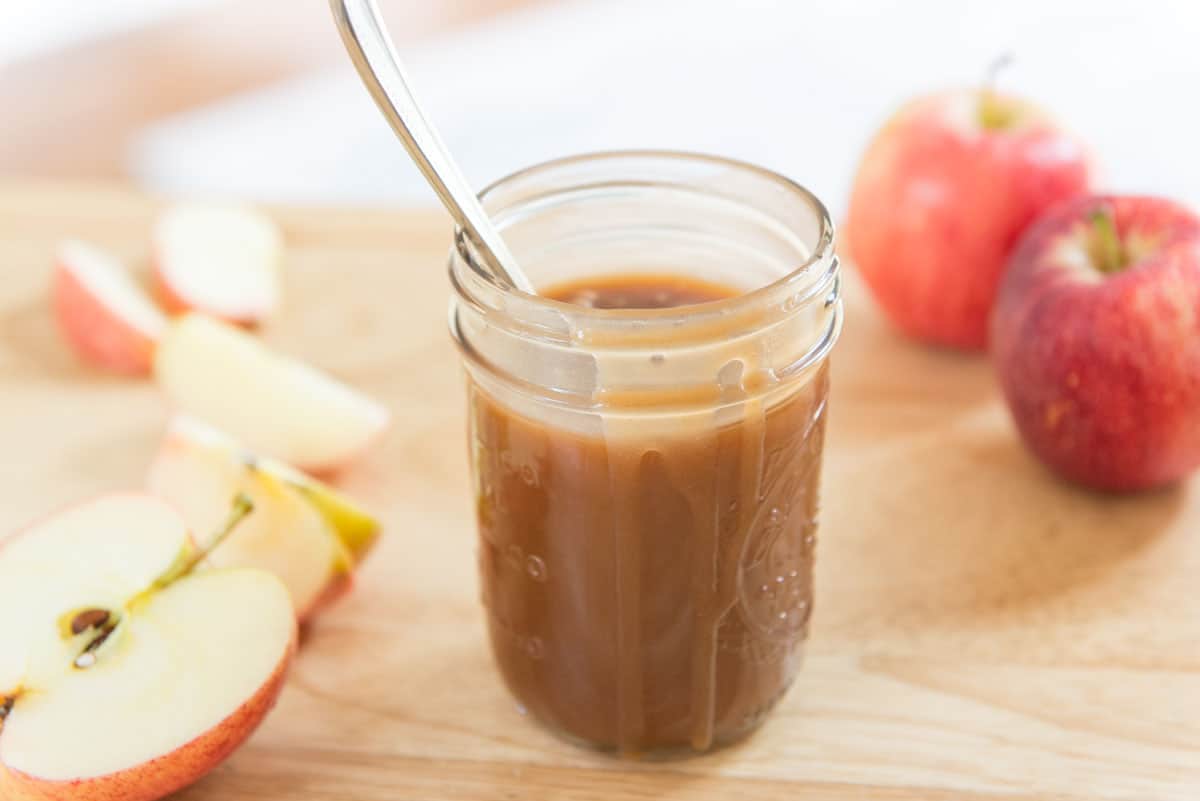
It needs to cool to thicken
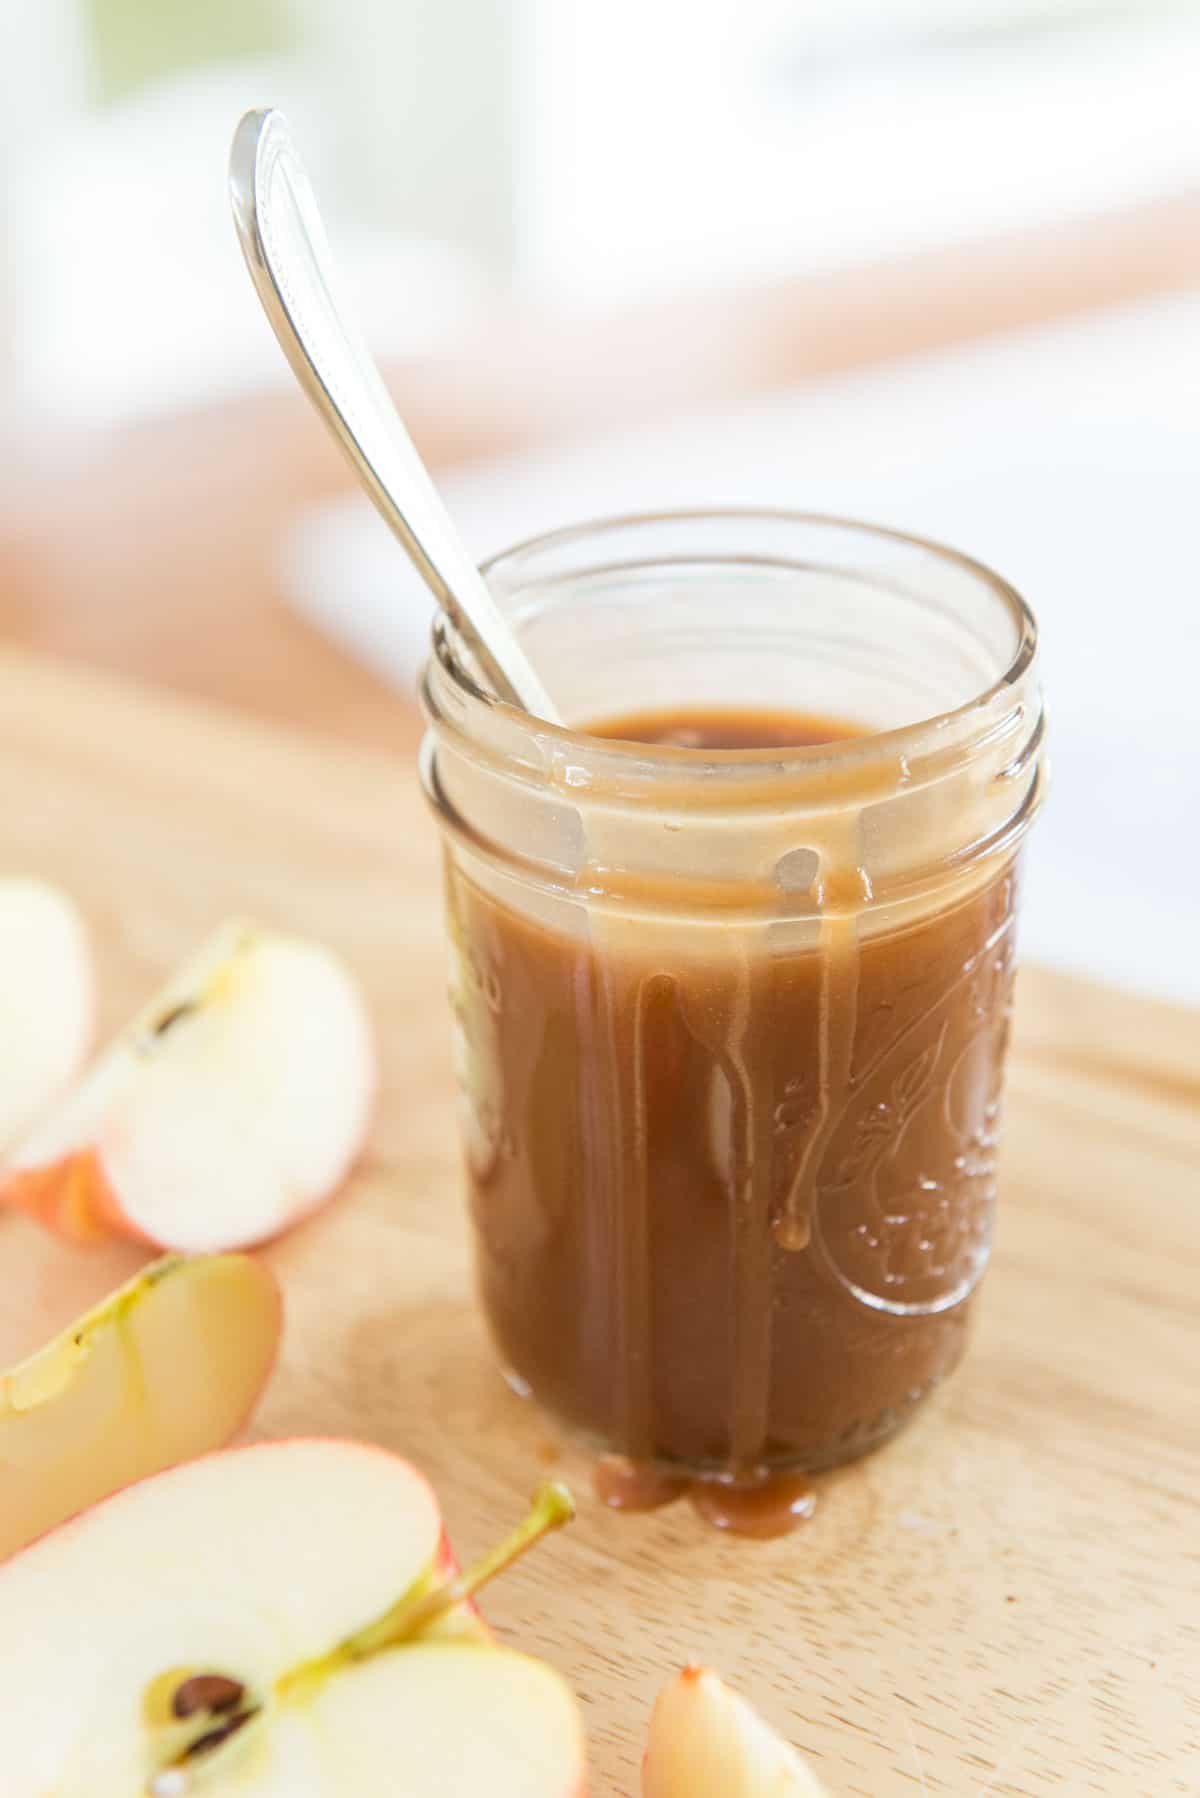
Right now while the mixture is hot, it will look very thin and runny, but the sauce will thicken as the caramel cools. I find the caramel has the best drizzling consistency at room temperature. If you refrigerate it, it may become too thick to drizzle, and you’ll need to warm it slightly. You can do this gently in the microwave or in a saucepan on the stove.
To keep your delicious caramel sauce from absorbing off flavors from the fridge, make sure to store your finished sauce in an airtight glass container or mason jar.
Suggestions for Serving
Caramel is a great topping or finishing ingredient for elevating all of your favorite desserts, but it can also be mixed into lots of different recipes.
Drizzle over cheesecake like Mini Cheesecakes with Gingersnap Crust and Raspberry Sauce, or your favorite ice cream (try my Homemade Vanilla Ice Cream Without An Ice Cream Machine).
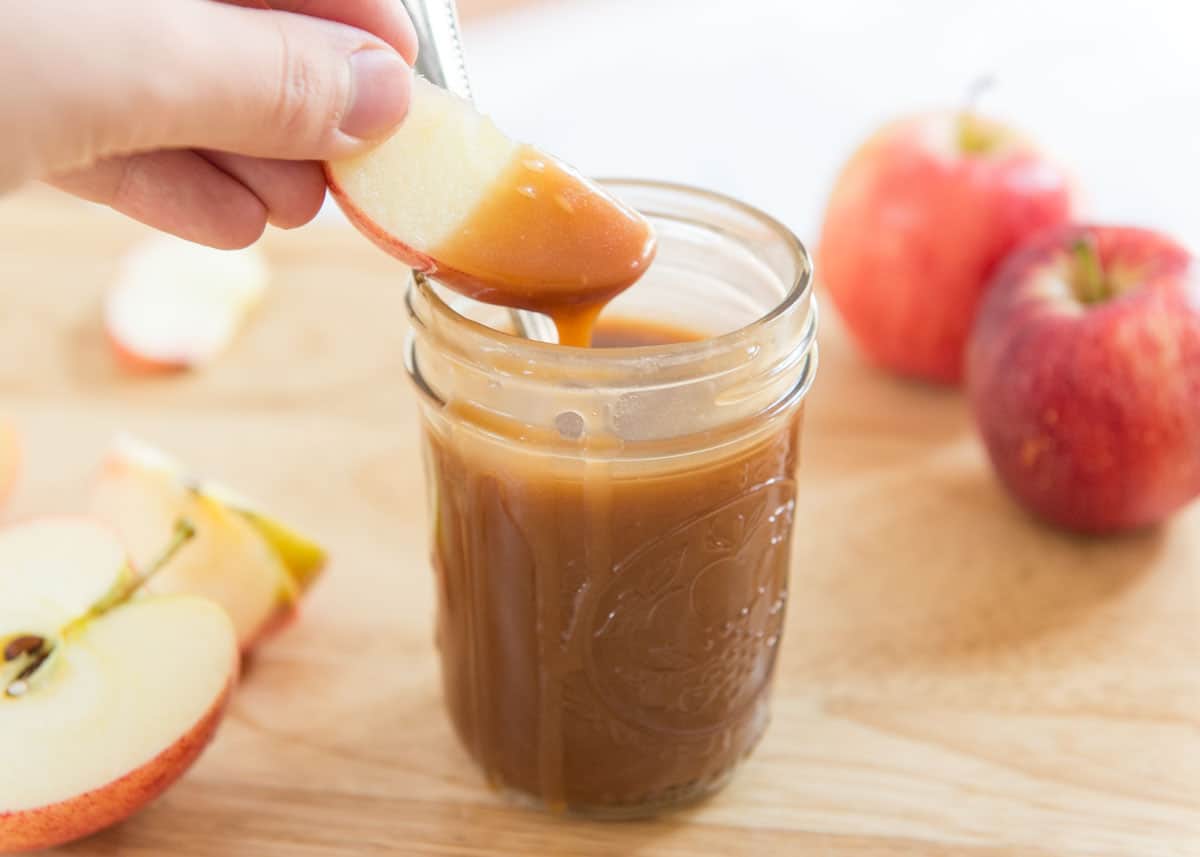
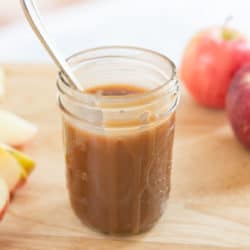
Serve as a dip for cut apples, or incorporate it into any apple dessert like this Caramel Apple Crisp or Apple Tarte Tatin.
Bread Pudding is also great with a drizzle of fresh caramel, or add a few spoonfuls to the blender of your favorite milkshake, like this Toasted Marshmallow & Malt Milkshake or Apple Pie Milkshake.
Tips and FAQ
It will keep in the refrigerator for at least one month. Store in an airtight container so it does not absorb any off odors from the fridge.
Yes, for up to 3 months. Store in an airtight container so it does not absorb any off odors from the freezer. Thaw it in the fridge overnight or in a water bath before serving.
Yes! The cream, butter, and sugar all need refrigeration. It will get very thick as it cools, so reheat as necessary to achieve a drizzling consistency again.
In a microwave-safe container, microwave in 15 second intervals until warm and able to be drizzled. Or, heat over medium low heat in a saucepan on the stove, until warm. Heating the caramel makes the consistency thinner and runnier.
Do not stir, swirl, or even touch the pan once you’ve added the water. If you run into crystallization somehow, use a wet pastry brush to wash down the sugar from the walls of the pan. An alternative is to put a lid on the pan for a minute or two when you see crystals forming, which will use steam/condensation from the lid to wash down the sides. Another preventative option is to use a little bit of corn syrup (2 tablespoons) to prevent crystallization. However, a lot of people don’t like to add corn syrup and you don’t need it to make caramel. Most importantly, never stir the caramel until you’ve added the cream.
Yes, you don’t need to start over or throw it away. Add 1/4 cup of water and bring the sugar back to a boil. Heating it up with the water should re-dissolve and moisten the crystals. Then you can proceed with the recipe and start getting some color on the sugar.
No, this will not work, as it’s not thick enough. This is too much of a fluid and creamy caramel sauce for that. I recommend looking up caramel recipes that are specifically designed for dipping whole apples.
Did you enjoy the recipe? Please leave a 5-star rating in the recipe card below and/or a review in the comments section further down the page. Or, follow me on Facebook, Instagram or Pinterest!
Homemade Caramel Sauce
Ingredients
- 1 cup granulated sugar
- 1/3 cup water
- 3/4 cup heavy whipping cream
- 2 tbsp salted butter*
- 1 tsp vanilla extract optional
Instructions
- Add the sugar to a heavy bottomed saucepan, then shake it so it lies in an even, flat layer.
- Add the water to fully moisten the sugar. Do not stir or agitate the sugar in any way once the water has been added. It's okay if a few spots didn't moisten, don't touch it.
- Place the pot over medium heat and cook until the sugar dissolves and turns clear, a few minutes.
- Raise the heat to medium high, and cook the caramel until it turns amber colored**, about 10 minutes.
- Turn the heat off and immediately add the heavy cream. It's okay (and expected) if the caramel seizes up when adding the cream.
- Add the butter and stir everything together until the caramel smooths out. If it's still clumpy, turn the heat back on to low, and gently stir for a few minutes until it's smooth. When finished cooking, add vanilla extract, if desired.
- Let the caramel sauce cool to room temperature, then transfer to a jar and refrigerate.
Notes
Nutrition
Nutrition is estimated using a food database and is only intended to be used as a guideline for informational purposes.
Post updated from the archives with new photos, new text, and more tips in August 2018. Originally published March 2012.
293 Comments on “Caramel Sauce”
I just made this, and even though I felt like I did everything wrong, it turned out beautifully! I’m dairy-free so I didn’t taste it, but it feels smooth, smells good, and looks to be the right color.
I made this at my temporary living situation, so I ended up doing a double batch in a flimsy 2 quart saucepan, and definitely got a little worried about it foaming over, but no mess happened. It did seize up when I added the cream but I kept stirring and added gentle heat until it all came together. I will suggest that a double batch does not need double water, because you just boil it off anyway. Maybe start with 1 recipe with of water and add more until all the sugar is moistened.
I haven’t made caramel sauce before, but I have made thermometer-driven caramels. I’ll have to give this a rating after my roommate taste tests the sauce. 🙂 5/5 for comprehensive instructions though!
Clearly, I did something wrong. My error is why I at least gave 3 stars. When allowing sugar and water to cook on medium heat, all that happened was the water cooking out. That then left large clumps of hard, crystallized sugar. I left the pan on medium heat, the rest of the sugar did turn amber colored. I added the heavy cream and butter, the clumps of crystallized sugar still did not break up. I removed those clumps. Due to removing so much clumped up sugar, the sauce stayed completely liquid, which means completely unusable. I did try heating the liquid longer, that did nothing to help the consistency. The taste is amazing, just not sure what I did wrong to make the sugar clump and crystallize.
Yummmm, thank you for this recipe. I thought a couple times I had ruined it because the sugar crystallized all over my spoon, but I just kept stirring and heating and it all worked out in the end. A wonderful sauce to top my Apple Pie and Vanilla Ice Cream .❤️❤️
I would like to make this, but what is heavy cream? Where I live we don’t have heavy cream can you use whipping cream or half & half instead?
😄 whipping cream = heavy cream
This recipe rocks! I made a batch for us and we loved dipping Honey Crisp apple slices in this sauce. I looked at several caramel sauce recipes online and tried a few but this one is the best. It’s very easy to make and is delicious. I learned after a few tries that if you just drip the heavy cream slowly into the hot sugar mix it doesn’t seize up at all. I give holiday baskets to friends and relatives every year and this recipe of caramel sauce went in every one of them.
Thanks much for providing this!
How large of a batch can I make safely? Looking to make some gifts. Thank you, my test batch was DELISH.
My sugar never ambered out. So my caramel sauce was white…ugh!
My suggestion would be to keep the heat on medium and wait patiently for the color to develop before adding the heavy cream and butter. Good luck!
So good!
Hi, I’m excited to try caramel for the first time, and I like this recipe. Other ones I’ve seen make sure to state that the butter and HWC should be room temperature. Would you say this is important?
Thanks!
I would say that it is better to have the heavy cream and butter refrigerated before mixing, because it’s added once the heat is turned off and the sugar has cooked to the right color, in order to stop further cooking of the sugar and get the right consistency and flavor
This was like magic! I will say the colorization took a few minutes to appear, and then within seconds it began to darken, so you really need to pay attention or else you might burn it! Otherwise, it’s VERY easy. Very tasty payoff for just 20 minutes.
My roommate and I have been trying for WEEKS to make a caramel sauce for lattes. After four recipes, this is the first one that worked! The caramel seized up slightly when we added the heavy cream, but it became smooth and creamy after stirring. We will definitely be making this again!
So easy and oh so very good!
Wanted to make this to add to the top of a fresh baked apple crumb cake. It was the perfect addition! Followed instructions exactly with no issues and great results
So the first time I made this, it was near perfect. A bit darker than expected, but a nice consistency and only some solid bits at the very bottom. The second time, I wanted to have it a bit lighter and waited exactly 10 minutes to turn the heat off and add the heavy cream. It didn’t look dark but it was starting to smell a bit burned, so that’s why I didn’t wait more. I instantly realized it wasn’t caramelized at all and it turned out beige. I turned on the heat once more and kept it stirring constantly. It got a bit darker, but it got much more cristallized and too solid. I ended up adding more heavy cream and heating it a few times in the microwave and I’m not sure what consistency it will have when it’s cold. Anyways, my advice: don’t go by the 10 minutes, just make sure the sugar/water is already brown before you add the cream.
The caramel tastes good but when it was cooling in the pan afterwards it got a bit grainy or sandy textured. I will have to try it again and hope this doesn’t happen.
This was a success and very easy. It truly is foolproof if you read the entire blog post first. Upon adding the heavy cream, it did seem to “seize up” but don’t worry, as the recipe mentions, just keep stirring and it all comes together in the end. I thought I did something wrong when it seemed too thin, but as the recipe mentions, it WILL thicken when it cools. I’ll be saving this recipe to use again and again.
I respectfully disagree with the comments suggesting that this is incredibly difficult, not for beginners, etc – it seems that the things that went wrong in the negative reviews were entirely due to not reading the recipe. For example, people stirring the sugar when the recipe says not to move it, people adding “additional” water to the sugar heating process when the recipe says to just heat it and not touch it, people using watery low-fat liquids like soy milk when the recipe says to use heavy cream, people doing random things when it seized up after adding the dairy when the recipe says that it might seize but not to worry and just keep stirring, etc. etc. Read the recipe first.
What am I doing wrong? I have followed the recipe to the letter, and have burnt my sugar 4 times. I never even get close to the amber color before all the water dissolved and I’m left with a dry sugary mess. I thought “oh maybe my stove gets too hot” so I did it on a lower temp and same result. I’ve tried it without stirring at all, and with stirring just a little bit once it became clear. I don’t have a clue why people say it’s such an easy recipe.
I have the same problem. I can’t get it to turn amber before the water evaporates. It looks like a simmer based on the photos.