Brioche
This Brioche bread has the ultimate soft and fluffy texture, with a sweet buttery flavor. It’s absolute heaven when it comes out fresh and warm from the oven. This recipe yields 3 loaves from one batch, so you can stash some in the freezer and really make it worth your time!
Part bread and part pastry, brioche is a French bread classified as a Viennesoirie. The brioche is enriched with butter, eggs, milk, and a touch of sugar, and has the most amazing rich flavor and airy texture.
There’s a fair amount of hype around Brioche, and for good reason. It’s incredible on its own, torn into bite-sized pieces and maybe spread with a little swipe of butter, but also as an ingredient for other recipes. For example, brioche is one of the best breads for Bread Pudding and also for French Toast. I’ve also noticed that brioche burger buns have become really popular for hamburgers!
Here we’ll be using quality ingredients in our homemade brioche recipe, made with traditional components like real butter and eggs.
I’ve noticed that the store-bought brioche at my grocery store uses canola oil instead of butter, which in my eyes is a complete travesty. I’ll share below how to take this one recipe and make it into loaves, rolls, or brioche buns.
Why This Recipe Is The Best
3 loaves from one batch – Brioche is not hard to make, but it does have a lot of steps. It’s an investment of your time, and it’s nice that you get 3 loaves from the effort. I always freeze some for later. Bread freezes beautifully, but especially this one!
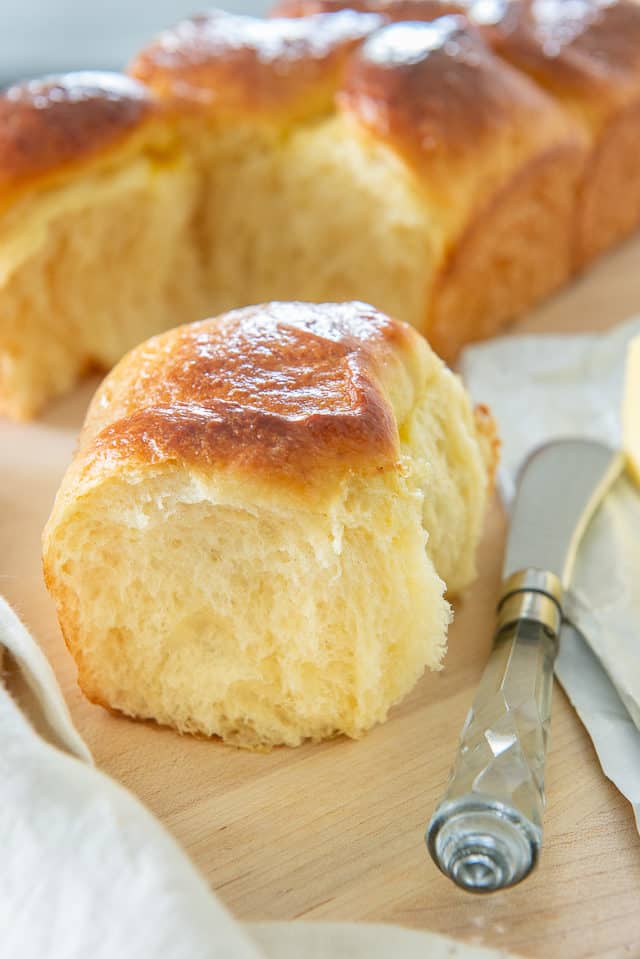
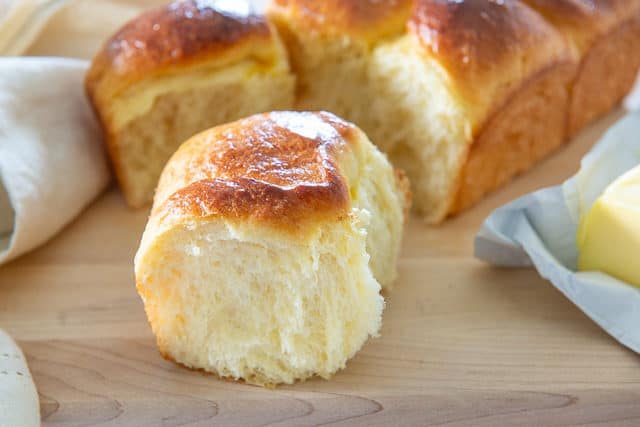
Fluffy and tender – You can see from the photos how soft and fluffy the crumb is. The butter and eggs really work their magic, giving us a pillowy texture.
Rich flavor – This is a true bakery-quality brioche. You can taste how buttery the soft crumb is in every bite, and the bread has a subtle sweetness that tastes of dairy.
Adapted from Julia Child and James Peterson – Julia Child and James Peterson are two of the best chefs of all time, and this brioche recipe is adapted from their methods. It’s a consistent method that produces fluffy and rich loaves, and I provide step by step photos of the process.
Tips for Best Results
Use high quality dairy – It’s incredible how different brands produce wildly different tasting butters, milks, and dairy. Some have zero flavor, while others have that quintessential rich, slightly sweet dairy fat flavor all humans love. Use the best quality butter and milk you can here. My favorite butter is made by Kerrygold. Plugra and Vermont Creamery also make great butter. If you look up butter taste tests online, you’ll see that they are definitely not all equal.
Don’t rush it – Depending on the temperature of your kitchen and the time of year you’re making this, your batch of brioche might require slightly different rise times. I provide approximate times, but if the dough doesn’t look like it has risen enough, give it longer.
Be wary of hot spots – Ovens are notorious for having hot spots, and if the top of the brioche loaf is too high up in the oven, it can be prone to overbrowning. Make sure to watch toward the end, and consider lowering the brioche a rack down, or covering it with aluminum foil to protect from overbrowning.
Do you need a stand mixer?
The short answer is no, you do not need a stand mixer. A few people have reported making this successfully by hand, but I’d consider that an advanced endeavor. It certainly is a lot easier and more consistent if you use a mixer.
Brioche is easy to make from scratch, but in my opinion, a lot of that ease hinges on using a stand mixer to make it. There is a lot of kneading, the dough is quite wet and sticky, and the butter ideally needs to stay cool. You may be successful if you use the dough blade on a food processor.
Step by Step Overview:
Combine warm whole milk, active dry yeast (you may also use instant yeast), an egg, and all-purpose flour in the bowl of a stand mixer:
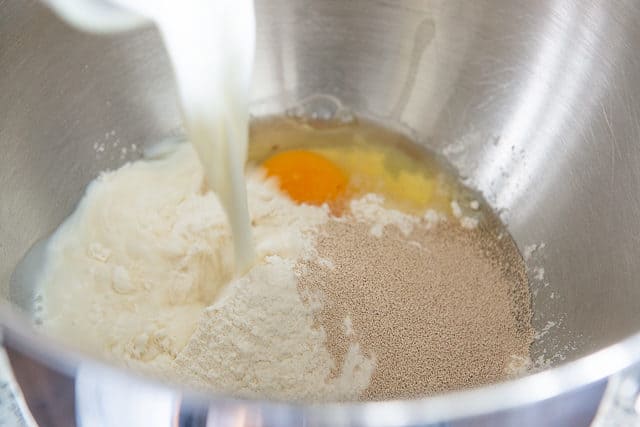
Make sure you are using fresh yeast that isn’t past its expiration date.
Stir the yeast mixture together with a sturdy spatula, and you’ll end up with a very wet and sticky dough:
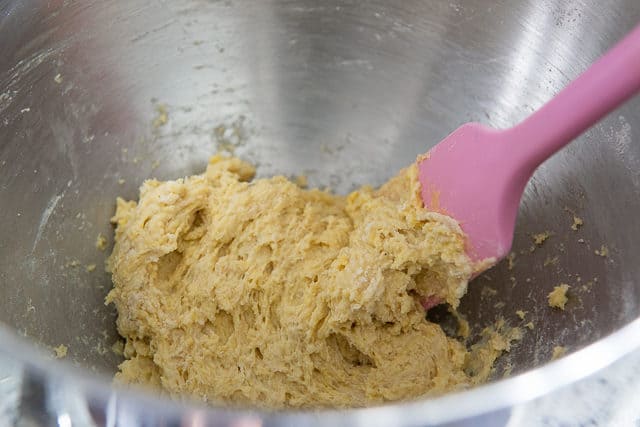
This mixture is actually called a sponge.
What is a sponge?
It’s a precursor to the brioche dough, and adds a deep flavor and a lovely texture to the bread. It’s considered the equivalent of adding another rise.
Sprinkle a cup of all-purpose flour over the sponge, to cover it:

Let the dough rest for 30 minutes, and when you come back, there should be cracks in the dough, like this:
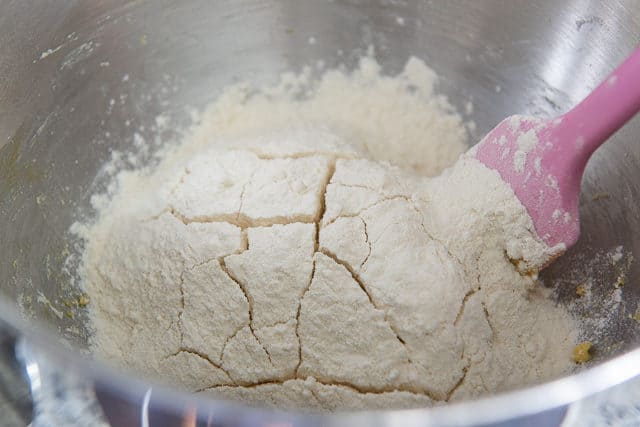
This lets you know that the yeast is active and working well.
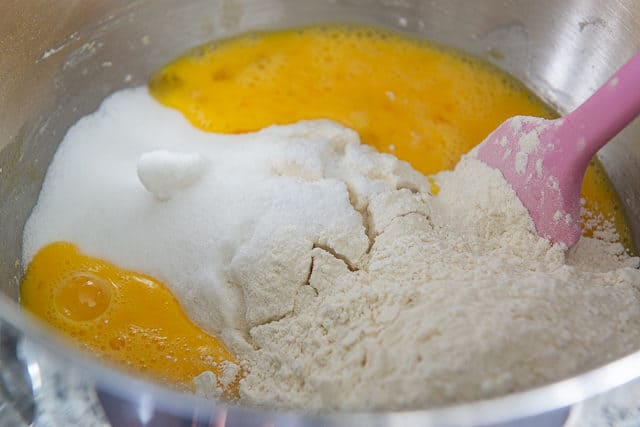
Add granulated sugar, salt, eggs, and more all-purpose flour to the sponge:
Fit the bowl onto the stand mixer and mix it all together using the dough hook attachment on low speed, until the flour is incorporated. Then increase to medium speed and keep mixing for about 15 minutes.
During this time, you will develop a richly colored beige, egg enriched dough that’s relatively smooth, which indicates that gluten and the dough strength has been developed.
Now, add softened butter, a few pats at a time, and incorporate them into the brioche dough:
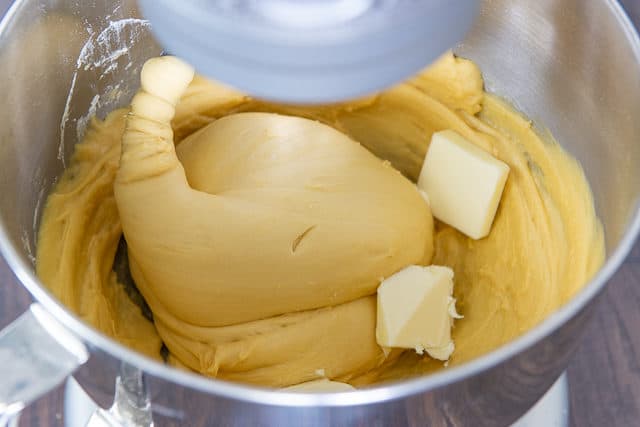
It’s important that you use properly softened butter that’s not too firm and not too soft, in order for it to incorporate well. Ideally it should be at about 72F.
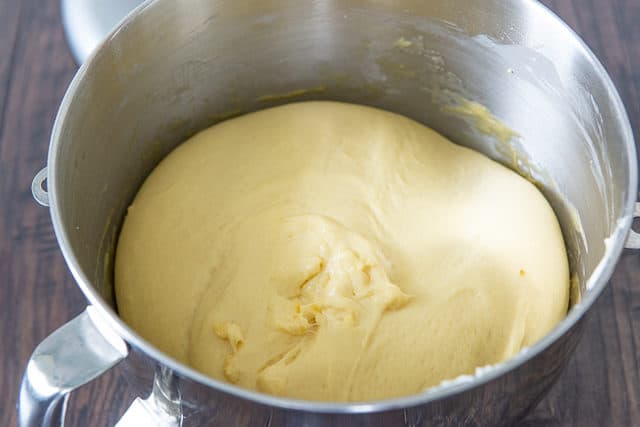
When the butter has been mixed in, the dough should be soft and slightly sticky:

Cover the bowl with plastic wrap, then let rise at room temperature for 2 hours, until doubled in size:
Turn the brioche dough upside down to redistribute the yeast slightly, then cover again and refrigerate overnight. The overnight refrigeration will develop the flavor of the brioche, further the dough strength, and also make it easier to handle when you divide the dough for the pans.
To make a brioche loaf, after the refrigeration time, divide the dough into 3 sections, then each section into 6 equal pieces. Roll each piece into a small ball, and place 6 dough balls into each loaf pan (this makes 3 loaves total):
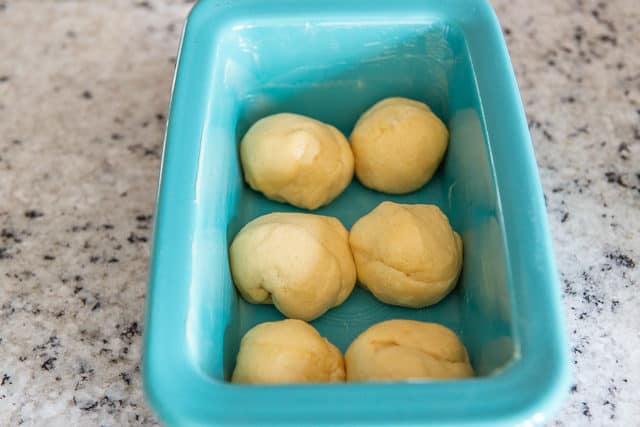
Cover with plastic wrap, then let rise in a warm place for 2 hours (ideally at least 72F room temperature). The dough balls initially will look like they won’t fill the pan, but look how much they puff up:
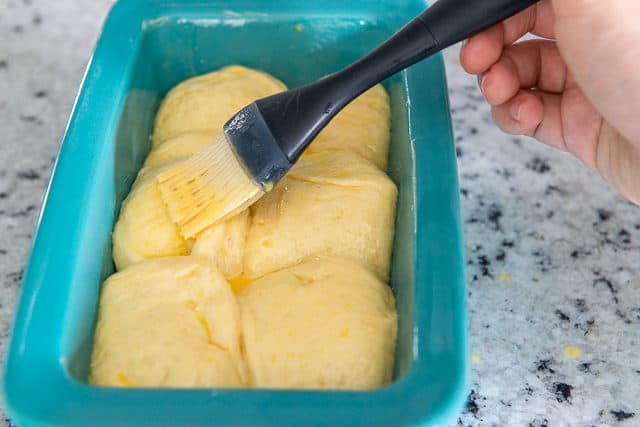
Brush the brioche with egg wash, if desired. This will give the top extra color and a glossy finish, but it’s optional. Bake the loaf for about 30 minutes, until golden brown all over:
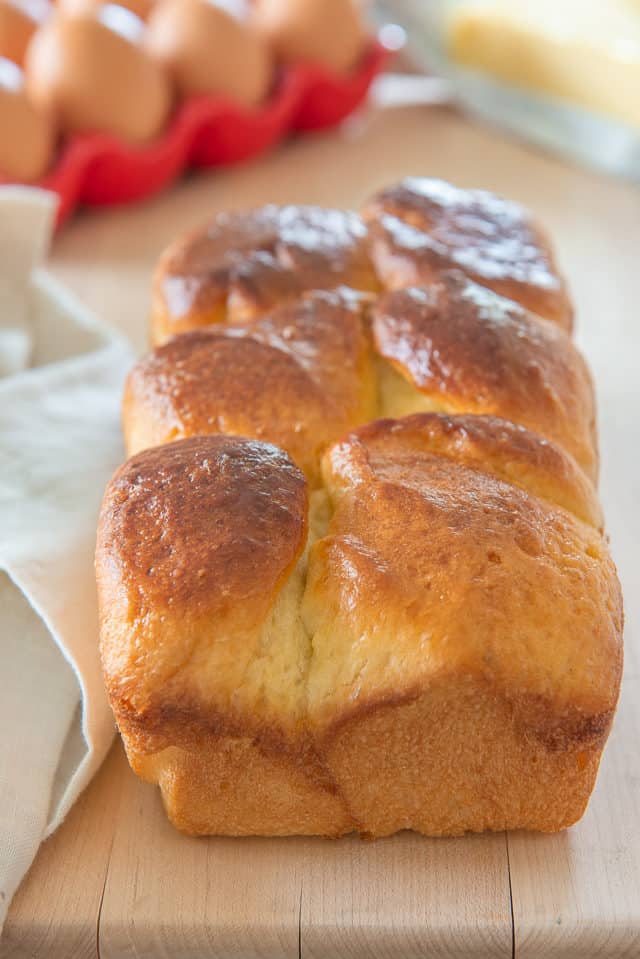
One thing I’ve noticed with brioche, is it is quite sensitive to hot spots in the oven. So partway through baking, the top will likely need to be covered with aluminum foil to keep it from browning too much. Sometimes if you move the bread down a rack, that is also sufficient.
If you have a really top-notch oven that bakes evenly, you may not need to cover it, but just keep your eye on the loaves so they don’t get burned on top.
When the loaf has reached an internal temperature of 190F, read with an instant read thermometer, it’s done. If you can, let the brioche cool at room temperature on a wire cooling rack for at least 20 minutes. As a blanket rule of thumb with all bread, this will yield the most superior crumb and prevent any gumminess inside the loaf.
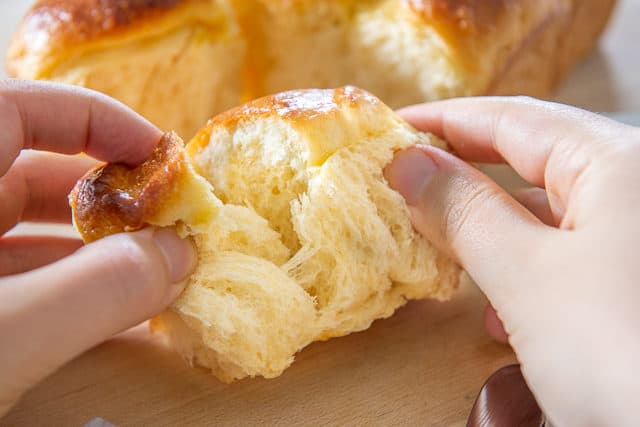
However, I must admit that I sometimes cannot resist tearing a loaf open while it’s warm, and enjoying it right away. There are pros and cons to both!
If you’d like to prepare a different shape with your brioche dough, you can certainly make stand-alone brioche rolls or even hamburger buns.
For the rolls, spread the 6 small balls of dough in a wider 8×8 baking dish instead of the loaf pan, and bake until 190F inside. For the buns, take this dough, and flatten and bake just like I do in my Whole Wheat Hamburger Buns post, with 6 buns per half sheet pan.
How to Serve
You can pull the brioche apart into rolls, or you can slice the loaf and enjoy. I like to use this in my Brioche French Toast with Orange Macerated Strawberries. You can also save it for Bread Pudding or other bread-based dessert recipes.
Homemade English Muffins, English Style Scones, and Homemade Soft Pretzels are some of my other favorite breads to make from scratch. Enjoy!
Recipe FAQ and Tips
Keep at room temperature for 2 days, in the fridge for 2 weeks, or in the freezer for up to 2 months. Keep the brioche stored in an airtight bag so it doesn’t dry out.
Absolutely! You may freeze the bread in a fully baked state, tightly wrapped or placed in a freezer-safe bag, for up to 2 months. You can also freeze the dough unbaked, after it has done the cold rise in the refrigerator. Then thaw the dough overnight in the fridge, and bake it fresh.
If it’s fully baked, simply leave it at room temperature for about one hour, until it has thawed. If it’s not baked from the first rise, thaw the dough in the fridge overnight, then bake it fresh.
Did you enjoy the recipe? Please leave a 5-star rating in the recipe card below and/or a review in the comments section further down the page. Or, follow me on Facebook, Instagram or Pinterest!

Brioche
Ingredients
For the Sponge:
- 1/3 cup warm whole milk (110 degrees F)*
- 2.25 tsp active dry yeast (instant or rapid rise is fine too)
- 1 large egg at room temperature**
- 10 ounces all-purpose flour, by weight (2 cups, measured), divided
For the Dough:
- 1/3 cup granulated sugar
- 1 tsp kosher salt
- 4 large eggs lightly beaten
- 7.5 ounces all-purpose flour, by weight (1.5 cups, measured)
- 3/4 cup unsalted butter at 65-70 degrees F
- butter for greasing optional
- egg wash**** optional
Instructions
- Start with the sponge: Place the milk, yeast, egg, and 1 cup of flour in the bowl of a stand mixer. Mix the ingredients with a spatula until combined (it will be very sticky).
- Sprinkle the remaining cup of flour on top, covering the sponge completely, and let it rest in a warm place for 30 minutes (no need to cover the bowl with plastic wrap).
- After 30 minutes, check that there are cracks in the flour (see blog photo). The cracks let you know that the yeast are alive and well.
- Continue with the dough: Add the sugar, salt, eggs, and 1 cup of the flour to the sponge. Fit the bowl on your stand mixer, and using the dough hook, mix on low for 1 minute, until the dough starts to come together. With the mixer still running on low, add the remaining 1/2 cup of flour.
- When the flour has been incorporated, increase the speed to medium, and mix for 15 minutes. After 10 minutes have passed, if the dough seems too loose, add 3 additional tablespoons of flour, to help the dough form into a cohesive piece. Make sure you don’t skimp on kneading the dough for 15 minutes.
- Turn the mixer down to medium low speed and add the butter, a couple pats at a time, waiting until each installment of butter is absorbed before adding the next. When all the butter has been added, bump the speed up to medium high for a minute, then reduce to medium and knead the dough for 5 minutes. The dough will be soft and slightly sticky.
- Cover the bowl tightly with plastic wrap, and let it rise at room temperature for 2 hours, until it has doubled in size.
- Using a spatula, gently turn the dough upside down and compact it back to its original volume (we are redistributing the yeast, but take care not to "bash down" the dough too much).
- Cover the bowl again with plastic wrap and let it rise in the refrigerator overnight, or for at least 8 hours.
- With a sharp knife, gently slice your dough into 3 sections. Cut each section into 6 pieces. You may gently roll those pieces into balls, but you can also leave them sort of square.
- Get three standard loaf pans***. If using nonstick bakeware, you can skip greasing, but if using uncoated bakeware, I recommend greasing with butter. Place 6 balls each into each pan, then cover with plastic wrap. Let rise for 2 hours.
- When you are ready to bake, preheat the oven to 375F. Brush the tops of the loaves with egg wash, if desired.****
- Bake the loaves for about 30 minutes, until the interior measures 190F using an instant read thermometer. If during the baking process your brioche browns too much, loosely cover the loaves with aluminum foil. Sometimes moving the brioche down a rack in the oven is sufficient to prevent overbrowning as well.
- For superior texture and to prevent gumminess inside the loaf, let cool on a wire rack at room temperature for at least 20 minutes. However, you may find that you cannot resist eating some of the brioche warm out of the oven, and that's okay too. Let the loaves cool completely before storing, and enjoy!
Notes
Nutrition
Nutrition is estimated using a food database and is only intended to be used as a guideline for informational purposes.
108 Comments on “Brioche”
I love everything about this project! Thanks for sharing.
Can this bread be made without a stand mixer and still turn out o.k?
Someone in the comments said it went well, but I haven’t tried it personally.
Informative post! Thanks for sharing.
I have made these twice in the past week as I tested portion sizes, and will be making them again for Thanksgiving.
Instead of loaves/pull apart, I portioned into dinner rolls (50g of dough) and baked at 350 for 12-14 minutes and they turn out perfectly!
Thanks for such an easy recipe with great images for someone relatively new to yeast dough 🙂
Ok, you got me. I have to make these brioche rolls/bread for Thanksgiving dinner now. I’ll post a comment/review after dinner.
Have a great Thanksgiving, Craig!
Can chocolate chips be added to this?? I buy a chocolate chip brioche loaf from Aldi that I’d love to be able to make instead!
Hi Melissa, yes you can add chocolate chips!
I’ve made this recipe a few times, kneading by hand. It’s a commitment, but not too difficult.
Hi and thanks for all those great recipes.. I am not really sure it moght sound strange to you tho, but at the end I will have 18 pieces right? well since i wasn’t sure and my family could not wait i made like 6!big balls and put them in the loaf . Cant wait for,my possibly exploding broiche
Hi Sandy, I don’t think it’s really important to end up with a particular number of pieces, just to get small clumps/balls nestled into the pan that rise up together. Hope it turned out well!
Can this be made a day or two before you want to eat it , does it hold well?
Thanks, pat
Hi Pat, you can keep it at room temp a day in advance, wrapped, or you can freeze for up to 2 months. Enjoy!
Wow ! My brioche is super good and the texture looks like yours. I re- thank you because I have found the best recipe I needed.
Now and after to eat one of my little brioches I can go to bed and to have a good dream.
Hello Joanne !
I was following Herve on his blog, Hervecuisine, when I saw you with him. I like what Herve makes and I decided to follow you too. Your blog is quite pretty and I was surprised by the brioche you show us. So I’m making it right now and I hope the result will be what I expect which is to look like yours…
Sorry if my English language isn’t quite well but it is all I can write but I work hard to improve it each day…
Can I ask you a question ? Is it possible to envoy you one photo when we succeed a recipe you show in your blog ?
Hi, welcome! Herve is great isn’t he? Love him. I hope your brioche turns out well, I know that European measurements are quite different and the conversions can be tricky. I’m not sure what envoy a photo means, maybe email? Aside from that your English is very, very good!
Hello Joanne,
I have made your recipe and my brioche looks quite pretty. Now, though it is 2:20 in the morning, I’m waiting the brioche was cool enough to taste it… The measurement isn’t a problem because I bought several items in UK or got another ones through Amazon.
I live in The South of Spain, though I love France and Herve is an amazing person and I make and succeed all his recipes. He explaines them very clear and his video are very useful.
Bye and have a good day.
Oh neat! Where in Southern Spain? I lived in Granada for 4 months. Went all over the place…Malaga, Sevilla, Cordoba, Nerja, so many little towns.
This is the first time i check out this page and it helps me a lot to improve my cooking skills, i tried the other day to make brioche, but it seems the dough didn’t grow at all, i haven’t make brioche for a very long time so kind of forgotten the recipes , i think i mistake the correct messurement of the yeast, seems i never use the dry yeast before , but i will try again with your recipes, thank you very much for sharing Joanne 😛
Hi John, thanks for your comment! I’m so glad I can help you learn. Brioche is a little tough but very worth it. Make sure you keep the water at the right temperature so you activate the yeast but don’t kill it off with too high heat water. I always use a thermometer so I can measure it exactly. Good luck!
I’ve always been too scared to try brioche but you’ve given me the courage to try it! Thanks for the step-by-step photos. You make it look so easy!
Great recipe! You can actually make brioche without a stand mixer if you just let it proof overnight in the fridge the first time, then let it proof for at least 3 hours in the fridge the second time. This allows the butter in the bread to harden again before baking.
It’s not the easiest dough to work with by hand because of all of the butter and because the dough is sticky, but it’s possible. I just used to fridge for proofing, and mine came out perfect.
YUM! I can’t wait for the french toast 🙂 That dough looks soooo good!
Brioche is pretty glorious!
Wow, I love brioche and that looks delicious.
Thanks Elizabeth! It’s easy to make as long as you have a stand mixer =)