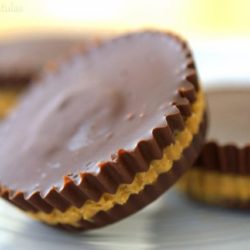
Homemade Peanut Butter Cups
Homemade Peanut Butter Cups are easy to make yourself from scratch, and the best part is that you get to use good quality chocolate and all natural ingredients. These are a massive improvement on the cheap, preservative-filled ones you typically find at the store.

Quite possibly the most popular candy of all time, there’s a reason this simple treat is so loved by many. It’s so simple, so unpretentious, and so heavenly.
You might say, why make your own peanut butter cups when you can buy them?
I have a few reasons. First, I get to use my good chocolate and good peanut butter. The popular one you buy at the store uses such junky chocolate, and you can really taste the difference here.
Second, I find that a quality homemade peanut butter cup is WAY more satisfying than the storebought one, and thus I tend to eat less this way. Better for my waistline!
And third, when I make these myself, I know there are only four simple ingredients. And none of those ingredients are preservatives or other stuff I don’t want in my body.
I have no idea what TBHQ is, but I know it’s something I would not like to eat.

Tips for Best Results
Use good chocolate – Chocolate varies HUGELY in quality. In fact it might be the one food that has the biggest range of quality out of anything you’ll find at the grocery store. I highly recommend Guittard brand here (my favorite kind of chocolate is made by them), which you can find at Target, Whole Foods, and Amazon. To me it is the best combination of quality and affordability. If you can’t find that, Ghirardelli is also decent. Callebaut, Vahlrona, and Scharffen Berger are also great, but tend to be expensive and hard to find.
Use your favorite peanut butter – Unlike my epic Peanut Butter Cookies where I recommend not using natural peanut butter, it’s actually okay to use any kind you like here. If your grocery store has a grinder, that can be a wonderful treat because it tastes so fresh.
Don’t rush the chilling process – The peanut butter cups will need to be assembled in layers and chilled in the fridge or freezer every step of the way. Don’t rush this, or you won’t give the layers time to set.

And most of all, if you’ve got kids, invite them to make these with you!
My kids have the grandest time banging the pan against the counter like a bunch of maniacs, and this tapping is quite essential for flattening all the layers out. It’s fun to tell them that they’ve got the most important job of all.
Step by Step Overview
Start by whipping peanut butter with a little bit of softened butter and confectioner’s sugar (aka powdered sugar) in a medium bowl:

You may either use natural or smooth ground peanut butter with oil added, like what’s typical of Jif or Skippy. Above I used natural, which makes it a bit more textured. It’s also up to you whether you use creamy or crunchy peanut butter.
Place a little dollop of the whipped peanut butter filling atop a small layer of melted chocolate that’s been frozen for 15 minutes.
How to Melt the Chocolate
The easiest way to melt the chocolate is to place the chips or chopped chocolate into a microwave-safe bowl, and microwave in 30-second intervals, about 3-4 times, stirring after each interval, until melted. However, to absolutely ensure the safest melting, the best way is to melt in a double boiler set over low heat. This takes much longer though, and so long as you watch closely in the microwave, I’ve never had an issue.
Note: Do not overheat while melting. If you overheat the coating, it may seize and be unrecoverable clumpy. When there are only little bits of unmelted chips or chunks left, I stop microwaving and stir for a few seconds, as usually there’s enough residual heat to melt the rest.

I like to put everything into paper cupcake liners by the way, setting them inside the muffin cups of a metal tin, so that the cups are easy to remove. You may also use silicone liners instead of paper liners.
Now, you see how the peanut butter layer is not a flat surface?
Just drop the pan on the counter a few times and the filling will flatten and smooth itself out, like this:

Freeze the tray for 15 minutes, then finally, pour on the top layer of the melted remaining chocolate.

If the top of the chocolate layer is not smooth, tap gently on the countertop to smooth.
If you wish to add a touch of flaky sea salt to the top, or some chopped roasted peanuts, do it here.
Freeze for 15 more minutes until it hardens, then you’re good to go!
Which Darkness of Chocolate to Use
As a rule of thumb, the lower the cacao content in the chocolate, the softer and easier it will be to bite into. You’ve probably noticed that milk chocolate is much softer than dark chocolate, for instance. White chocolate even more so. Keep this in mind when deciding on the chocolate you use for this recipe.
Personally, I use a straight melted semisweet chocolate here, as milk chocolate is a little too sweet for me. I find that it’s still easy enough to bite into when served at room temperature. However, if you’d like to use a darker type and make it softer to bite into, what you can do is make a chocolate ganache, which is basically just chocolate mixed with heavy cream. I have instructions in the recipe box. Or you can stir in 2 tbsp of oil into each 8-ounce batch of chocolate, and that will make it slightly softer.
For more homemade candy, try Pecan Praline Candy, Peanut Brittle, or Chocolate Bark.
Here’s the full video on how to make the peanut butter cups, if video is your style. I talk a little bit about the different methods of melting the chocolate, as well:
Recipe Tips and FAQ
Keep at room temperature in an airtight container for up to 2 days, or in the fridge for up to 2 weeks. If storing in the fridge, you will need to allow them to come back to room temperature again for a softer texture.
Yes, store in an airtight container for up to 3 months. To thaw, leave at room temperature for 1 hour.
You may use any nut butter that you prefer, including almond butter, cashew butter, or a mix of nut butters. However, some nut butters are looser than others, so you may need to add extra confectioner’s sugar to thicken up to the right consistency. You can also thicken with crushed graham crackers for a more cookie-like filling.
No. You need the cornstarch that’s in the confectioner’s sugar to thicken up the peanut butter mixture.
Yes, simply rotate the pan while the chocolate is still melted, to come slightly up the sides of the cups. That way you can conceal the peanut butter layer visually.
Did you enjoy the recipe? Please leave a 5-star rating in the recipe card below and/or a review in the comments section further down the page. Or, follow me on Facebook, Instagram or Pinterest!
Homemade Peanut Butter Cups
Ingredients
- 16 oz semisweet chocolate chopped, or in chip form
- 1/2 cup creamy natural peanut butter
- 2 tbsp butter softened
- 1.75 oz confectioner’s sugar, by weight (1/4 cup+2 tbsp, measured), sifted
Instructions
- Line a standard 12 cup muffin tin with paper cupcake liners.
- Melt half the chocolate either in a double boiler (the safer method) or in the microwave (the slightly more dangerous, but easier method). I opt for the latter. Place the chocolate into a microwave-safe bowl, and microwave in 20 second intervals, about 3-4 times, stirring after each interval, until melted. Make absolutely sure not to overcook the chocolate, or it will seize and turn grainy.
- Distribute the melted chocolate into the 12 muffin tins (I use a cookie scoop to portion it out evenly), only barely filling the bottom of each cup. If the chocolate does not lie flat, drop the pan repeatedly on the counter, and it will flatten and smooth itself out. Place the pan in the freezer for 15 minutes, until the layer is firm.
- In the meantime, whip the peanut butter, butter, and confectioner’s sugar together with a hand mixer for about 1 minute until creamy and light. Taste it and make sure the sweetness is to your liking. Place small tablespoons of the peanut butter mixture into each cup, then drop the pan repeatedly on the counter again, so the layer is flattened out. Place in the freezer for 15 minutes, until the second layer is firm.
- Melt the last 1/2lb of chocolate, and portion small spoonfuls into the cups, one cup at a time, immediately dropping the pan repeatedly on the counter to flatten each cup. In my experience of making these, the chill from the peanut butter layer (because it was just in the freezer) will harden up that top layer very quickly, so you must flatten out the tops immediately after you pour the chocolate into each cup. Place the tray in the freezer for 15 minutes to set the top layer of chocolate.
- In order to have the softest bite, I recommend enjoying the peanut butter cups at room temperature. If you store them in the fridge or freezer, the chocolate will be more firm, making the filling more likely to ooze out. See the notes below for more commentary on storage and texture.
Notes
Nutrition
Nutrition is estimated using a food database and is only intended to be used as a guideline for informational purposes.
213 Comments on “Homemade Peanut Butter Cups”
I love how pretty these came out! I recently tried my hand at homemade peanut butter cups using ice cube trays (http://www.creativesimplelife.com/organic-ice-cube-tray-peanut-butter-cups/). They turned out really great, but I love the idea of using a prettier mold like you used. Enjoyed the video too! So glad I found your blog.
Thanks Alexandra! Your ice cube tray peanut butter cups were so smart!
These were awesome! I filled everyone’s stocking with them for the holidays! Thanks! I did, however, make a few adjustments after the first few:
-I used a mini-muffin tin and liners, because the standard size were just too huge! 🙂
-I also didn’t bang the pan to flatten out the peanut butter layer, because I found that when you do that and the peanut butter is visible from the outside of the peanut butter cup, the peanut butter all oozes out when you take a bite because the chocolate layers are much stronger than the middle layer.
So much fun, these were a hit! Love your blog and thanks for sharing!
That’s fantastic! Thanks for sharing all your personal tips with us.
So I just literally finished making mine! They are ok. My peanut butter was really all that smooth. And my layer of chocolate is really thick on top and thin on the bottom. When I bite into it frozen it kind of comes apart. Like the chocolate slides away from the peanut butter. Not really sure if I did something wrong or just simply wasn’t paying full attention since I started at 9 tonight. I also used Jif peanut butter and milk chocolate. I also didn’t use room temperature butter either. I know I am inpatient and don’t read all the instructions before I start. None the less they taste delicious!!! Hopefully the boys in my sons Cub Scout Den like them!!! I will bring extra napkins because they are gonna be super messy!!! Thanks for such a great recipe!!!
Hi Shawna, I’m glad you thought they were delicious! Yes, it’s important not to make the layers too thick or it will be hard to bite through. Happy holidays!
I tried them with Honey Soy Nut Butter because my son is allergic to peanuts. Has anyone else tried them with an alternate nut butter? The “butter” part was too creamy (not firm at all), and the chocolate was too hard. Next time I am going to try omitting the softened butter and sugar altogether. I am also going to try them with almond butter.
Hi DD, since the chocolate is semisweet, it’s going to be harder than milk chocolate. You can counteract this by making a chocolate ganache instead (adding cream) or adding butter to the chocolate (some sort of fat, to soften it). I think almond butter would be nice with these =)
Well, I actually made them with sesame butter – and they turned out fabulous !!
You can see them here
http://www.winnish.net/2012/10/blog-post_9.html
My husband wants to marry me all over again after having made these. Delicious and easy! thank you!!
haha that’s awesome Julie!
I would like to make those as gifts, but my intention is to make them today and give them at the end of the month.
Where do you recommand i keep them? In the refrigerator? In the freezer? Room temperature?
Thank you
Hi Lori, you shouldn’t keep them at room temp because of the butter, it won’t last that long. I suggest freezing them in your case. Put them in an airtight container and do not remove the peanut butter cups from the container until it has reached room temperature (this will prevent condensation from forming on the peanut butter cups). I have some peanut butter cups in my freezer at this very moment actually =)
Thank you Joanne!
I made a batch today and they look and taste amazing!
These look great Joanne 🙂 I don’t bother adding extra sugar, etc to the peanut butter before making these and they still turn out ambrosia.
can i use crunzy peanut butter? and do the liners need to be wax based?
Yes crunchy is fine, the middle layer won’t’ be as smooth but you can add some vanilla extract to smooth it out if it’s too thick. I use paper liners for mine and they work fine.
I tried these and the chocolate came out really hard, even at room temp. Anything I can do to soften it up?
Hi Crystal, if you want a softer texture, milk chocolate would do better. The semisweet is not going to be very soft just melted on its own. However, what you could do next time is make a chocolate ganache (add heavy cream to the chocolate) which would give it a softer, creamier texture but still have the darkness of the semi-sweet (I do semisweet or bittersweet because milk chocolate is a bit too sweet for me). Hope that helps.
Another thing you can do is add a small amount of peanut butter to your chocolate. It makes it slightly softer & tastes amazing! 🙂
Hi Crystal,
If you use 1/4 to 1/2 (of total chocolate used) unsalted melted butter or ghee, the chocolate will be softer, even if frozen.
Oops – one more question. Do you think they would work in mini-muffin pans? I think they would look so cute as a holiday gift in a clear jar.
These would work great in mini muffin pans, just make sure you get good quality (sturdy) mini liners. And milk chocolate is fine too. You might want to cut back on the sugar in the peanut butter since the milk chocolate is sweeter, but you can just sweeten it to taste.
Do you think these could be made with milk chocolate? I’m not a huge semi-sweet fan.
I just got done making mine with milk chocolate. I haven’t tried one yet but they seem to have come out ok.
I also added more powdered sugar. Guess I like my pb sweet lol
This is just wonderful. We’re trying to eat non-processed and this recipe satisfies a certain name-brand chocolate and peanut butter cup craving. Of course, mine didn’t turn out looking so pretty, they sure tasted awesome. I might cut down even more on the sugar next time (used less than 1/4 cup) since my dear husband found them a bit too sweet and we’re not crazy about a lot of sugar anyway.
Thanks for the yummy recipe!
Hi Jennifer, YAY! Good for you to cut back on the sugar. I’ve done that in general with my diet and it’s amazing how sweet some of the snacks I used to eat taste now that I’ve cut back!
For every American (like me) who lives outside the US, this recipe is just perfect because you can’t get these candy bars in Australia. These folks don’t eat chocolate and peanut butter together – I know, I can’t believe it either. 🙂
I can’t imagine a life without eating lots of chocolate and peanut butter together 😉
Oh you obviously don’t live in Melbourne!
Yep, we’re expats and this recipe hit the spot! We made them tonight and they turned out great! I had the same experience of the chocolate being a bit hard and the peanut butter softer but that was ok with us. I’m a recipe tweaker so I made a small second batch and instead of putting the chocolate in the freezer I immediately put the peanut butter on it so that the chocolate would “rise” around the sides of the peanut butter just like the store bought ones. Then I put the melted chocolate on top to conceal the peanut butter. Worked out nicely! Thanks for the recipe!
Cool, thanks for sharing your method!
Can’t wait to try these I have skippy peanut butter hopefully it will work thanks for sharing ur recipe
I am living abroad and finding peanut butter cups is nearly impossible, and when you do find them, they’re insanely expensive! This was a GREAT find. I added a little maple syrup to the peanut butter mixture and it really made it taste more “reeces” like!! I strongly recommend it.
Sorry, I forgot to include the link back to my post for you to review if you so choose!
http://ichooseawesome.blogspot.ca/2012/10/easy-home-made-peanut-butter-cups.html
Hi Jess, loved your post! I wrote up a comment for it but sadly I can’t post it since there’s no Name/URL option for your comment section. I’m now eyeing those pumpkin pie PB cups!!!